Makes 2 x 10 inch pizzas.
Pepperoni pizza is a hot favourite in our home. As a result, I’ve experimented extensively before arriving at this recipe. While everything is made from scratch, you can bang out this pizza in 90 minutes flat. There’s no need to pre-bake the crust or reduce the sauce for hours. All you need is great ingredients and an appreciation for great pizza. Paying homage to both—its Italian and American legacies—this gorgeously fresh, light, and flavourful pizza is sure to become a staple in your home too.
At a glance
– This recipe covers pizza dough, pizza sauce and pizza toppings.
– You will need two 10-11 inch pizza pans, and one 10-11 inch cast iron or high heat griddle.
– This recipe has been broken into 5 stages for ease and comprehension. Please read the entire recipe from start to finish before beginning.
Stage 1: pizza dough
Ingredients
1. 1 ½ tsp instant yeast
2. 180 ml warm water (38-43OC)
3. 1 tsp white granulated sugar
4. 280 gm all purpose flour plus extra for dusting
5. ½ tsp bread improver
6. 1 tsp salt
7. 1 tbsp. extra virgin olive oil plus extra for greasing
Method
1 – Place the instant yeast, warm water, and sugar in a small bowl. Stir to combine, and then cover the bowl and let it sit for 5 minutes.
2 – Place the flour, bread improver, and salt in a large bowl. Whisk all the ingredients to combine.
3 – After 5 minutes, add the now frothy yeast+sugar+water mixture to the large bowl with the flour mixture.
4 – Add the olive oil to the bowl.
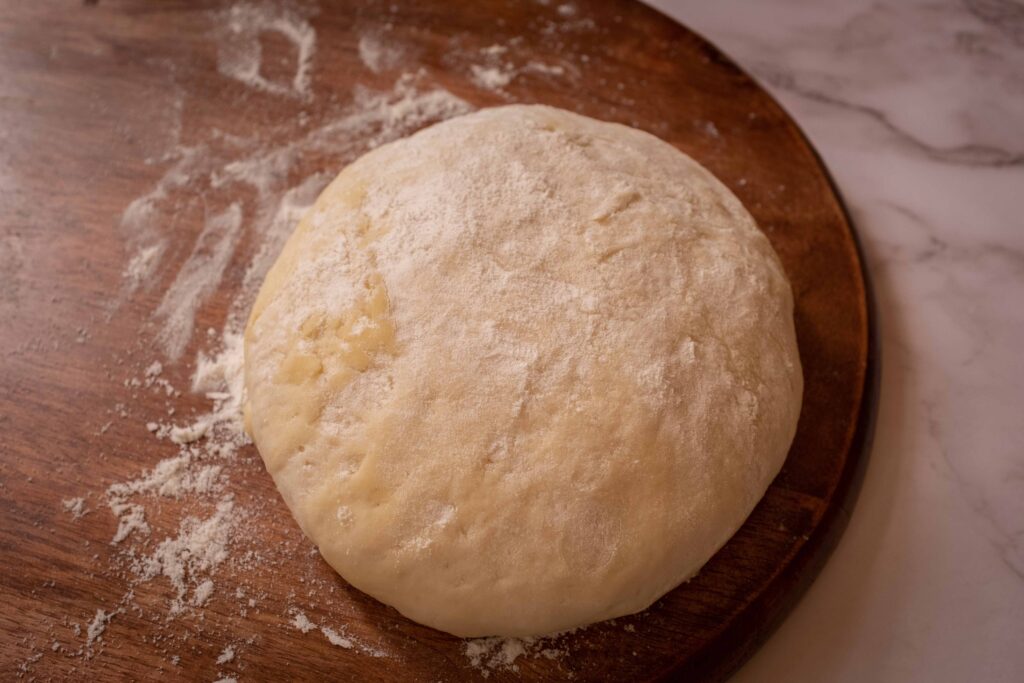
5 – Using your hand like a claw, stir the mixture together for one minute, until it forms a thick, shaggy, sticky dough.
6 – Dust your counter with flour and tip the shaggy mass of dough onto it. Knead the dough with well-floured hands, for 2 minutes until it is smooth and forms a ball. If the dough is too sticky, add a sprinkle of flour and re-shape it.
7 – Grease your bowl with olive oil and place the dough ball in it. Coat the ball with some oil too.
8 – Cover the bowl tightly with cling wrap and leave it in a warm spot for 60 minutes. You’re looking for the dough to almost double in size. While your dough is fermenting. Move on to Stage 2.
As is, this is a New York style pizza crust, but the great thing about this pizza dough recipe is that it’s super versatile and just minor modifications can yield very different results. The 60 minute fermentation time yields a medium thickness crust that crisps up and is both chewy and light. If you prefer a flatbread/focaccia style of pizza, add only 1 tsp of yeast and ferment the dough for only 45 minutes. Want a thicker, puffier crust? Ferment the dough for 90 minutes and use the entire amount to make one thick 11-12 inch pizza. After the dough has fermented, you can keep it covered in the fridge for up to 2 days. This dough freezes well too. Simply ferment it according to the recipe, then punch down on the dough to release the air, portion it out, and individually wrap the portions in cling wrap. Place them in an airtight container in the freezer, where they will keep for up to 3 months. To use, thaw the dough overnight in the fridge, and then on your counter for about 30 minutes.
Stage 2: pizza sauce
Ingredients
1. 200 gm canned San Marzano tomatoes (peeled and in tomato juice)
2. 40 gm tomato paste
3. ½ tbsp. extra virgin olive oil
4. 1 small clove of garlic very finely diced
5. ¼ tsp dried oregano
6. ¼ tsp dried basil
7. ½ tsp white onion powder
8. Pinch of salt
9. Pinch of black pepper
10. ¼ cup chopped fresh basil leaves
11. 1 tsp chopped fresh oregano leaves
12. Pinch of sugar (optional)
Method
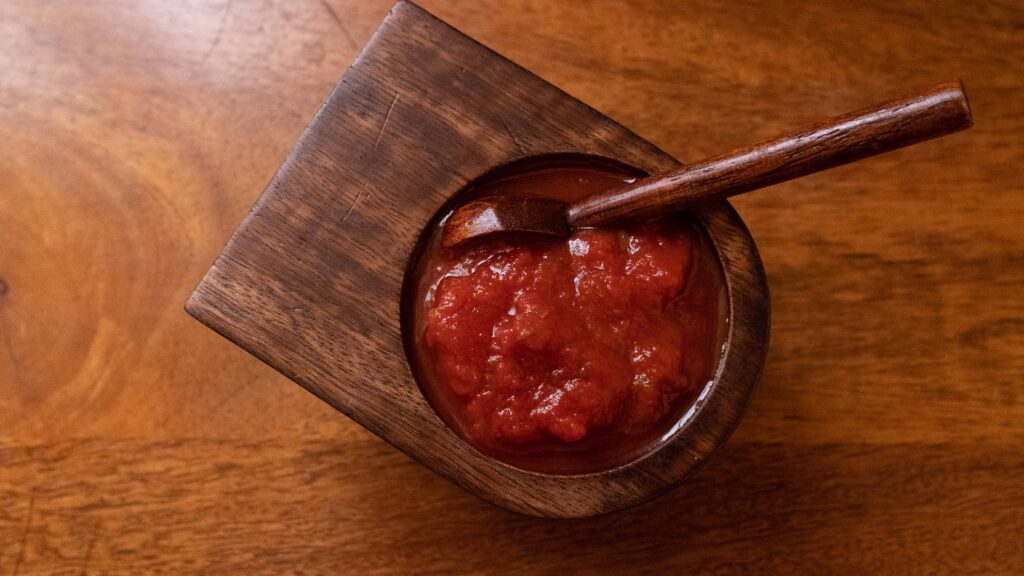
1 – Add the canned tomatoes to a bowl. Using your hands or a potato masher, squash the big/whole tomatoes till you have a chunky, pulpy mix.
2 – Add in the tomato paste, dried oregano, dried basil, and onion powder and give it all a stir.
3 – Add the olive oil and diced garlic to a medium saucepan. Bring the pan to a low heat and wait for the garlic to just begin sizzling. Keep your eye (and nose) on the garlic. As soon as it turns light golden and no longer smells raw, remove the pan from the heat, add in the tomato mixture, stir everything together and put the lid on. Keep the saucepan aside for 5 minutes, keeping the lid on. Do not cook the mixture. We’re only looking to warm it in the already hot pan.
4 – Remove the lid and check the texture of your sauce. If it looks watery, put it on the stove and boil the mixture (sans lid) for no more than 2 minutes. Then take it off the heat.
5 – Add in the fresh basil, fresh oregano, salt, and pepper. Stir. Taste the sauce at this point and add a pinch of sugar if desired. The sauce should taste under-salted and have a fresh, tomato zing. This is enough sauce for two 10-12 inch pies it’s now ready to be used on your pizza. Let’s put our other toppings together.
There is a great divide in the pizza fraternity regarding pizza sauce – to cook or not to cook, that is the figh…question. Neapolitan purists would argue that pizza sauce should be fresh, bright, and untouched by the stove. American pizza aficionados demand that the sauce be cooked down for hours until it’s sweet, thick, and dark. Each camp thinks the other is crazy. To determine my stand, I’ve experimented with both types, and it comes down to what your palate prefers. Perhaps I patronised the wrong places, but I’ve eaten pizza that has been rendered watery, insipid, and unpleasant by raw sauce in Naples. At the same time, I do not like pizza that tastes like simmered-for-hours spaghetti sauce. So, to misquote Obelix; these Italians are crazy, and so are these Americans. My stand is a well-balanced pizza—where I can taste the fresh sweetness of a ripe tomato, as well as the cheese, as well as the crust—with no particular element dominating the eat. How do you make tomatoes taste both sweet and fresh? Get canned San Marzano tomatoes! Traditionally used in Italian pizza, they are naturally sweet, full of tomatoeeyness and have just the right amount of acid. What’s more, they’re harvested and canned when they’re most ripe, so the work has been done for you. If you use the good quality, canned variety every time, you’ll consistently get a sauce that tastes great and needs very little tinkering. So why do I tinker at all by adding tomato paste or pre-cooking my garlic? Since I don’t reduce my tomatoes on the stove, I add a little paste to thicken the sauce. Secondly, commercial pizza ovens are blisteringly hot, so a completely raw sauce is going to get cooked to some degree, even if it’s for just 90 seconds. Standard countertop ovens like mine only go up to 230OC or thereabouts. As this temperature won’t cook my sauce, I can’t risk having raw garlic in it.
Stage 3: pizza toppings prep
Ingredients
For the basil pesto
1. 1 cup packed fresh basil leaves
2. 3-4 walnut kernels
3. 1 tbsp. red wine vinegar
4. 15 gm Parmigiano Reggiano (or any other parmesan)
5. 50 ml extra virgin olive oil
6. Salt to taste (we add approximately 1/2 tsp)
For the rest
1. 200 gm fresh buffalo mozzarella
2. 60 gm Gouda
3. 150 gm spicy Italian sausage (raw)
4. 8 cherry tomatoes
Method
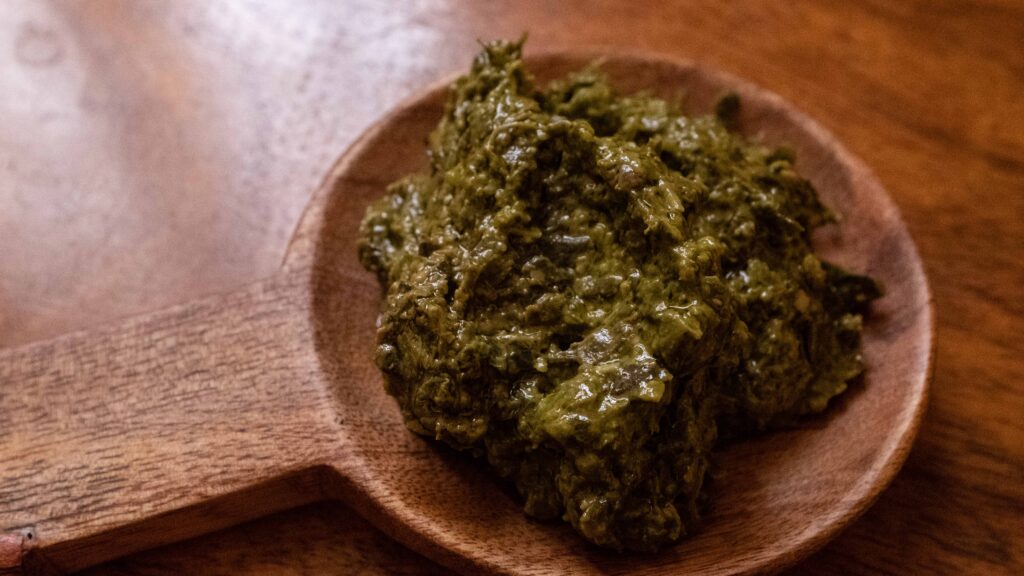
1 – Make the pesto by putting all the ingredients, except for the olive into a food processor. Pulse until you have a coarse, chunky, mixture. Now, keep the processor running and slowly drizzle in the oil. Once the oil has emulsified with the mixture and you have a homogenous paste, the pesto is ready. This makes roughly 1 cup of pesto. Keep aside 1/4th of the pesto for this recipe and store the rest in an airtight container inside your fridge.
2 – Drain your mozzarella balls on kitchen towel.
3 – Roughly grate 60 gm of Gouda. Keep aside.
4 – Remove the sausage from its casing. Put a frying pan on the heat and pinch in little nuggets of sausage (½ inch squared chunks, 40-45 in total). Fry these little meatballs for 2-3 minutes on medium heat. All the oil from the meat will render out. Remove the lightly browned chunks from the pan and drain them on kitchen paper. Keep this aside. Sprinkle the spicy oil from the pan into a small bowl. Season it with a little salt and keep aside.
5 – Slice each cherry tomato into 3 rondels. Keep aside.
Keep all your toppings prepped so that you’re not floundering about during assembly. All raw meats must be cooked before they’re topped for 2 reasons. 1 – safety; the heat from your oven is not intense enough to fully cook them. 2 – aesthetics; meats like sausage release a lot of oil when heat is applied to them, resulting in oily lakes pooling and running off your pizza. Pre-cooking them on the stove will eliminate this unsightly and unpleasant occurrence. I like to drain mozzarella to prevent extra water content from leaking into the other toppings and causing them to stew.
Stage 4: shaping and assembly
After a 60 minute rising time, your pizza dough will have almost doubled in size. It’s now time to turn your fermented pizza dough into a pizza crust, atop which everything else will sit.
Part 1 – Shape the pizza crust
Components
1. Pizza dough (prepared in Stage 1)
2. Extra flour for dusting
3. Pizza pans
Method
1 – Remove the cling wrap from the bowl. Lightly punch down on the dough to knock the air out. Divide the dough into two.
2 – Lightly flour your hands and your pizza pans. Working with one piece at a time, place it in your floured pan and begin the shaping and stretching process.
3 – Start by applying pressure in the centre of the dough; push and stretch the dough towards the edges of your pan until it’s about ¼ inch thick, and more or less a 10 inch round. Slightly roll in the edges to form a rim/lip.
4 – Using your knuckles, make light indents all over the surface of the dough, ensuring that you don’t poke all the way through to the bottom (it should look like the moon as viewed through a telescope; pock-marked and full of craters). This prevents bubbling.
5 – Repeat the process with your second piece of dough. Your crusts are ready.
6 – Set your oven to preheat at 200OC and move on to Part 2.
Always shape and stretch your pizza dough with your hands. Never flatten your pizza dough with a rolling pin as this will push out all the air and leave you with a dense, hard pizza crust.
Part 2 – Top the pizza crust
Components
1. 2 x 10 inch pizza crusts, stretched and shaped in their pans
2. 1 tsp extra virgin olive oil
3. ½ cup pizza sauce (prepared in Stage 2)
4. 60 gm roughly grated Gouda
5. 1/4th cup basil pesto (prepared in Stage 3)
6. 200 gm buffalo mozzarella, drained
7. 60 gm pepperoni (approx. 30 small slices)
8. 40–45 spicy Italian sausage nuggets (prepared in Stage 3)
9. Cherry tomato slices
Method
There’s a proper way to layer a pizza so that the dough on the bottom cooks without getting soggy, and the toppings roast without stewing or burning. Here’s how I construct my pizza, starting from the crust and moving upwards.
1 – Brush each pizza crust with half a teaspoon of olive oil. This prevents sogginess from the pizza sauce.
2 – Spread a thin layer of pizza sauce on each crust. You should be able to see the white crust through the sauce.
3 – Sprinkle the grated Gouda onto the sauce. You should be able to see the red sauce through the cheese.
4 – Using a teaspoon, dollop small amounts of pesto on top of the cheese for some green splotches.
5 – Tear the mozzarella into 1 ½ inch rough chunks, and top each pizza with 100 grams’ worth. You should be able to see the green splotches of pesto.
6 – Top each pizza with the spicy Italian sausage nuggets.
7 – Top each pizza with roughly 30 gm pepperoni (or 15 small slices/pizza).
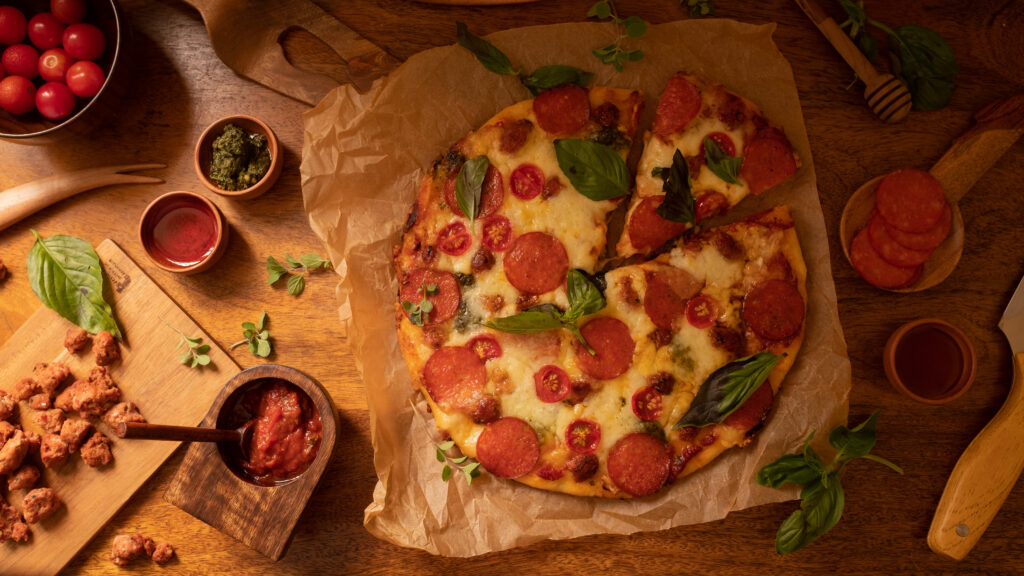
8 – Finally, top the pizzas with the cherry tomato slices, roughly 12 slices per pizza. Your pizzas are ready to bake!
While this isn’t a Margherita pizza, your assembled pizza should still be reminiscent of the Italian flag, with its distinct areas of green, white, and red. That’s your visual cue to knowing your pizza flavours are balanced. Don’t overload your pizza with sauce, toppings, or cheese. Too much sauce will make for a wet pizza. Too much meat and that’s all you’ll taste. Too much cheese will result in a heavy, greasy pizza. When you strive for balance and exercise restraint, you’ll achieve maximum flavour and freshness.
Stage 5: finale; cooking
Components
1. 2 x 10 inch pizza pies, fully assembled and ready to bake
2. A 10-11 inch cast iron or high heat griddle
3. 8-10 fresh basil leaves
4. 20 ml spicy oil (rendered from the spicy Italian sausage in Stage 3)
5. 60 ml honey
Method
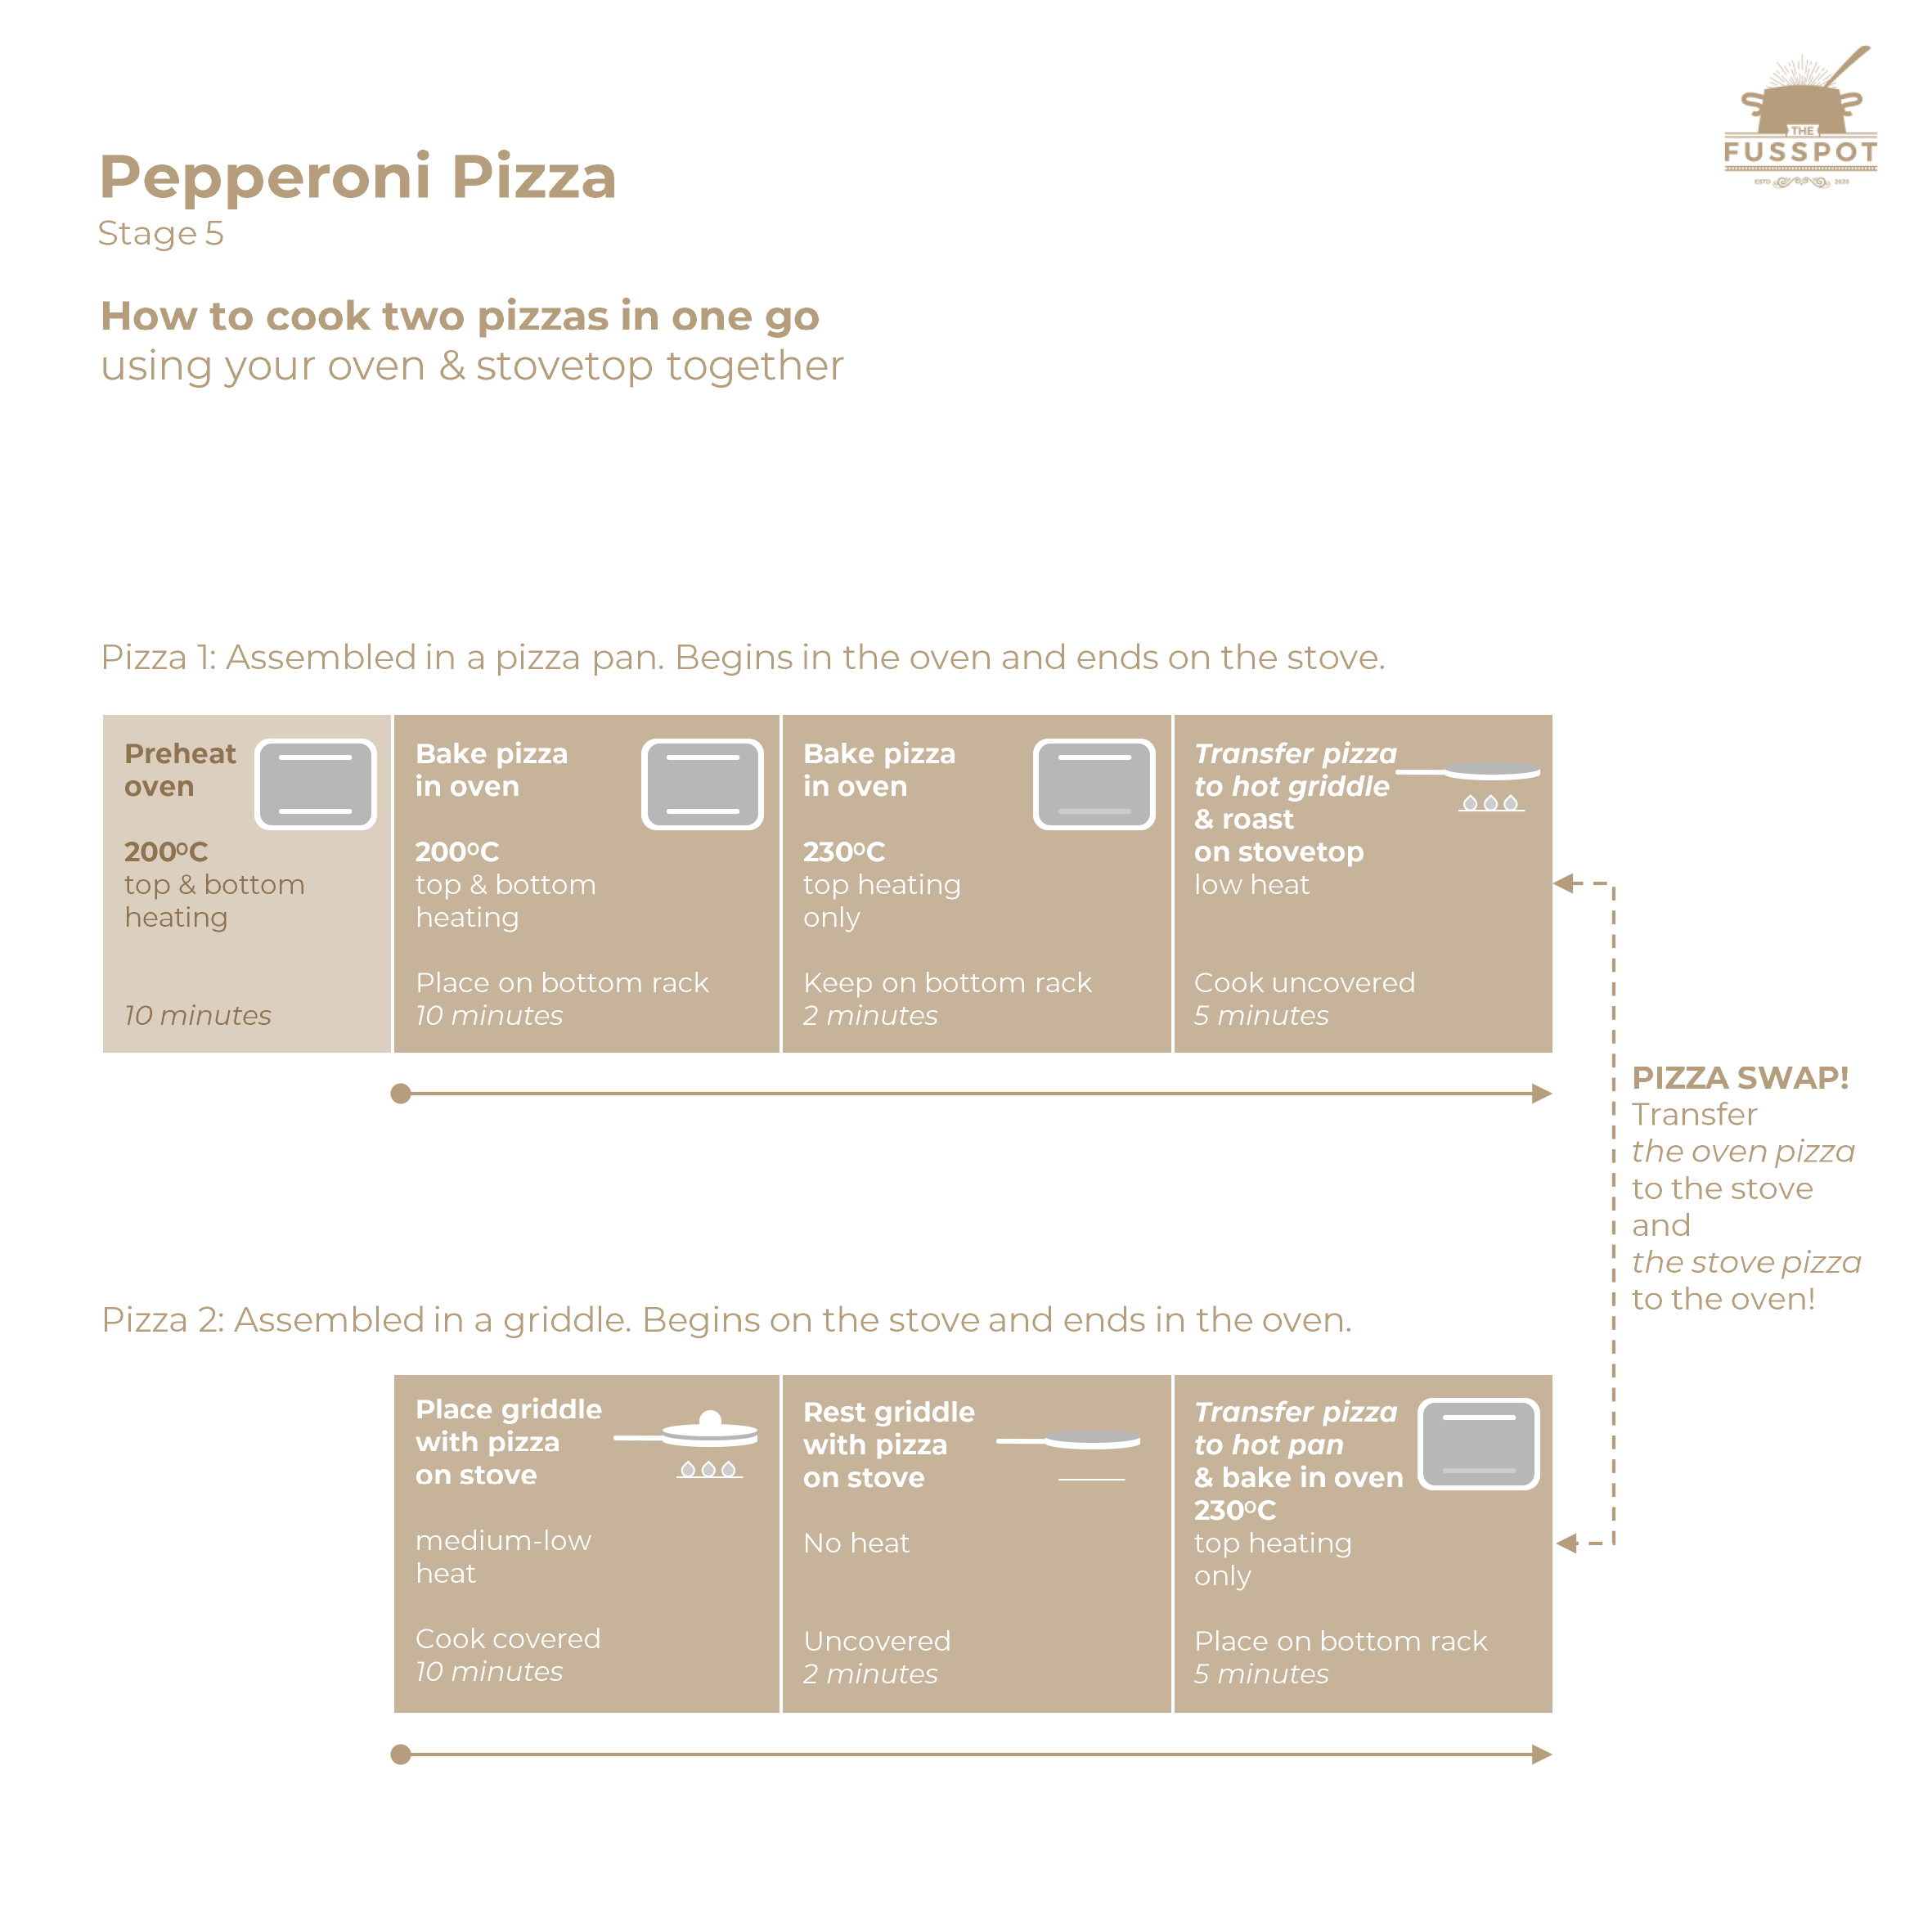
Unless you have access to a massive oven that can fit both pizzas in side by side, you’re going to have to cook them, one at a time. Do not cook pizzas one on top of the other in different racks, as they won’t cook evenly.
Total pizza cook time = 27 minutes.
10 mins preheat at 200OC + 10 mins at 200OC + 2 mins at 230OC + 5 mins on low heat.
1 – After ten minutes preheating at 200OC, place your pizza in the bottom rack of the oven, with both the top and bottom heating elements running.
2 – Bake for 10 minutes at 200OC.
3 – Thereafter, crank up the heat to 230OC (that’s the highest on my oven) on the top element only, and bake the pizza for an additional 2 minutes. In the meantime, place a cast iron griddle (or any other kind of high heat griddle) on your stove and start heating it on high.
4 – After 2 minutes is up on the oven timer, transfer the hot pizza to the surface of the hot griddle and roast it on low-medium heat for 5 minutes. This additional step on the stove top will beautifully crisp up the crust without overcooking the toppings.
5 – Slide your pizza onto a plate and give it two minutes to rest. This will further crisp up the crust.
6 – Repeat this cooking process with your second pizza.
7 – Before serving, cut each pizza into 6 or 8 slices. Drizzle your slices with spicy oil and honey. Savour.
A crisp yet chewy crust, optimally melted and blistered cheese, and a sauce that retains a fresh flavour. These should be your pizza goals; but there is no one way to achieve them. All the techniques mentioned in Stage 5 are based on what works in my kitchen. You will have to experiment with your oven to see what times and temperatures yield the best results. Too long in the oven and your sauce will lose freshness. Not enough heat and your crust won’t rise sufficiently. Uneven heating, and your toppings will burn while your crust remains undercooked. Find your problem areas and their fixes. Ready to have your mind blown? Despite having a small oven that can only cook one pizza pie at a time, I make both pizzas simultaneously! That way, they’re both piping hot and ready to slice & serve at the same time. Check out my neat little kitchen hack below: