


Makes 4 very generous servings.
Arguably Japan’s most celebrated soul food, ramen’s ubiquitous influence has spread to every corner of the world, including my kitchen. Having eaten authentic ramen in Japan, my husband has implored me to recreate it for over a year now! In this recipe, I have made a Tokyo-style Shoyu Ramen, crowned with tender chashu pork and soy-marinated egg. Comprising the holy quintet of Ramen—broth, noodles, sauce, oil, and toppings—this ramen takes time and effort. But my husband’s slurrrrps are certainly worth it.
At a glance
– This dish comprises ramen eggs + chashu pork + shoyu broth + toppings, seasoning sauce, & flavour oil + noodles
– You will need a large cooking pot (5 litre capacity), a big roasting tray, a couple of medium cooking pots (3 litre capacity), and a deep flat pan with a lid.
– This recipe has been broken into 7 stages for ease and comprehension. Please read the entire recipe from start to finish before beginning.
Stage 1: ramen eggs (ajitsuke tamago)
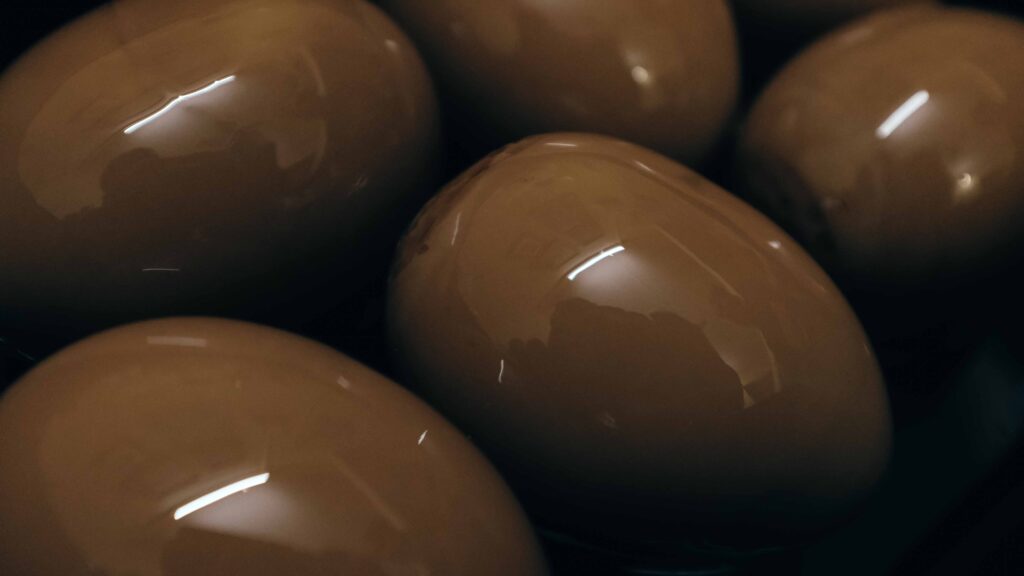
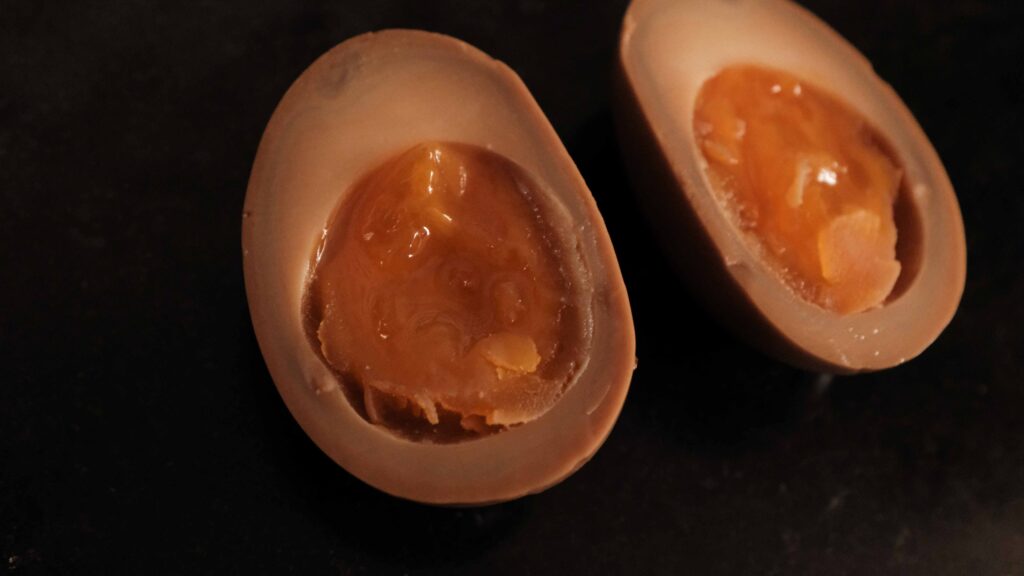
Sweet, salty, jammy, and deliciously rich with notes of umami, these soy-marinated eggs, popularly known as ramen eggs are the crowning glory of a ramen bowl. I started this recipe with the eggs because they need 3 days to steep and the marinade itself serves another purpose (more on this later). Cured in a Japanese-style soy sauce known as ‘shoyu’—which is more sweet and less salty than its Chinese counterpart—1 egg per person just isn’t enough. Make more if you like. You’ll thank yourself later.
Ingredients
1. 6 eggs weighing 60 gm each
2. Enough water to just submerge all 6 eggs
For the hot marinade:
1. 1 tbsp. brown sugar
2. 250 ml Japanese-style soy sauce aka ‘shoyu’ like this
3. 85 ml mirin
4. 85 ml sake
5. 250 ml water
6. 2 cm chunk of ginger
For the ice water bath:
1. 1 litre cold water
2. 20-30 ice cubes
Prep
1 – Keep your eggs in the fridge for 5-6 hours. They should be totally cold before hitting the boiling water. This will set up the egg whites, while keeping the interior yolks jammy and soft. It’s important to get large eggs weighing about 60 gm each, for a cook time of 6 ½ minutes to be perfect.
Method
1 – Using a needle or a pin, carefully prick the bottom-end (wider) of the eggs. This will allow the air inside the eggs to escape while they boil, and cause the shell to separate from the eggs; making them really easy to peel. Do not skip this, trust me!
2 – Bring a large saucepan of water to a boil. There should be more than enough water to submerge all the eggs in a single layer.
3 – In the meantime, keep your ice water bath ready.
4 – Once the water comes to a rolling boil, lower the heat so that the water is gently boiling.
5 – Place your cold eggs on a wire skimmer and lower them into the boiling water. Boil your eggs for exactly 6 ½ minutes; for the first 1 minute, use the handle of a wooden spoon to swirl the eggs in the water (like a mini typhoon). This centrifugal force will set the yolk in the centre of the egg, and prevent it from setting somewhere off to the edges. Thereafter, let the eggs boil normally for 5 ½ more minutes.
6 – Using the skimmer, immediately transfer the boiled eggs to the ice water bath to stop the cooking process. Once again, swirl the eggs around in the cold water, this time for 30 seconds. Leave the eggs to cool in the chilled water for about 5 minutes.
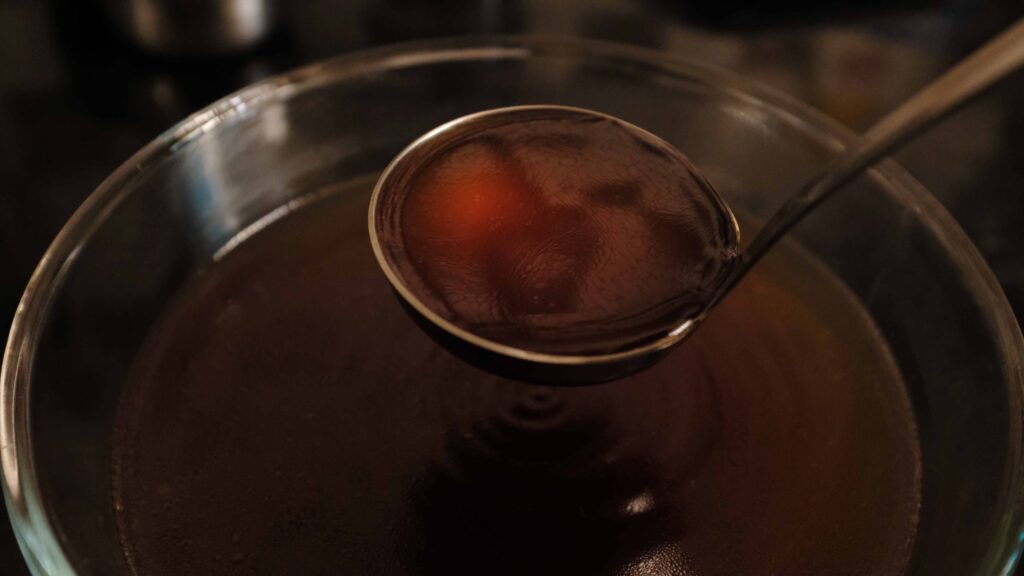
7 – While the eggs are cooling down, prep your hot marinade; lightly smash your ginger piece. In a small saucepan, combine all the ingredients, except for the water. Place the saucepan on the stove and heat the mixture on medium for 5 minutes or until the sugar has fully dissolved and the mixture begins to bubble. Turn off the heat and add the water. Your hot marinade is ready. Keep it warm while you peel your eggs.
8 – Pick up one egg. Use the flat side of a teaspoon to gently crack the egg all over. Then start peeling the egg from the bottom-side, beginning at the point where you made the hole. Once you are able to pinch off a bit of shell, the rest will unravel like an orange peel to give you a perfectly smooth, divet-free soft boiled egg! Phew! Repeat for all of your eggs.
9 – Transfer the eggs to a container, where they can lie in a single layer without overlapping. Remove the smashed ginger from the still warm marinade and then pour it over the eggs. The eggs should be fully submerged so you get an even colour on them. Cover the container and place it in the fridge to marinate for up to 3 days for best results.
10 – After 3 days of curing, the egg whites will be at the perfect texture and your ramen eggs will be ready to eat. Using a slotted spoon, scoop the eggs out of the marinade and lay them on some kitchen paper and pat them dry. Store your eggs in the fridge in an airtight container. Keep the used marinade in another container in the fridge, until ready for use in Stage 2. Even if you’re not planning to reuse this marinade for the chashu pork, separate the eggs from the marinade after 3 days, else the eggs will become too salty and the egg whites will become rubbery.
This may sound like a lot of work for boiled eggs, but these umami packed bombs are no ordinary boiled eggs! Every divet and cut will be highlighted by the dark soy colour, so go slow and steady with the peeling of the eggs. This marinade is 100% reusable. Stored in an air-tight container in the fridge, it will last for up to 3 weeks and can be used to make even more soy marinated eggs. But here’s the best news. With just some minor tweaking, the same marinade can be used to braise the chashu pork in this very recipe. And that’s exactly what I do.
Stage 2: chashu pork (nibuta)
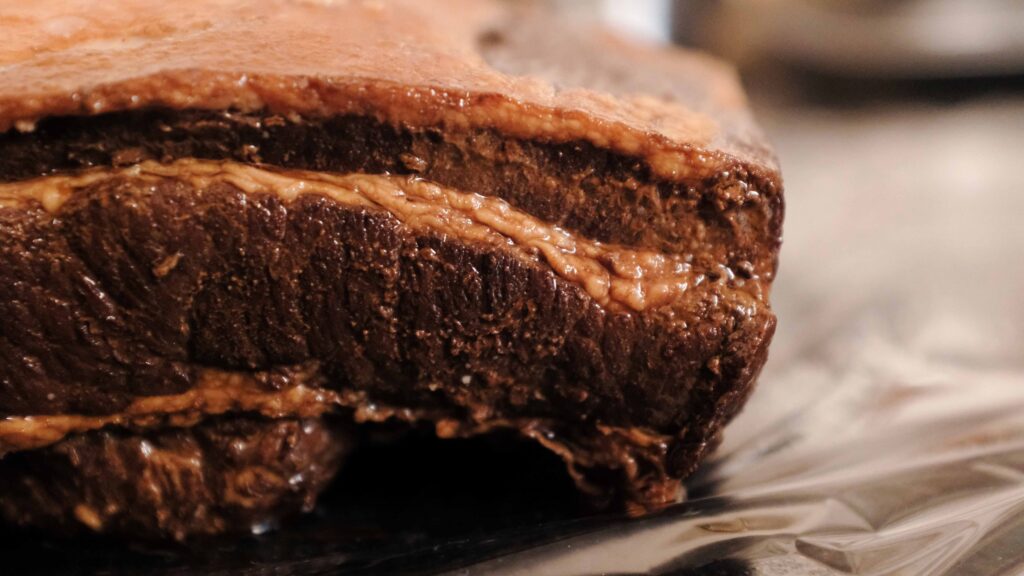
After ramen eggs, chashu pork is undeniably one of the most popular ramen toppings across the world. Also called ‘nibuta’, chashu pork is a slow braised/simmered pork traditionally made with pork belly. Tender and succulent, it is different from barbequed pork or ‘yakibuta’, which has a roasted flavour and a toothier texture.
Ingredients
1. 1 kg pork belly slab
For braising, if re-using marinade from Stage 1:
2. 1 ½ tbsp. brown sugar
3. 1 tbsp. vegetable oil
4. 2 cm piece of ginger
5. 2 large garlic cloves
6. 2 spring onion stalks
7. 1-2 litre plain water (depending on the depth of the pan you use)
OR
For braising, if not re-using marinade from Stage 1:
2. 250 ml Japanese-style soy sauce aka ‘shoyu’ (1 metric cup)
3. 35 gm brown sugar
4. 85 ml mirin (1/3 metric cup)
5. 85 ml sake (1/3 metric cup)
6. 250 ml water (1 metric cup)
7. 1 tbsp. vegetable oil
8. 4 cm piece of ginger
9. 2 large garlic cloves
10. 2 spring onion stalks
11. 1-2 litre plain water (depending on the depth of the pan you use)
Prep
1 – Take the pork belly out of the fridge 30 minutes before you plan on cooking it. Pat your pork belly dry with some paper tissues. If your pork belly has a thick layer of skin, you will need to trim it off and remove it. Here’s how. Save the skin to make crackling!
2 – If you’re reusing the marinade from Stage 1, add 1 ½ tablespoons of brown sugar to the marinade and set it aside. If you’re not reusing the marinade from Stage 1, mix together the soy sauce, mirin, sake, brown sugar, and 250 ml of water. Set aside.
3 – Slice your ginger into 2 mm thick slices and roughly crush your cloves of garlic.
Method
1 – Place a deep flat pan on your stove and begin heating the pan on medium.
2 – Add the vegetable oil to the pan. While the oil is heating up, place the pork belly, skin side down in the pan, allowing it to heat up with the oil.
3 – Sear the pork belly skin-side down for 3 minutes, and then flip it and sear the other side for 3 minutes. You’re looking for an even golden-light brown colour on either side.
4 – Get the dark brown liquid mixture you have prepped and pour it over the pork belly slab.
5 – Toss the sliced ginger, crushed garlic cloves, and spring onion stalks into the pan.
6 – Now add enough plain water to the pan, so that the pork belly is just submerged.
7 – Turn the heat to low and cover the pan with a lid. Simmer on low for 3 hours, turning the pork belly every 30 minutes.
8 – After 3 hours, turn the heat off. Let the contents of the pan come to room temperature (or roughly 25OC).
9 – Gently transfer the pork belly to a container. Then strain the braising liquid from the pan into the container with the pork belly. Cover the container with cling wrap and place it in the fridge to chill overnight.
10 – The next day, take the container out of the fridge. Scoop off the congealed cold fat from the surface of the braising liquid, gently scraping around the braised pork slab. Do not throw this fat away! Store it in a sterilised airtight jar in the fridge and use it in future recipes.
11 – Transfer the braised pork belly slab to a cutting board. This will leave you with a big bowl of braising liquid. Do not throw this away either! Store it in the fridge. We will use it in Stage 4 to make another classic ramen topping. It can also be used as a future braising liquid, or added to anything from soups to stir fries, for an instant note of umami.
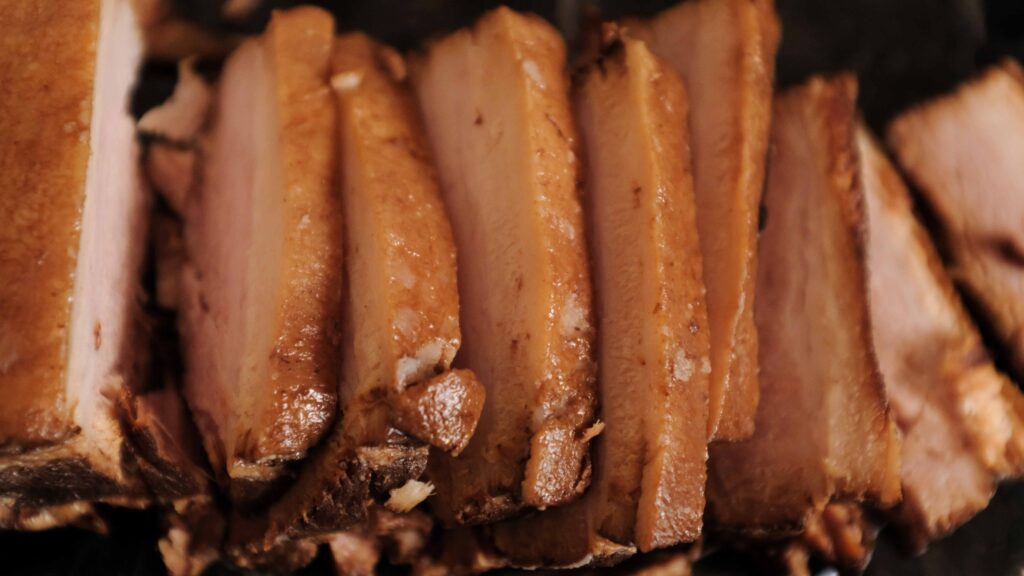
12 – Back to our chashu pork. Using a very sharp knife, cut the slab into ½ cm thick slices, along the grain. I get 24 clean slices from this amount. Keep the slices refrigerated until you’re ready to assemble your ramen. You will need 4 slices per serving of ramen.
Make your chashu pork ahead of time. It will keep in the fridge for up to a week. You can also freeze it whole or in slices for up to a month. If frozen, remember to thaw it in the fridge before taking it out to prep it for service.
Stage 3: shoyu broth
Popular in Tokyo, Shoyu ramen’s hallmark is a golden-red broth that is clear (as opposed to cloudy/opaque). Once the broth is made, it is seasoned with shoyu right before serving. Hence, a shoyu broth is one wherein the dominant seasoning is shoyu. At the heart of any good broth is a base-stock called ‘dashi’—upon which other flavours are built—which gives the broth its signature savoury, umami-ness. I have made ‘Awase Dashi’, where dried kelp otherwise known as ‘kombu’ and bonito flakes, or ‘katsuobushi’ is responsible for the underlying note of umami.
Ingredients
For the dashi:
1. 20 gm dried kelp aka ‘kombu’
2. 2650 ml plain, cool water (10 ½ metric cups)
3. 20 gm dried bonito flakes aka ‘katsuobushi’
For the broth:
4. 2 kg chicken wings (skin on)
5. 400 gm carrot (roughly 2 medium)
6. 4 dried shitake mushrooms
7. 4 spring onion stalks
8. 1 large head of garlic
9. 4 cm piece of ginger
10. 60 ml shoyu
11. 500 ml water (1 metric cup)
Prep
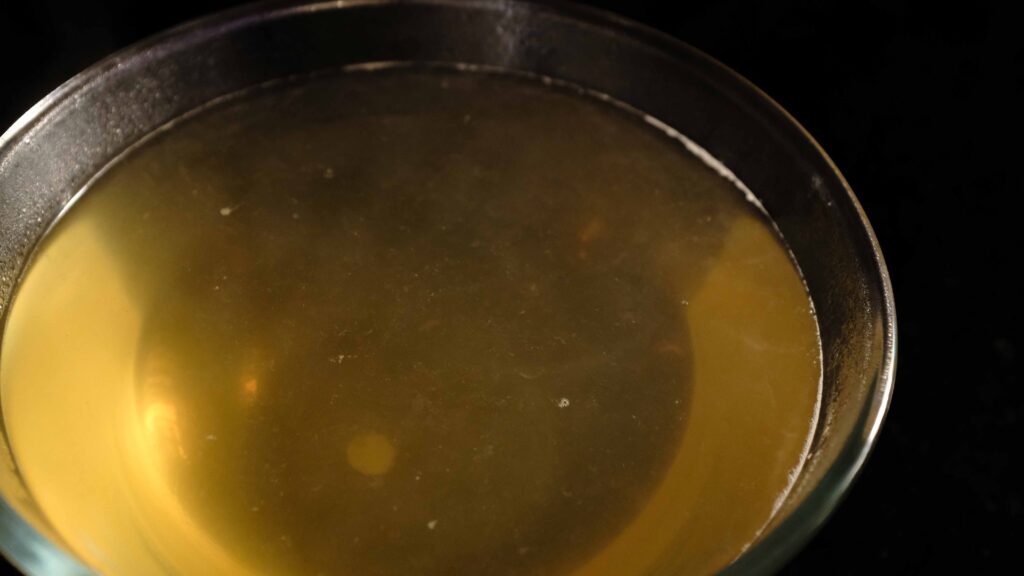
1 – Make your ‘dashi’; add 2650 ml of plain, cool water to a pot. Make a few slits in your kombu and then place it in the water. Cover the pot loosely with a kitchen towel and leave the kombu to steep at room temperature for 3 hours. After 3 hours is up, put the pot on medium-low heat and bring to almost boiling point. This will take about 10 minutes and will release some impurities. Use a skimmer to remove them from the surface of the water. Just before the water begins boiling, lower the heat and remove the kombu from the pot. Discard or reserve the kombu*. Add the bonito flakes to the pot and bring it to a boil again. Once boiling, reduce the heat to low and simmer for just 30 seconds and then turn the heat off. Leave the pot alone for 10 minutes. Strain the broth through a fine-meshed sieve. Discard or reserve the bonito flakes*. The 2500 litres of broth you have collected is your ‘dashi’. Set it aside. If not using right away, store the dashi in an airtight container in the fridge for 3 to 5 days.
2 – While your kombu is steeping, clean your chicken wings and pat them dry. Then cut each wing through its joints into 3 pieces.
3 – Cut your carrots into 2 cm chunks.
4 – Start preheating your oven to 200OC.
* You can discard the kombu and the bonito flakes after you’ve made your dashi or you can reserve them to make ‘furikake’, a Japanese seasoning that is a fantastic topping for rice, noodles, soups, salads, and more. See how to make it here. After removing your kombu and bonito flakes from the dashi, drain them well and then freeze separately for 2 to 3 weeks. Thaw before re-using.
Method
1 – Place the chicken wings and carrots in a large roasting tray, spreading them out in a single layer.
2 – Place the roasting tray in the middle rack of the oven and cook for 45-60 minutes at 200OC, or until the chicken is golden brown.
3 – When your chicken wings are almost done roasting, place a large cooking pot on the stove and begin heating it on medium.
4 – Take the roasting tray out of the oven and transfer its entire contents to the cooking pot, scraping in every bit of browning. I have a non-stick roasting tray so this is easy. If lots of juices are stuck to your tray, deglaze it with a splash of hot water and then transfer the tray juices to the pot.
5 – Once all your tray contents are in the pot, turn the heat to high and bring the roasting juices to a bubble.
6 – Add 500 ml of water (2 metric cup) to the pot and bring it to a bubble.
7 – While it’s coming to a bubble, cut your ginger piece into 2 mm thick slices and cut the head of garlic in half, horizontally.
8 – Once bubbling, add in the dried shitake mushrooms, the ginger slices, both halves of the garlic head, the spring onion stalks, and the soy sauce.
9 – Pour all of the ‘dashi’ into the pot and bring the pot to a simmer.
10 – Once it comes to a simmer, reduce the heat to lowest possible setting and gently simmer for 3 hours. Do not put a lid on. Every half an hour or so, you will need to skim off the surface impurities with a large metal spoon or skimmer. Do not stir the broth or boil it at any stage or it will become cloudy.
11 – After 3 hours, turn the stove off. Gently remove the shitake mushrooms from the broth. Set aside.
12 – Gently remove and discard the aromatics. Then, take out the chicken wing pieces. Keep them to snack on (they’re pretty much devoid of nutrients at this point) or even better—debone and feed them to your hungry neighbourhood stray animals!
13 – Strain this reddish-golden broth through a muslin-lined fine mesh strainer with a clean bowl placed underneath it, to catch the broth. You should have about 2 litres of broth, which is perfect for 4 very generous servings. Do not push anything through the strainer as this will make your broth cloudy and undo all your hard work! You can totally eat what’s left in the strainer if you like, although it won’t offer much in the way of nutrition. Cover the bowl of broth with some plastic wrap and place it in the fridge overnight, so that the fats on the surface of the broth can solidify.
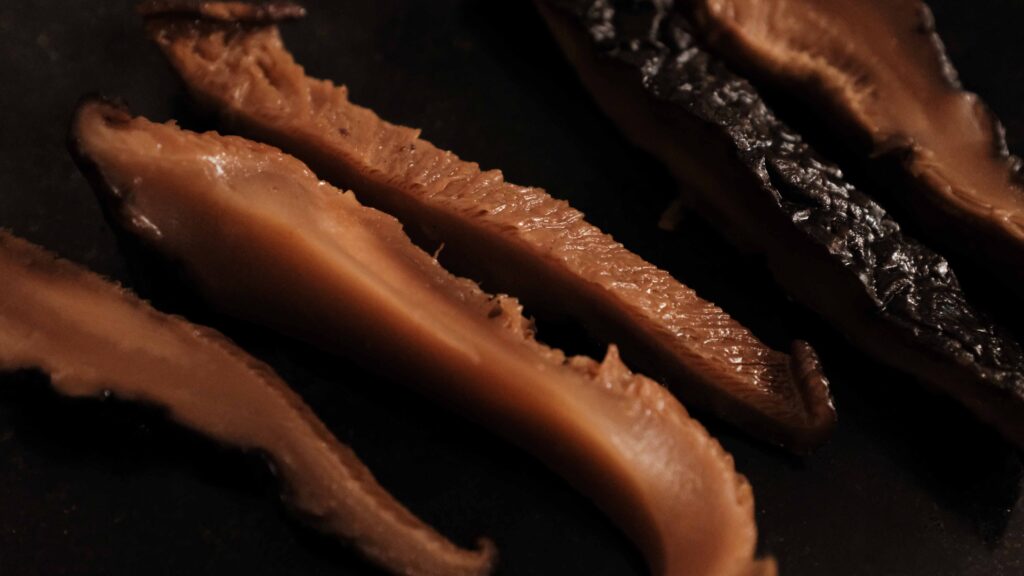
14 – Get your shitake mushrooms. First cut off and discard their stems. Then cut the mushroom caps into ½ cm thick slices and store them covered in the fridge; they will be used as a ramen topping in Stage 7.
When you make ramen, there’s no hiding behind noodles, toppings or proteins, because the broth is the hero of the dish. To that end, if you want to make an authentic Japanese broth, you can’t get away with substitutes. Please source bonito flakes, kombu, shitake, sake, and mirin if you’re able to. Without these, you will greatly compromise the taste and integrity of the dish. Thanks to India’s obsession with Japanese cuisine, these ingredients are readily available in most metro cities. Mirin is a rice wine that’s used in Japanese cooking. While similar to sake, it is sweeter but less boozy. If you have sake, you can make your own mirin substitute by counteracting the sourness with some sweetness. To make roughly 1 metric cup of homemade mirin; Mix 67 grams of granulated sugar with 4 tablespoons of water in a small saucepan and place it over medium heat. Bring the solution to a boil and let it simmer gently for 2-3 minutes. Then remove it from the heat. Drizzle in 240-250 ml of sake until you reach the desired level of sweetness. Stir everything together and leave it to cool completely. Store your homemade mirin in an airtight jar in the fridge and use it as needed in your Japanese dishes.
Stage 4: toppings, seasoning sauce, & flavour oil
When it comes to extra ramen toppings, it’s really dealer’s choice. Add whatever you fancy. For this ramen, I’ve kept the toppings simple and easy to source, but wholly traditional. Both the seasoning sauce and the flavour oil are essential to how the final ramen eats, so please do not leave them out.
Cured toppings:
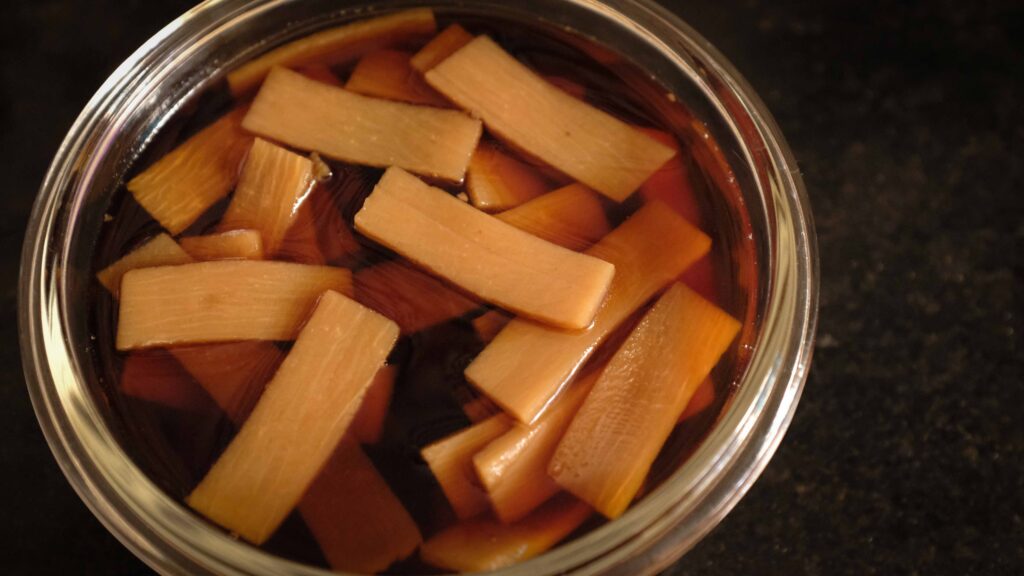
Seasoned bamboo shoots aka ‘menma’
1. 1 can bamboo shoots in water (drained weight 283 gm)
2. 500 ml water
3. 250 ml braising liquid from the chashu pork in Stage 2
4. 120 ml mirin
5. 10 gm kombu
Dried toppings:
1. Roasted seaweed sheets aka ‘nori’; two nos. 10cm x 10cm sheets per bowl
Fresh toppings:
1. 1 green onion stalk/scallion; green part only
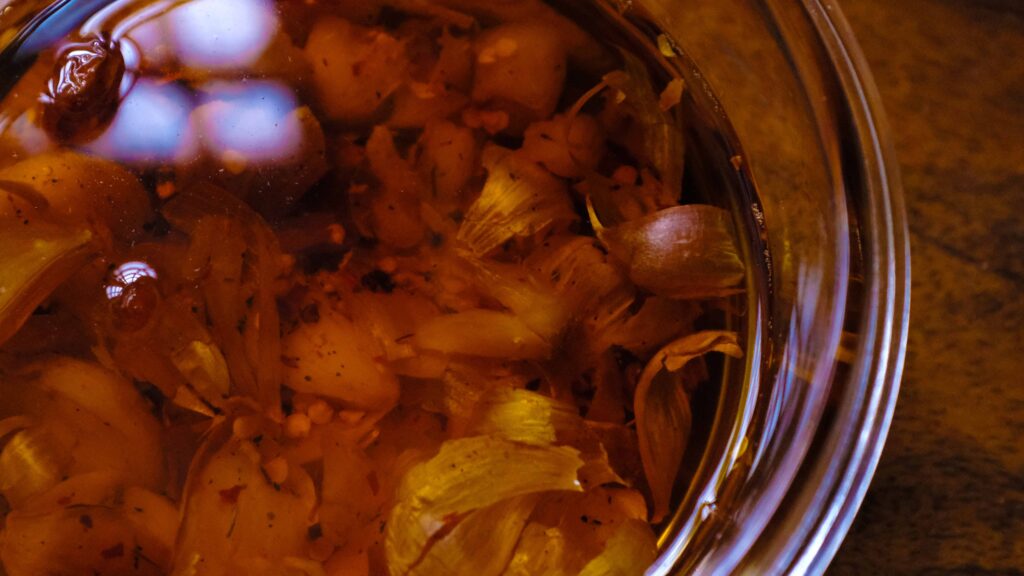
Flavour oil aka ‘la-yu:’
1. 8 fat cloves of garlic
2. 250 ml canola oil
3. 1 tbsp. crushed red chilli flakes
4. ½ tsp toasted sesame oil
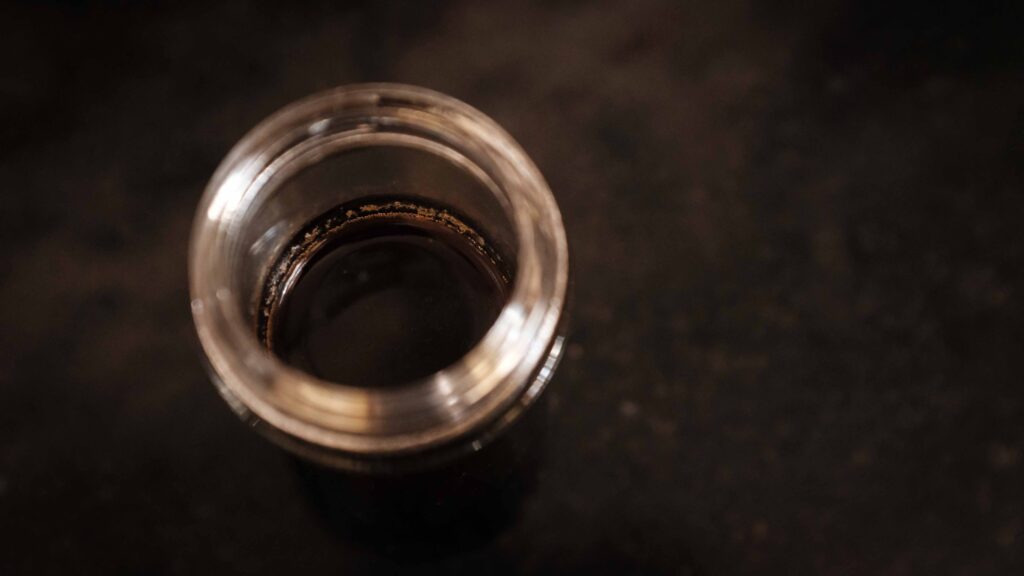
Seasoning sauce aka ‘tare’:
1. 45 ml Japanese-style soy sauce aka ‘shoyu’
2. 20 ml sake
3. 20 ml mirin
4. 1 tbsp. sugar
5. 2 tsp salt
6. 200 ml shoyu broth
7. 1 tsp rice vinegar
Method
1 – Make your ‘menma’; strain your canned bamboo shoots. Then cut them into 3 cm x 1 cm strips. If your bamboo is already cut into strips, then leave them as is. Wash the shoots very well in running water. In a medium saucepan, combine the bamboo shoots with the water, the braising liquid from the chashu pork, and the mirin. Bring the pan to a boil over medium-high heat. Add the piece of kombu to the pan and then reduce the heat and simmer for 25 minutes. Thereafter, remove the pan from the heat. Discard the piece of kombu and let the pan cool completely. Transfer the menma and its curing liquid to an airtight container and refrigerate overnight before using. Menma ready. Set it aside.
2 – Make your flavour oil or ‘la-yu’; add the oil to a small saucepan. Then lightly smash each garlic clove (skin on) and add it to the oil. Simmer the garlic in the oil on the lowest possible setting for 25 minutes, or until tender and translucent, swirling the pan occasionally. Go low and slow—you’re looking to make confit garlic, not fried garlic. Once it’s done, remove the pan from the heat and immediately stir in the chilli flakes. Let the mixture cool for about 2 minutes and then then stir in the toasted sesame oil. Cool completely before using. If not using immediately, transfer to an airtight glass jar and keep it in the fridge for up to 2 weeks. La-yu ready. Set it aside.
3 – Make your ‘tare’ or seasoning sauce. In a small saucepan, combine all the ingredients except for the vinegar. Stir together and simmer on low until the mixture has reduced by half. Take the pan off the heat and leave it to cool. Once cool, transfer the tare to a bowl and mix in the vinegar. If not using it immediately, store it covered in the fridge. Tare ready. Set it aside.
4 – Slice your green onion stalk into thin rounds. Place in a bowl, covered. Green onion is ready, set aside.
5 – Portion out your ‘nori’ or roasted seaweed sheets; cut them into 10 x 10 cm sheets and set aside 2 sheets per bowl. Do this only when you’re truly ready to assemble your ramen as the sheets will start to soften as soon as they’re exposed to air.
I couldn’t find ready-made menma where I live, but to make menma at home, you can procure any kind of fresh bamboo shoot, either canned or bottled. I found whole shoots, halved shoots, and sliced shoots online. Whatever you find, make sure to rinse them well before using. Once cured, the menma with the liquid can be stored in the refrigerator for up to a week and used as a ramen topping or eaten as a snack. If you cannot get scallions, substitute them with fresh chives or use the tender green portion of spring onion stalks. Fresh toppings should only be prepared right before serving.
Stage 6: noodles & mise en place
Before we get to assembling, we need to heat up all the elements we’ve made so far, as well as cook our noodles. Traditional ramen noodles are made with ‘kansui’, a type of alkaline water. This specific ingredient gives ramen noodles their signature bouncy, chewy texture and helps them to keep their shape even after sitting in hot liquids for a bit.
Components
1. 1800 ml cold shoyu broth
2. Cold, sliced chashu pork + (optional) 1 tsp vegetable oil
3. Ramen eggs; 6 total
4. Sliced shitake mushroom
For the noodles:
1. 400 gm ramen noodles (either egg noodles or all-wheat noodles)
2. 4 litre plain water for boiling
3. ½ tsp vegetable oil (optional)
4. 1 litre cold water for the ice water bath (optional)
5. 20-30 ice cubes for the ice water (optional)
Method
1 – Take your ramen eggs out of the fridge and bring them to room temperature. Once at room temperature, keep the eggs whole or cut each egg horizontally—diner’s choice! Eggs ready, set aside.
2 – Take your slices of shitake mushroom out of the fridge and bring them to room temperature. Shitake ready, set aside.
3 – Heat your shoyu broth; take your bowl of shoyu broth out of the fridge and scoop away the cold, congealed fat from the surface of the broth. Do not throw this away! Store this fat in a sterilised airtight jar in the fridge and use it in future recipes. Transfer the bowl of cold broth to a medium cooking pot and bring it to a gentle simmer. After the broth has heated through, taste it for seasoning. Add as much seasoning sauce or ‘tare’ to the broth as you like, depending on how salty your broth already is. Alternately, you can ladle the broth into separate bowls serve the ‘tare’ on the side. That way everyone can season their individual bowls of broth to their taste.
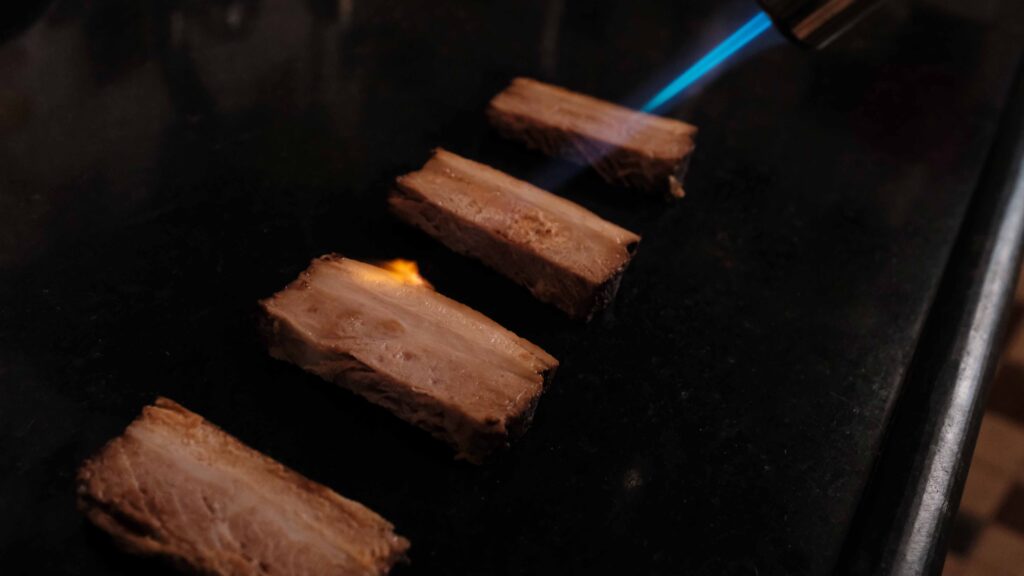
4 – Turn your chashu pork into ‘aburi chashu’ or seared braised pork; briefly char each cold slice of pork on either side with a culinary torch. This gives it a great smoky flavour. Gently transfer to a plate, ready to add to your bowl of ramen. Set aside. Alternately, gently heat 1 tsp vegetable oil in a non-stick frying pan. Once the oil is hot, add the cold slices to the pan, flat-side down. Sear each side for 2 minutes until fully warmed through and lightly golden on both sides. Set aside.
5 – Cook your noodles only after you’ve completed all your mise en place, and both your shoyu broth and chashu pork slices are nice and hot. Bring 4 litres of water to a boil in a large pasta pot. Once it comes to a rapid boil, lower the raw noodles into the pot, without snapping them. Cook time will depend on whether you’re using fresh or dried noodles. Either way, cook them as per the package instructions, stirring with tongs or chopsticks until they’re al dente or ‘barikata’. The noodles should still have a bit of bite, as they will soften further in the hot shoyu broth. Once they are barikata immediately pull them out of the hot water and drain them very well before portioning into individual serving bowls. If not serving immediately—first drain the noodles, then plunge them in your ice water bath. This will stop the cooking process. As soon as the noodles are cool to the touch, transfer them to a bowl, drizzle some oil onto them and toss. Immediately move on to Stage 7.
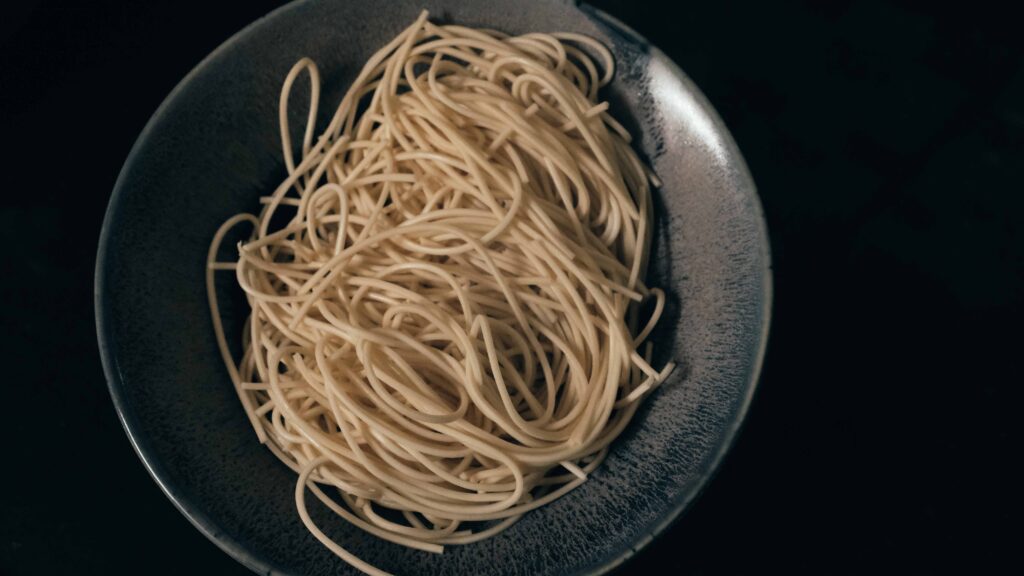
In a standard ramen, the noodles are rapidly boiled and then directly added to the bowl of hot stock, with the understanding that it will be eaten instantly. That’s all well and good in a restaurant kitchen when ten things can happen at once, but we’re doing this at home, people! Feel free to rapidly cool your noodles and let them sit around while you do other prep work (as long as you don’t wait too long). Full disclosure; I have happily substituted Italian pasta like spaghetti, vermicelli, and angel hair for Asian egg noodles and vice versa, and nobody has complained! There’s a hack circulating on how to turn pasta into springy kansui-esque noodles with the help of baking soda—do this at your own risk—but when I tried it even with all the tips and tricks, I detected an unmistakable, bitter-soapy aftertaste in my noodles.
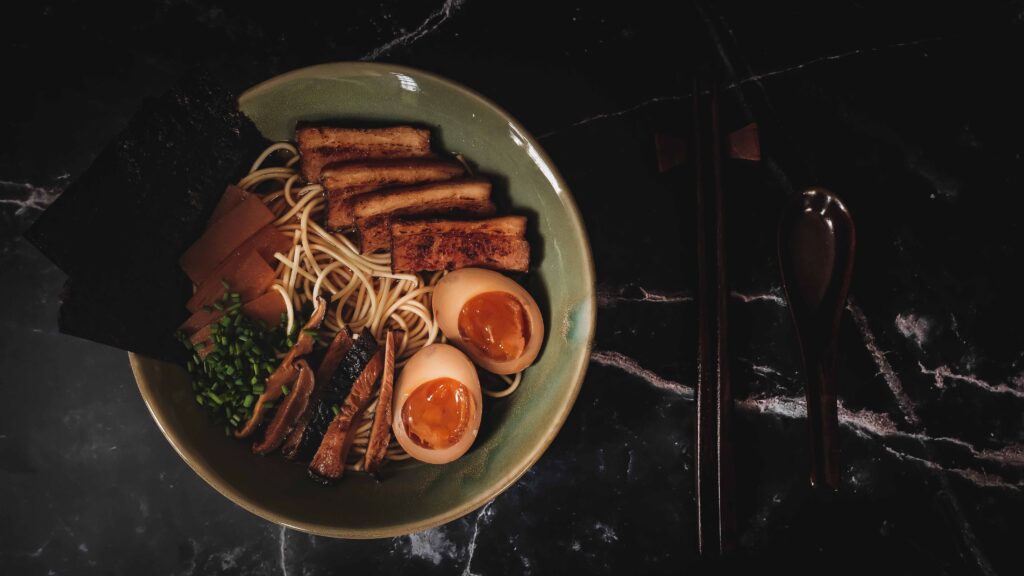
Stage 7: assembly & service
To build the ultimate ramen bowl, don’t just muddle all the components together—that’s the prerogative of the eater! After all this work, you must confer equal respect upon all the elements by giving them their own little place of pride in the bowl. After placing the broth and noodles in each bowl, I arrange the rest of the components on the surface, going in a clockwise motion. Here’s the full breakdown. Adjust the amount of tare and la-yu to your own taste. The more tare you add, the saltier your ramen will be. The more la-yu you add, the heavier your ramen will be.
Components
1. Hot shoyu broth
2. Seasoning sauce aka ‘tare’
3. Flavour oil aka ‘la-yu’
4. Cooked ramen noodles
5. Sliced chashu pork, seared and warm
6. Room temperature shitake mushrooms, sliced
7. Menma
8. Room temperature soy-marinated eggs, halved or whole
9. 1/4th cup green onions, sliced
10. Roasted seaweed sheets aka ‘nori’, cut to size
Method
1 – Add 450 ml shoyu broth to a bowl.
2 – Let everyone taste their own bowls of broth and add as much tare and la-yu as they like. I added 2 tbsp. of tare and 2 tsp of la-yu to mine.
3 – Place 1 cup of boiled ramen noodles into the bowl of broth. The height of noodles and the depth of the broth should be more or less level.
4 – Place 4 slices of chashu pork at 12 o’clock.
5 – Place both halves of a ramen egg at 3 o’clock.
6 – Place 5 to 6 slivers of shitake mushroom at 6 o’clock.
7 – Place 1 tablespoon of finely sliced green onion at 8 o’clock.
8 – Place 5 to 6 slices of menma at 10 o’clock.
9 – Tuck 2 nori sheets on the left hand side, between the noodles and the side of the bowl, submerged a quarter of the way in. You could also slice up the nori sheets into ¼ cm strips and scatter them on top.
10 – Now eat!
And that’s it! Shoyu ramen at home! Fully homemade and incredibly flavourful. Researching ramen is like falling into a never ending rabbit hole, where the more you learn, the more there is to learn. A truckload of homework went into this recipe. Before you make ramen, read up on its history, types, and techniques and then discover what works for you. Explore and experiment with broths and toppings! While I cannot claim that this is a 100% authentic ramen, the beauty of a ramen is its inclusive, shape-shifting nature—which makes it a truly global food that you can make on your own, as well as make your own.
Sources & Inspiration