


Makes one 8 inch round cake
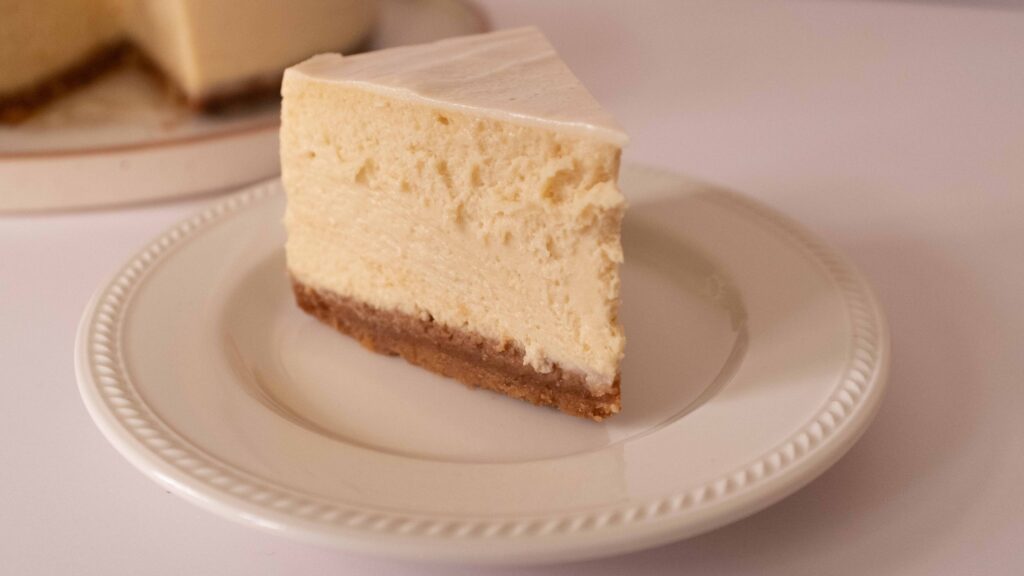
New Yorkers believe that cheesecake wasn’t really cheesecake until it came from New York. I have to agree. A perfectly baked cheesecake should be a symphony of texture and flavour—at once both smooth and velvety, rich yet light, sweet as well as tangy—with no overpowering notes of vanilla or citrus. Moreover, when you get the taste right, it needs to look like perfection too. Look no further. Your quest for cheesecake enlightenment ends here.
At a glance
– This cake comprises a biscuit base + cheesecake filling + sour cream topping + bonus recipe for Homemade Vanilla Extract.
– You will need an 8 x 3 inch round springform pan, a deep roasting pan/baking pan that can contain the springform pan, and parchment paper.
– This recipe has been broken into 4 stages for ease and comprehension. Please read the entire recipe from start to finish before beginning.
Stage 1: Biscuit base
Ingredients
1. 200 gm digestive biscuits
2. 1 tbsp. granulated sugar
3. 50 gm unsalted butter, melted and cooled.
Prep
1 – Preheat your oven to 180OC.
2 – Grease a tall 8 inch springform pan with nonstick spray and line the bottom and inside edges with parchment paper. Your parchment should stick up ½ an inch taller than the pan’s height.
Method
1 – Using a food processor, combine the digestive biscuits, granulated sugar, and melted butter. Pulse until the mixture has the appearance and texture of wet sand.
2 – Press this crumbly mixture into the base of your prepared springform pan, using a flat-bottomed glass/cup to compress it into an even layer.
3 – Bake the base for 8-10 minutes, or until golden brown. Remove it from the oven and let it cool to room temperature on a wire rack.
The reason the base is baked, is to prevent the liquidy filling from making it soggy. If you skip this step, you won’t get that great biscuit texture on the bottom. It’s so hot and humid where I live, that I have to refrigerate the pan as soon as the base has come to room temperature. This is to prevent the butter content from separating from the crumbs. You won’t need to do this if you live in a cooler climate.
Stage 2: Cheesecake filling
Ingredients
1. 680 gm full fat cream cheese like this (not cream cheese spread or the whipped stuff)
2. 90 ml heavy or whipping cream (not the low fat stuff)
3. 345 gm sour cream
4. 3 ¾ tbsp. all purpose flour
5. 3 large eggs (171 gm)
6. 300 gm castor sugar
7. 2 ½ tbsp. vanilla extract
8. ½ tbsp. finely zested lemon rind (optional)
9. Pinch of salt
10. 1 ½ ltr water for a water bath or baine-marie
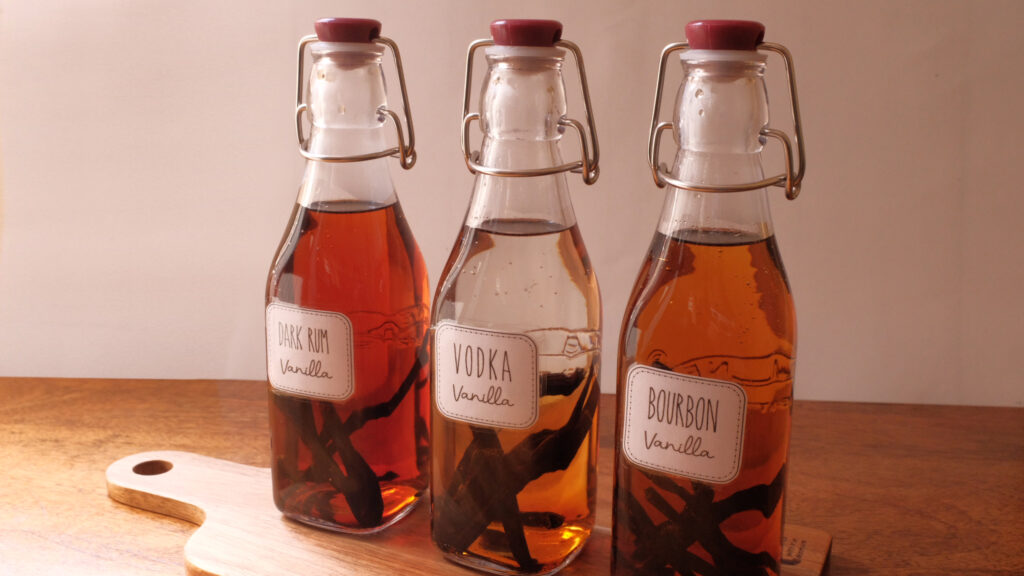
Granted, there’s a lot of dairy in this recipe. That’s what makes it so delicious. If you use cream cheese spread (which is whipped, lighter, and has more water content than plain cream cheese) or low fat cream cheese, you will compromise the stability of your cheesecake. Look for cream cheese with at least 33% fat and a moisture content of no more than 55%. Don’t skimp on the rest of the dairy either. Heavy cream brings airiness, while sour cream imparts tartness. Sour cream also results in a creamier, smoother cheesecake. This cheesecake also contains a lot of vanilla and might just deplete your stash. To keep a steady supply of vanilla in your pantry, without spending big bucks buying the real stuff, check out my bonus recipe for Homemade Vanilla Extract at the bottom of this recipe!
Prep
1 – Before beginning, ensure that all your ingredients are at room temperature.
2 – Wrap the outside of your springform pan with heavy duty foil. Do three layers for good measure. Place the wrapped pan inside your roasting pan/baking pan.
3 – Preheat your oven to 180OC.
4 – Fill your kettle with 1 ½ litres of water and set it to boil
Method
1 – In a large bowl, add the cream cheese and sugar. Using a handheld blender, beat the ingredients together till well-combined and fluffy (about 1-2 minutes).
2 – Pour in the heavy cream and beat to combine (about 30 seconds).
3 – Add the sour cream, all purpose flour, salt, vanilla extract, and lemon rind and beat to combine (another 30 seconds).
4 – Add the eggs, 1 at a time. Beating in each one till combined. As soon as the last egg has been combined, stop beating. Scrape your bowl down to ensure everything has been mixed in. The mixture should be smooth and creamy, but you must not over-mix it.
5 – Pour the cream cheese mixture into your springform pan. Smooth out the top with an offset palette knife or spatula.
6 – Fill the roasting pan/baking pan with hot water, about 1 ½ inches up the sides of the springform pan. This is our water bath or baine-marie.
7 – Carefully place the entire roasting pan/baking pan (containing the springform pan and hot water) into the oven and bake for 1 full hour at 175-180OC.
8 – Turn off the heat, and keeping the oven door closed, let the cheesecake rest inside for 1 hour. Do not open the door before the hour is up.
When you’re pouring your cheesecake filling into your springform pan, don’t be alarmed if the batter comes almost to the top – it will only marginally rise, and the extra parchment lining will give your pan additional height. Because you’re using a water bath, your cake will cook evenly and gently, and sport zero cracks. Once it’s baked, don’t open your oven door for an entire hour. This will set your cheesecake fully and prevent it from sinking in the middle. When you do finally pull it out, it should look perfect. You could stop right there, but I like to elevate it further by brightening it up with a fresh, sweet-tart note. Keep reading.
Stage 3: Sour cream topping
Ingredients
1. 170 gm sour cream
2. ½ tbsp. castor sugar
3. ½ tsp vanilla extract
Method
While your cheesecake is cooling inside the oven, make your sour cream topping. Simply whisk the sour cream, sugar, and vanilla together until it’s all smooth. Keep aside.
Stage 4: Finale; last bake & chill
Components
1. 1 baked cheesecake rested in the oven for an hour (with the door closed)
2. Sour cream topping.
Method
1 – Remove the springform pan from the baking pan/roasting pan.
2 – Unwrap the foil-covering and discard.
3 – Apply the sour cream topping and evenly spread it on top of the cheesecake. You’re looking for a layer of topping that’s about 3-4 mm thick.
4 – Place the springform pan back into the oven (no water bath is required for this step) and bake it for 10-12 minutes at 175-180OC.
5 – Remove the springform pan from the oven. Your cheesecake needs to come to room temperature before you can refrigerate it. While it’s still warm, gently run a paring knife around the outside of the cheesecake to loosen the parchment from the sides of the pan. This prevents pulling, which can cause cracks as the cheesecake cools.
6 – Once sufficiently cool, cover the entire pan with plastic wrap and transfer it to the fridge. The plastic should not touch the surface of the cheesecake. Chill it overnight.
7 – Take the chilled cheesecake out of the fridge and release the springform pan. Thereafter, carefully strip away the parchment lining and discard it.
8 – Loudly sing ‘We are the champions’ for having created something this spectacular. Now eat!
To achieve the perfect cheesecake (taste-wise and visually), do try to follow this recipe to the tee. Make minor adjustments only if your oven runs hotter/colder than normal, or you’re using a 9 inch pan. To serve perfectly clean slices, dip your knife’s blade into a tall container of hot water, dry it off, and then cut downwards in one smooth motion. Wipe off the cake residue after each cut. Again; dip, dry, cut, wipe, repeat.
Bonus Recipe! Homemade Vanilla Extract
Ingredients
1. 240 ml unflavoured alcohol with ABV of 40% or higher such as vodka, rum, bourbon, or brandy
2. 5-6 vanilla pods
Materials
1. 250 ml capacity bottle with a rubber/vacuum seal
2. Small funnel
3. Sharp paring knife
Method
1 – Wash and dry your bottle. If it’s a heat-proof bottle, sterilise it with hot water.
2 – Hold down one end of a vanilla pod and slit it down the middle to expose the seeds inside. The pod will become a little slimy if it is poking above the level of alcohol, so cut it in half if necessary. Place the slit pod inside your washed and dried bottle. Repeat with the rest of the vanilla pods.
3 – Using a small funnel, fill the bottle with your chosen alcohol so that the pods are fully submerged.
4 – Seal the bottle and shake the hell out of it for a good 10-15 seconds.
5 – Store your bottle of vanilla extract at room temperature, away from direct sunlight. Do the shake-shake-shake once every 2 weeks and then place it back inside your pantry.
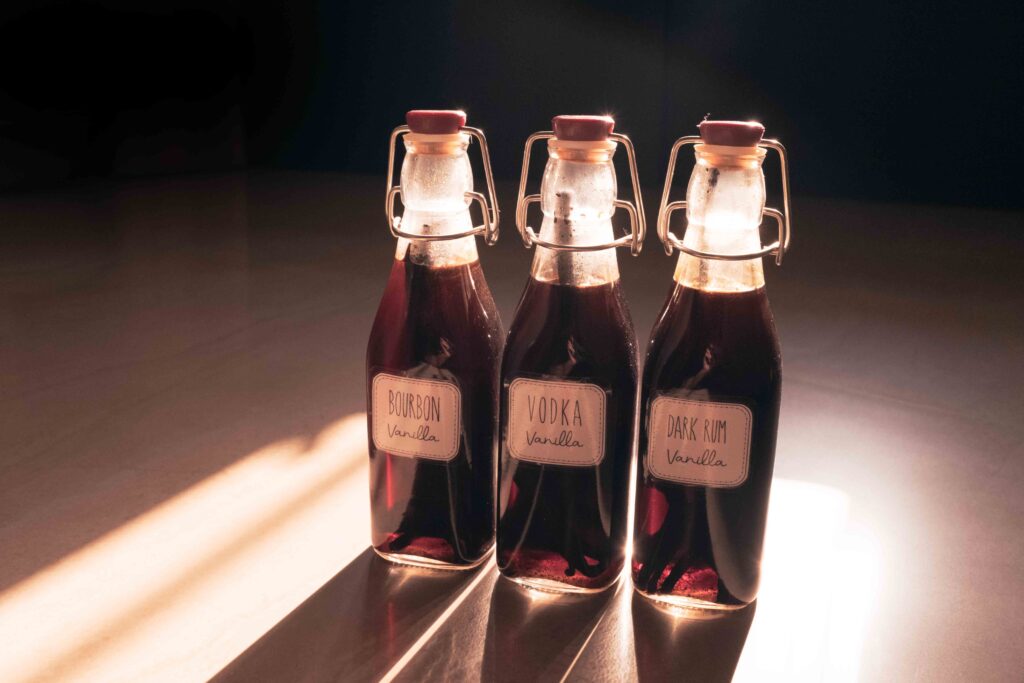
6 – If you have no patience, you can begin using your homemade vanilla after 2 months of steeping. However, for optimum flavour, wait 12 whole months like me!
I made 3 x 250 ml bottles of homemade vanilla extract, using plain vodka, dark rum, and bourbon. As long as you use a drinking alcohol with at least 40% ABV (alcohol by volume), feel free to use whatever alcohol you like. It’s wise to choose an alcohol that won’t obliterate the notes of vanilla with its own strong flavour. Once you start using your vanilla extract, remember to top it up with a little more alcohol, re-seal it, and then give it a good shake. Keep topping it up after every use, or until the extract loses its vanilla aroma – which means the pods have released all their flavour. Remember, if it still smells like vanilla, it’s still going to impart vanilla flavour to your dishes. To re-invigorate your extract, replace the old pods with fresh ones and resume the topping up + shaking up ritual.
Tips & Tricks
How to slice a cheesecake:
Pingback: Baked Mango Cheesecake -