


Makes 24 x 5 cm cookies.
Easy peasy, cookies cheesy. Made with just a handful of ingredients, these savoury cookies take such little effort and time, that you’ll be baking them a little too often. I must warn you though, as easy as they are to make, they’re even easier to eat. Buttery and crispy with punchy, umami hits of parmesan, warm notes of paprika, and the sweet zing of chives—they’re the perfect party appetizer or anytime snack for yourself. Remember to keep 3 or 4 cookies aside for yourself as soon as they’re out of the oven. Served with my flavour-packed red pesto, the entire batch of cookies tends to disappear as if by magic, in no time at all.
At a glance

– This recipe comprises parmesan cookies + red pesto.
– You will need a couple of baking trays, some baking parchment, a 5 cm scalloped cookie cutter, and a food processor,
– This recipe has been broken into 2 stages for ease and comprehension. Please read the entire recipe from start to finish before beginning.
Stage 1: parmesan cookies
Ingredients
1. 100 gm all purpose flour + extra for dusting
2. 100 gm parmesan
3. 100 gm cold unsalted butter
4. 1 large egg yolk (60 gm shell weight)
5. 1/8 tsp salt
6. 1 tsp sweet paprika
7. 1 ½ tsp mustard powder
8. 1 egg white for the egg wash
9. 1 tbsp. finely chopped fresh chives or 1 tsp dried chives
Prep
1 – Make sure your butter is very cold. Cut it into 1 cm cubes and keep it in the fridge for at least 6 hours or overnight.
2 – Separate your yolk from the white. Keep them aside in separate bowls.
3 – Finely grate your parmesan. Keep it aside in the fridge.
4 – Line your baking tray/trays with parchment. Keep aside.
Method
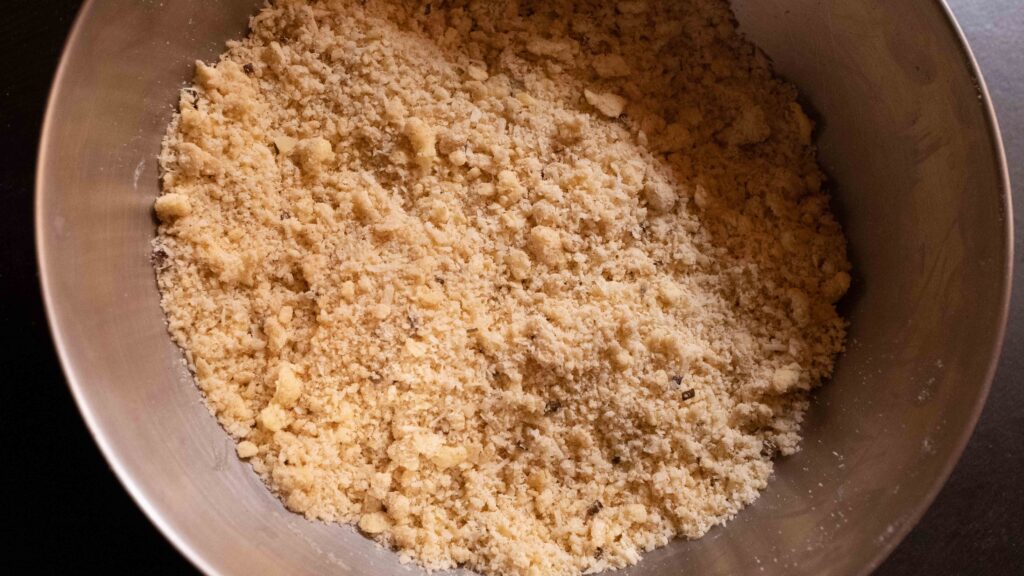
1 – Add the flour, grated parmesan, salt, sweet paprika, and mustard powder to a large bowl. Whisk together to combine all the dry ingredients.
2 – Add the cubes of butter to the dry ingredients and use a pastry cutter to ‘cut’ the butter into the dry mixture until you have the texture of coarse crumbs with pea sized dabs of butter. You could also use your hands to ‘rub’ the butter into the flour.
3 – Lightly whisk the egg yolk and then add it to the mixture. Stir it into the mixture with a fork.
4 – Using your hands, start gathering handfuls of dough and rubbing them together with your palms. The dough will begin clumping and coming together. Do not knead it.
5 – Spread a sheet of cling wrap on your counter and lightly flour it. Transfer the clumpy dough mixture onto it. Working quickly, form a dough by gathering the loose mixture together and packing it into a ball. Some loose crumbs are okay at this stage.
6 – Wrap the ball of dough in cling wrap. Using your hands, pat the dough into a rough disc, roughly 2 ½ cm thick. Try to pack the loose crumbs into the dough. Leave the wrapped dough to chill in the fridge for 30-60 minutes.
7 – After it has chilled, take the wrapped dough out of the fridge and lay it on your work surface. Open the cling wrap so that it’s flat on the counter and the rectangle of dough is smack in the middle of it.
8 – Lay another sheet of cling wrap on top of the rectangle of dough. Roll out the dough between the two sheets of cling wrap, to about 4 mm thick.
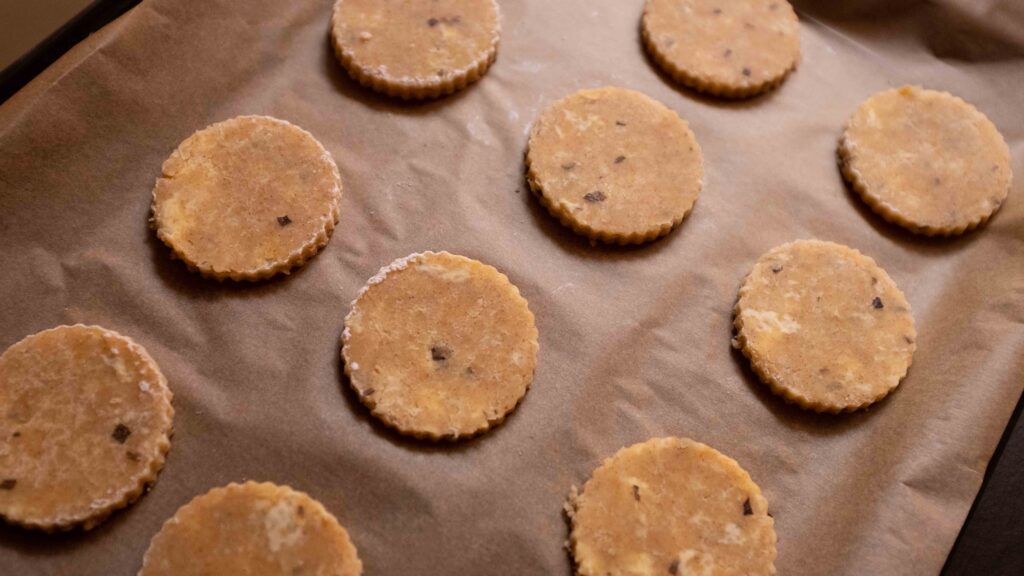
9 – Using your 5 cm cookie cutter, cut out as many cookies as you can get. I get 24-26 clean cookies. Remember to dip your cookie cutter in a bowl of flour after every 2 cookies, to prevent sticking. Transfer each cookie one by one onto your parchment lined baking sheet, leaving a 2 cm gap between each cookie. If one tray cannot accommodate all the cookies, use multiple parchment-lined trays (I used 2 trays). If the dough starts getting soft at any stage, place it in the fridge for 30 minutes. This is essential to keeping the shape of the cookies. Soft or melted butter in the dough means the cookies will disintegrate and lose their shape while baking.
10 – When you’re ready to bake your cookies, use a pastry brush to carefully glaze the top surface of each cookie with the egg white wash. Arrange a couple of fresh chives if you like. Place all your cookies in the fridge for at least 30 minutes.
11 – Start preheating your oven at 180OC.
12 – After 20 minutes of preheating, begin baking your cookies. Bake each batch of cookies in the middle rack of your oven for 15-20 minutes at 180OC, or until they are a gorgeous golden-brown colour and the delicious aroma of baked cheese wafts through your kitchen. Mine took exactly 16 minutes. While one batch bakes, keep the second unbaked batch in the fridge.
13 – Remove the tray from the oven and let it rest for 5 minutes. Then, using a palette knife, carefully transfer the cookies from the hot tray to a wire rack.
14 – Repeat steps 11-13 for both batches, remembering to pre-heat for at least 10 minutes with each new batch. Allow the cookies to cool to room temperature before devouring, or storing them in an airtight container.
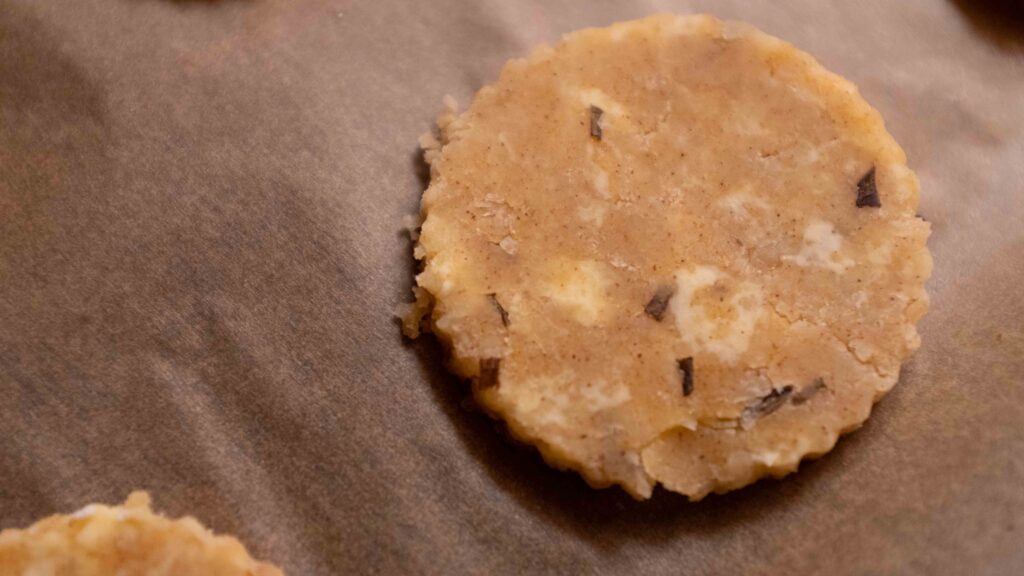
If you’ve never made pie dough or short crust pastry, you might find this recipe a tad challenging. Because this dough is suuuuuuper short and crumbly, you need a little patience and a cool environment to bring it together. Those bits of butter you can see in the dough? You want that because that’s what makes the cookies flaky and light. If the bits of butter start to melt and your dough gets too soft, you must chill it in the fridge for 30 minutes before working with it again. Because I live in hot and humid Mumbai, I always put together and roll out short crust pastry dough in an AC environment with the temperature set at 18-21OC. While I’ve added fresh chives to my cookies, you could substitute them for whatever you like; rosemary, thyme, or oregano also work really well. Once they’re baked, these cookies will keep in airtight container for a few days (if they last that long!). And while you could eat them as is, I highly recommend proceeding with Stage 2 and whizzing up a flavour-packed pesto to dollop onto the cookies. When eaten together, that’s when things get really special.
Stage 2: red pesto
Ingredients
1. 100 gm sundried tomatoes in oil (drained)
2. 150 gm ripe cherry tomatoes
3. 1 large red bell pepper, roasted
4. 70 gm roasted almonds (skin on)
5. 30 gm freshly grated parmesan
6. 2 small cloves of garlic
7. 60 gm Kalamata olives in oil (drained)
8. 2 tbsp. brined capers (drained)
9. ½ cup packed fresh Italian basil
10. ¼ tsp sweet paprika
11. ½ tsp freshly cracked black pepper
12. ½ tsp salt
13. 125 ml cup extra virgin olive oil or volumetric equivalent of oil drained from the sundried tomatoes and Kalamata olives
14. 1 tbsp. red wine vinegar
Prep
1 – Roast 1 large red bell pepper on the stove until the skin is blistered and charred. This will take about 15-20 minutes. Once blackened all over and soft, take it off the flame. Immediately place it in a bowl and cover the bowl with cling wrap. Leave the roasted pepper to ‘steam’ in the bowl for 15-20 minutes. Thereafter, slide off and discard the blackened skin, cut open the pepper and discard the seeds and stem, and then chop up the pepper into rough chunks. Keep aside.
2 – Using a skillet or pan, toast your almonds on low heat until aromatic and lightly browned. Keep aside.
Method
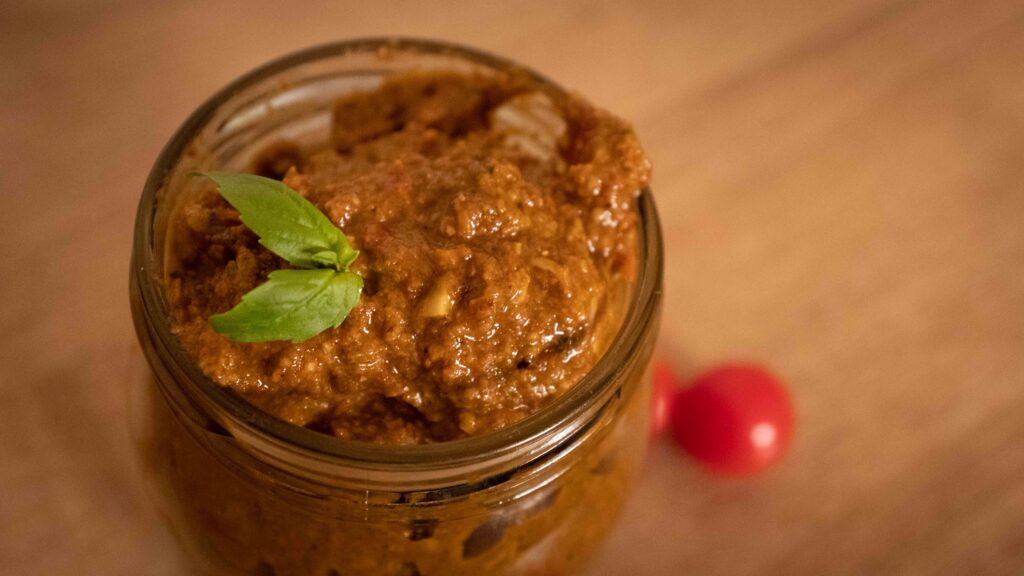
1 – In the jar of a food processor, place the sundried tomatoes, cherry tomatoes, roasted red bell pepper, roasted almonds, freshly grated parmesan, garlic, olives, capers, basil, salt, paprika, and black pepper. Pulse 2 to 3 times until coarsely chopped and chunky.
2 – Slowly drizzle in the extra virgin olive oil and pulse a few more times until the mixture is emulsified and you have reached the desired consistency. I like mine a little chunky. Remember to scrape down the sides as necessary.
3 – Taste the pesto and add additional salt and pepper if desired. Serve the pesto at room temperature with your parmesan cookies. Now eat!
This red pesto or ‘pesto rosso’ can be made well in advance and stored in the fridge for up to a week. This amount yields about 3 ½ cups, so you will have some leftovers depending on how much you polish off with your cookies. You can easily reduce the quantity of ingredients by a half or a third, but I like to make a large batch to keep on hand. Stirred into soups or used as a pasta sauce, this pesto packs bags of flavour. In topping or dip form, it can make even the driest cracker or crostini come back to life. The amount of salt specified in the pesto is perfect if you’re pairing it only with the Parmesan Cookies. Remember to add extra salt when using the pesto with pasta or any other neutral-tasting carbs.