

Makes one 10-11 inch tart
If you love French pastries, you’re going to fall hard for this dessert. Truth be told, even if you detest everything, you’ll love this. My husband once told me that he didn’t care for apple pie or marzipan. Imagine my horror. That’s until he tried this gloriousness, which brings together the best of the two classics. Yes, it takes an age and all of your patience—but just one bite will be enough to convince you that the painstaking effort was worth it.
At a glance
– This tart comprises a sweet shortcrust pastry + frangipane filling + apple slices.
– You will need a 10-11 inch fluted tart tin with a removable base, baking weights, and baking parchment.
– This recipe has been broken into 4 stages for ease and comprehension. Please read the entire recipe from start to finish before beginning.
Stage 1: Sweet shortcrust pastry
Ingredients
1. 170 gm all purpose flour, sifted + extra for dusting
2. 60 gm icing sugar, sifted
3. 1/8 tsp table salt
4. 113 gm cold unsalted butter
5. 1 large egg (57 gm) cold
6. ½ tsp vanilla extract
Prep
1 – Cut the butter into 1 cm cubes – keep chilled.
2 – Crack the egg, lightly beat it – keep aside, chilled.
3 – Weigh out your flour and sugar – keep chilled.
Keep all the ingredients chilled before starting. Yes, flour and sugar too if you’re in a hot and humid city like Mumbai.
Method
1 – In a large bowl, whisk together the flour, sugar and salt.
2 – Add the chopped butter to the bowl. Using a pastry cutter or two butter knives, ‘cut’ the butter into the flour until you achieve a texture akin to coarse cornmeal with dabs of pea-sized butter chunks distributed throughout.
3 – Add vanilla extract to the chilled beaten egg.
4 – Add the vanilla-egg mixture into the flour mixture, a little at a time, incorporating it with each addition. Mix with the knives in a cutting and scraping motion, till the dough comes together. It should feel crumbly but hold its shape when brought together in your fist.
5 – Transfer the dough to a very lightly floured surface. Form into a ball. Do not over-handle it.
6 – Wrap the dough in cling wrap and flatten it to form a thick disk. Chill in the fridge for 1 hour, or ½ hour in the freezer.
7 – While you wait, grease your tart pan and cut 2 parchment sheets large enough to cover the base and sides of your tart pan.
8 – Remove the wrapped dough from the fridge and let it sit for a minute or two.
9 – Lay down a sheet of parchment and lightly flour it. Place your dough on top of it and then place the second sheet of parchment on top. Roll your chilled dough between the two sheets of parchment until you get a circle, roughly 12 inches across and 1/8th inch thick.
10 – Using whatever means necessary (the rolling pin method works for me), lift the dough and gently lower and ease it into the tart tin, making sure not to stretch it. Use a ball of scrap dough like a makeup brush to ‘dab’ the dough into the tin’s fluted crevices. Trim off the extra overhanging pastry and seal any cracks with the scraps. .
11 – Lightly prick the base of the dough all over with a fork. Cover your tin with cling wrap and place it in the freezer for 30 minutes.
12 – It’s time to partially blind bake your pastry crust. Preheat your oven at 180OC for 20 minutes.
13 – Cut out a 12 inch parchment round. Scrunch the parchment round into a ball and then open it out. We’re making what is known as a cartouche. Take out your chilled tin. Place the wrinkled parchment round on top of the dough and then evenly weigh it down with baking weights. I use a mixture of dried kidney beans and raw rice for this purpose.
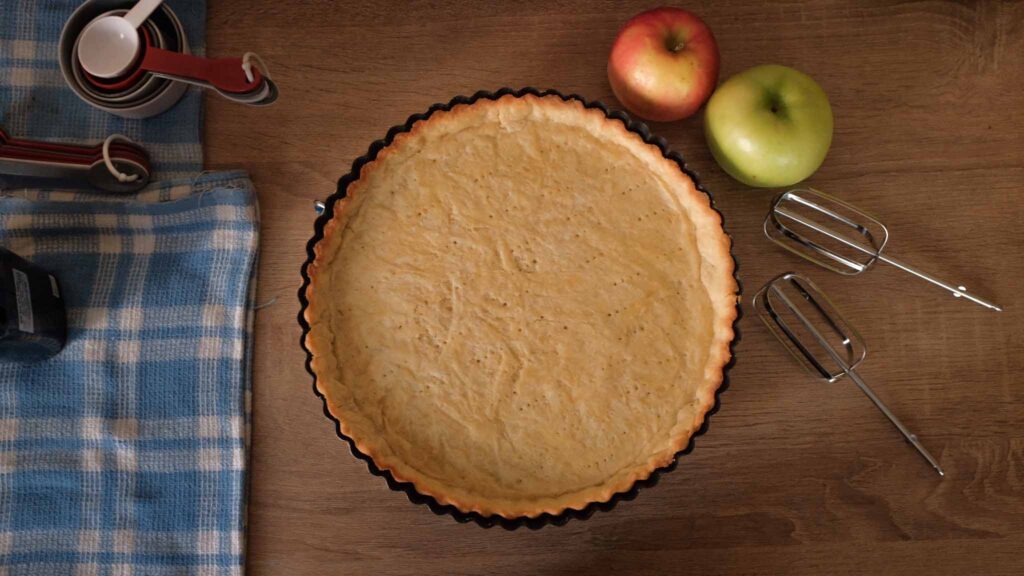
14 – Bake the pastry crust at 180OC for 20 minutes. Thereafter, remove the weights and parchment paper, and bake for an additional 5 minutes at the same temperature. This process is known as “blind baking” and keeps the pastry from getting soggy when the filling is added later.
15 – Remove your tin from the oven and cool it to room temperature on a wire rack. Do not remove the tart from the tin. This is your “tart shell”.
Hot and humid climate? Make your pastry dough in an air-conditioned environment. Work quickly. If it’s warm, use disposable gloves to prevent the transfer of heat from your hands. Pop the dough back into the fridge if you see the butter melting or the dough getting too soft at any stage. Make and blind-bake the crust in advance – cool the crust, keep it in its tin, wrap it in cling and store it in the fridge for up to a week in advance. Freeze leftover raw pastry dough. It keeps for 3 months!
Stage 2: Frangipane filling
Ingredients
1. 115 gm unsalted butter, softened to room temperature
2. 115 gm fine granulated sugar or castor sugar + 1 tsp. for sprinkling
3. 115 gm finely ground almond flour, sifted
4. 3 large eggs (171 gm) at room temperature
5. 1 tbsp. all purpose flour, sifted
6. 1 tsp vanilla extract
7. 1 drop almond extract
8. Pinch of salt, whisked into the all purpose flour
Method
1 – In a large bowl, combine the butter and sugar. Using an electric whisk, beat at medium speed until the mixture is creamy and pale.
2 – Switch to a spatula. Alternating between the eggs and almond flour, mix these into the butter-sugar mixture, using firm but few turns to incorporate.
3 – Sprinkle in the all purpose flour and fold it into the mixture. Take care not to knock the air out of the batter.
4 – Add the vanilla and almond extracts. Combine well (but gently).
5 – Cover and refrigerate this mixture until you’re ready to use it.
While your crust is cooling, make the frangipane filling and prep the apples. It can also be made a day in advance and kept in the fridge.
Stage 3: Apple slices
Ingredients
1. 1 Granny Smith apple
2. 1 Pink Lady apple
Method
Core and cut both apples into 3 mm thick slices. Do not peel.
I use two contrasting apples for colour, flavour, and texture. The sour velvety mouthfeel of the Granny Smith pairs beautifully with the crisp sweetness of the blushing Pink Lady. You’ll want to slice the apples right before you’re ready to use them to retain their colour and avoid oxidation. If you’re worried about browning, add a spritz of lime juice to the slices, toss, and then keep them aside, covered.
Stage 4: Finale; construction and final bake
Components
1. Blind baked tart shell (still in the tin)
2. Cold frangipane filling
3. Apple slices
4. Castor sugar/fine granulated sugar
5. Apricot glaze (made by diluting 1 tbsp. apricot jam with 1 tbsp. hot water)
6. 25 lightly toasted almond slivers (optional)
Method
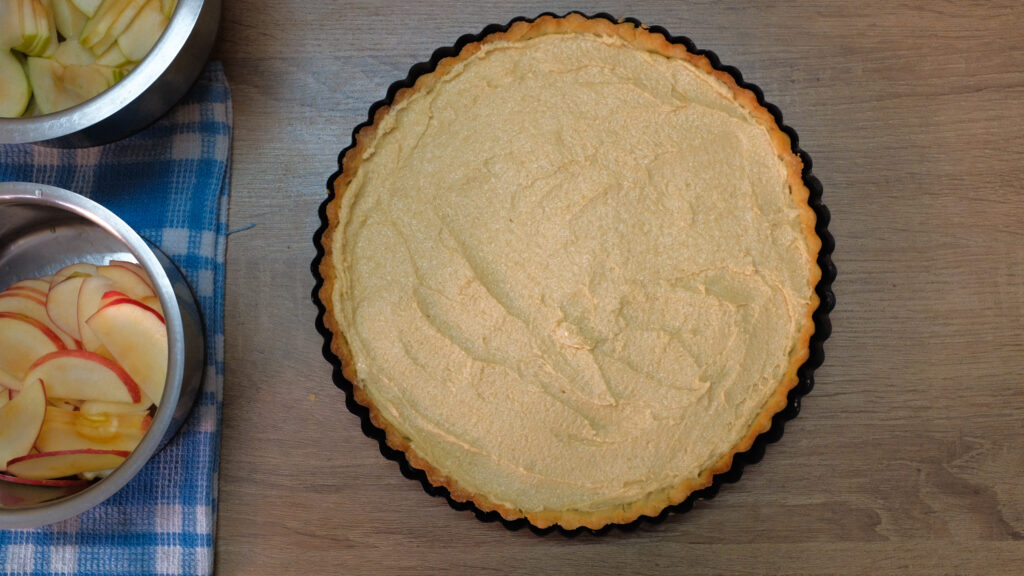
1 – Make sure your tart shell is no longer warm. Chilled is fine.
2 – Start pre-heating your oven at 180OC. 15-20 minutes is ideal.
3 – Dollop the cold frangipane filling into the tart tin, coming up 3/4th of the way.
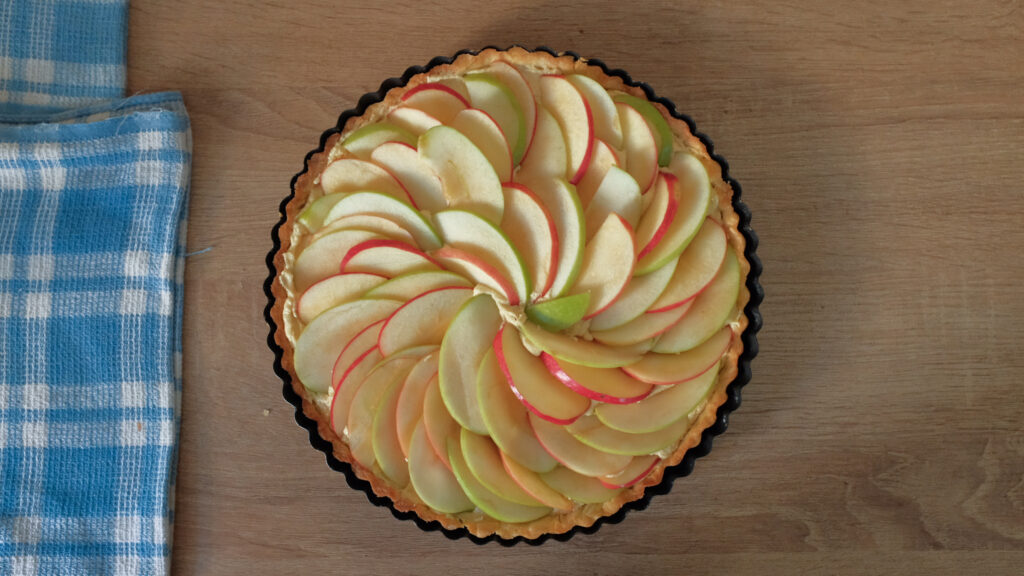
4 – Arrange the apple slices on top of the frangipane layer. Create whatever apple slice pattern you like, but be sure to alternate between the green and pink slices. I do an overlapping spiral, working from the inside out.
5 – Sprinkle a teaspoon or so of granulated sugar on top of the apple slices (optional).
6 – Keeping the tart in the tin, bake it at 180OC for 50-55 minutes or until the frangipane filling has risen a fair bit around the apple slices, and is a toasty golden-brown colour.
7 – Transfer the tart tin to a cooling rack. Cool to just warm. In the meantime, make your apricot glaze and toast your almond slivers.
8 – Glaze the surface of the apple slices with the warm apricot mixture and arrange the lightly toasted almond slivers onto the still sticky glaze.
9 – Carefully remove the tart from the tin when it’s no longer warm. Slice and serve immediately, or chill before slicing and serving. Now eat!
Did you know, chilling something mellows out its sweetness? That’s why ice cream tastes overly sweet in its melted state. We prefer eating this tart after it has chilled for a few hours in the fridge. All the individual almond and apple flavours get enhanced, the crust crisps up, and the perfect level of sweetness is achieved.
Tips & Tricks
How to make shortcrust pastry by hand:
How to transfer rolled pastry dough to a mould: