
")
")
")
")
Makes 6 burgers
If the Big Mac had an elegant cousin, this would be it. Juicy, tender and loaded with flavour, there’s a reason I call it “bigass”. Fully assembled, it stands at about 6 inches tall. However, because the bun is so soft, it squishes down oh so easily, adjusting itself to your mouth for the perfect bite. Love sharing? Hah! Like Barad-dûr, this dark tower of deliciousness will activate your lizard brain and have you fiercely protecting it while hissing out “my precious”.
At a glance

– This burger comprises burger buns + burger patties + extras
– You will need 6 metal rings; 1 ½ inch tall x 4 ½ inch across, and 6 “parchment paper collars”; 2 inch tall x 16 inches long. Click here to learn how to make your own rings out of aluminium foil.
– This recipe has been broken into 4 stages for ease and comprehension. Please read the entire recipe from start to finish before beginning.
Stage 1: Burgers buns
Ingredients
1. 90 gm water at room temperature
2. 1 tsp instant yeast
3. 90 gm whole milk at room temperature
4. 135 gm unflavoured vegetable oil
5. 2 large eggs (114 gm) at room temperature
6. 28 gm granulated sugar
7. 400 gm all purpose flour
8. 1 tsp bread improver powder, whisked into the flour
9. 1 ¼ tsp fine sea salt
10. Egg wash; 1 whole egg + 1 tbsp. water
11. 1/8th cup white sesame seeds for topping
12. Baker’s vegetable oil spray
Method
1 – In a large bowl, combine the water, whole milk, vegetable oil, eggs, granulated sugar, instant yeast, and half of the all-purpose flour. Stir the ingredients together till you get a thick batter.
2 – Whisk the sea salt into the remaining flour and it to the bowl. Fold the mixture together until you get a thick shaggy mass of dough.
3 – Using a scraper, tip the dough out onto your work surface. Your dough will be incredibly sticky. Don’t panic by adding more flour.
4 – Knead the dough; using one hand to flatten and spread it and the bench scraper to gather it back. Knead it like this for 4-6 minutes to develop the gluten.
5 – Once the dough comes together as a mass, start stretching and folding it with the aid of your bench scraper. This can take anywhere from 8-15 minutes depending on your brand of flour and how humid it is. You’re looking for a smooth and elastic dough, that’s strong enough to pull away from the counter in one piece. Don’t panic if it’s still slightly sticky after 15 minutes and don’t be tempted to add extra flour. Trust yourself and the process. Keep kneading till the dough is the correct consistency.
6 – Grease a big mixing bowl with vegetable oil. Form the dough into a ball and place it in the bowl. Lightly coat the dough ball in the oil and then cover the bowl with cling film. Ferment at room temperature for 1 hour until the dough grows 1 time its original size.
7 – Turn the fermented dough on a lightly oiled surface. Fold the dough in “thirds”; first from top to bottom, and then from left to right. Do this just once.
8 – Place the folded dough back in a lightly oiled bowl and oil the top of the dough as well. Cover the bowl in cling film again and let it ferment at room temperature for 1 hour until the dough grows 1 ½ times its original size.
9 – After the hour is up, turn the fermented dough onto a lightly oiled surface. Oil your hands and gently deflate the dough.
10 – Divide the dough into 6 pieces, weighing 125 grams each.
11 – Shape each individual dough into a tight round ball. Place your 6 balls on a lightly oiled surface and lightly spray the tops with oil. Loosely cover the dough balls with cling film and let them rest for 15 minutes at room temperature.
12 – Line your baking tray with parchment paper. Evenly space your aluminium rings on the tray and line the inside of each ring with parchment paper collar.
12 – Uncover the dough balls and lightly sprinkle the tops with flour. Reshape each ball into a tight round shape and place each ball into the centre of a ring.
13 – Lightly spray the tops of the buns with some vegetable oil and loosely cover the tray with cling film. Proof the buns for 1 ½ hours or until they triple in size.
14 – When you have 15 minutes remaining on your proofing time, start pre-heating your oven to 190OC.
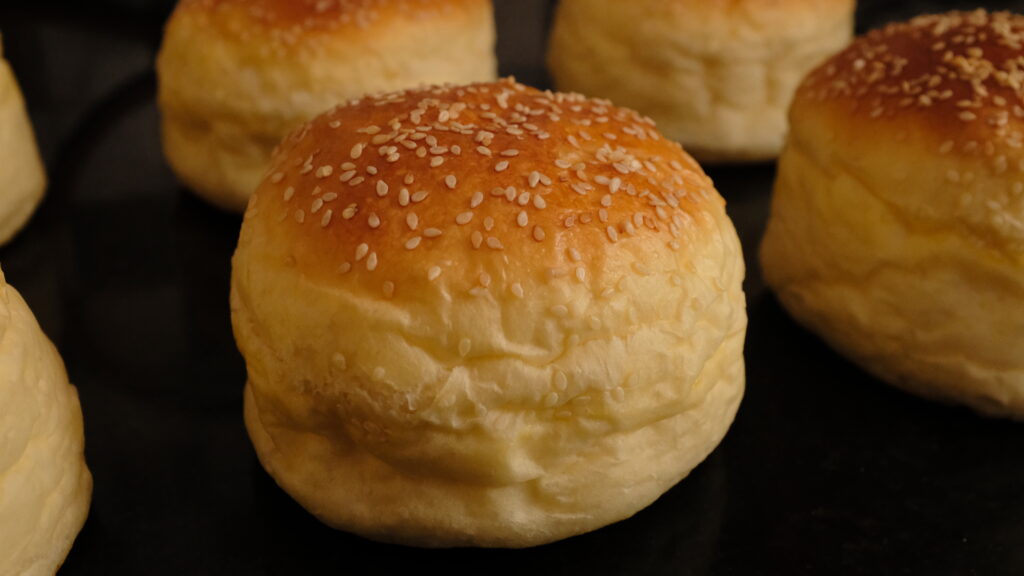
15 – Using a pastry brush, very gently brush the tops of the buns with the egg wash. Evenly sprinkle the wet tops with sesame seeds.
16 – Your oven should have been preheating for 20 minutes now. Place your buns inside the oven and bake at 190OC. for 14-16 minutes or until the tops are a glossy, golden brown. Depending on your oven, you might need to turn your tray at the halfway mark for even heat distribution and browning.
17 – Remove your tray from the oven and place it on a wire rack to cool. Use the burger buns when they’re completely cool for the softest texture and best flavour.
Because of the fermentation times, it literally takes half a day to make these. And while baking bread from scratch is definitely challenging, these Big Mac style buns with their evenly airy crumb texture are infinitely superior to generic store bought buns. Give it a go once, just for the joy of the crumb! While these taste amazing fresh out of the oven, the tops will be crusty and will be difficult to squish down when you’re trying to get a bite of all the burger layers. I recommend letting them rest overnight to soften a bit. I made the buns a day in advance and stored them at room temperature in an airtight container. You can pop them in the fridge for a few days as well, and bring them to room temperature before using.
Stage 2: Extras
Ingredients
1. Lettuce leaves (I use Romaine)
2. Sliced tomatoes
3. Ham slices/cooked bacon rashers
4. Thickly sliced cheddar cheese
5. Seared onion rondels (in a hot pan, quickly grill some onion rondels with salt and pepper. You’re looking for quick caramelisation, where the onions retain their crunch but no longer taste savagely raw)
6. Dill pickle slices
7. Mustard and mayonnaise
8. Salt and pepper
There are no rules when it comes to burger accompaniments. The above list of ingredients is simply what we like in our house. You can prep whatever your palate prefers. Prep your toppings and keep your condiments ready before you move on to Stage 4.
Stage 3: Burger patties
Ingredients
1. 375 gm pork mince
2. 375 gm beef/buff mince
3. 1 large egg (57 gm)
4. 1 tbsp. Worcestershire sauce
5. 1 small red onion, very finely diced
6. 2 fat garlic cloves, very finely crushed
7. 2 tbsp. smoked paprika
8. Salt and pepper for seasoning
9. High smoking oil for frying
10. 6 thick American cheese slices
Method
1 – In a large bowl, combine all the ingredients except for the salt, pepper, the cheese, and the oil. Using your hand or a wooden spoon, stir everything together till it’s all combined and just comes together as one. Don’t knead or overwork the mix.
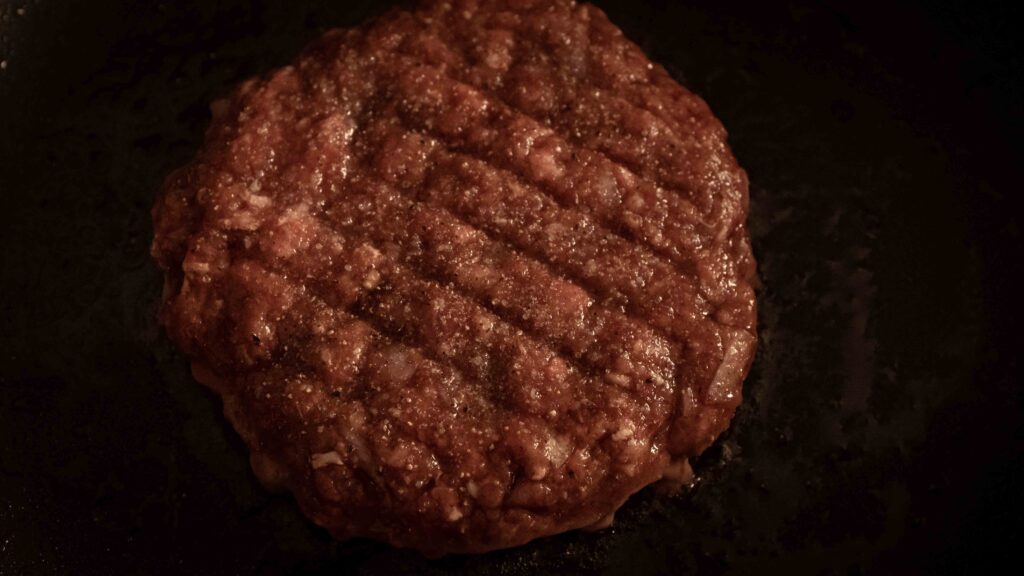
2 – Divide the mixture into 6 portions and form even, compact patties. A burger press is useful for this as there’s no fiddling and fussing around with the meat (the less you touch it, the better). Remember, your burger buns are 4 ½ inches across, so you want patties that are 3/4th of an inch thick and 5 ½ inches across to account for shrinkage while cooking.
3 – Generously season both sides of your patty with salt and pepper and then, using your index finger, make a shallow indent in the centre of the patty. This prevents the surface from bulging in the middle while cooking (although I have never needed to do this).
4 – Heat a cast iron skillet (or any high-heat pan) to medium-high. When the pan is hot, add a glug of oil and then put in the patties one by one, indent-side up.
5 – Sear the patties for 5 minutes on one side (covered). Flip the patties when you see juices beginning to pool on their tops. Sear for another 5 minutes (covered).
6 – Remove the lid, apply the cheese slices on top of the patties and cook for an additional minute, or until the cheese is melty and the internal temperature of the patty is about 75OC. Remove the patties from the pan, and rest them for at least 5-7 minutes.
I use a 1:1 pork to buff ratio because we like how the pork brings a fatty sweetness to lean structure of the buff (Indian cattle is the Twiggy of the bovine world). This hybrid also allows for more diverse toppings, condiments and sauces. You can use whatever meat you like, but the cook time will change for say, a chicken burger patty, which must be fully cooked through. An internal temperature of 75OC for our patties gives a medium to almost well-done burger. I don’t risk rare in our house. If you’re somehow left with extra patty mix, reshape and freeze it for another day. These patties hold their shape and texture really well. Simply thaw them to room temperature before searing.
Stage 4: Finale; the construction
Components
1. Burger buns, slit in half, buttered and toasted and grilled, butter-side down (do this in the last 2 minutes that the patties are cooking)
2. Burger patties
3. Everything from Extras (Stage 2)
Method
Much like a building, there’s a correct way to construct a steady burger. Always layer your ingredients so that the structure doesn’t topple or get soggy. Here’s how I do it — starting from the bottom to the top.
1 – Toasted bun bottom
2 – Lettuce leaves
3 – Sliced tomatoes
4 – Sprinkle of salt and pepper
5 – Thick slice of cheddar cheese
6 – Dollop of mayo
7 – Warm burger patty
8 – Ham slice/cooked bacon rashers
9 – Dill pickle slices
10 – Seared onion rondels
11 – Dollop of mustard
12 – Toasted bun top
After all that work, you’ve more than earned the 650 calorie (at least) burger towering before you. These burgers taste best, freshly made. If you don’t plan to scarf down your burger immediately, keep a skewer handy to hold it all in place.
Inspiration for buns: