


Makes 12 standard sized cupcakes.
I used to cringe at caramel. But after making my own batch, I realised it gets a bad rap because the commercially made stuff is too sweet. There are five (whaaaat?) types of caramel flavours in this cupcake—molasses, butterscotch, “caramelised” milk, “caramelised” white chocolate, and finally, true caramel. It’s utterly decadent without being utterly sweet. Flecked with savoury hits of salt, and just a shade bitter, this is a cupcake that will carry your taste buds all the way to the coveted land of umami.
At a glance
– This recipe comprises butterscotch cupcakes + Dulce de Leche filling + whipped blonde chocolate ganache + salted caramel sauce
– You will need standard cupcake liners, a standard 12-cup cupcake pan, (or individual moulds), some piping bags, and a large star piping tip.
– This recipe has been broken into 5 stages for ease and comprehension. Please read the entire recipe from start to finish before beginning.
Stage 1: butterscotch cupcakes
Ingredients
1. 115 gm unsalted butter, at room temperature
2. 200 gm dark muscovado sugar
3. 100 gm white granulated sugar
4. 2 large eggs (114 gm), at room temperature
5. 190 gm all purpose flour
6. 3/4th tsp baking powder
7. ½ tsp salt
8. 120 ml milk (whole, not low-fat)
9. 1 tsp vanilla extract
10. 50 gm butterscotch candy bits
Dark muscovado sugar or ‘dark khandsari’ with its strong molasses flavour and deep brown colour, is essential to this recipe. Using regular dark or soft brown sugar will not give you the same rum-like notes of caramel. When procuring butterscotch candy bits, please ensure that they’re baking grade, which means they will stand up to oven temperatures.
Prep
1 – Smash the butterscotch candy bits into little chunks. It’s nice to have a mix of both chunky and fine bits.
2 – In a medium bowl, combine the flour, baking powder, and salt. Sift them together and keep aside. This is your dry mixture.
3 – Line your cupcake pan or individual moulds with cupcake liners. Keep aside.
Method
1 – Start preheating your oven at 175OC.
2 – Place the butter and two types of sugar in a large bowl. Using a handheld mixer, cream the butter and sugars together on high speed for roughly two minutes. The mixture should be light and fluffy.
3 – Add in the eggs one at a time, and beat at high speed for roughly 20 seconds with each new addition.
4 – Add the vanilla extract and beat for another 20 seconds. Remember to periodically scrape down the sides of the bowl to ensure that everything is being mixed properly. Put the mixer down.
5 – Add the dry mixture to your bowl. Turn your mixer down to the lowest speed and begin to mix. Keeping the mixer on low speed, slowly pour in the milk. Once just-combined (you should see no floury pockets or liquidy pools), stop mixing the batter! Overmixing will result in a dense, stodgy cupcake.
6 – Tip in the butterscotch candy bits and gentle fold them into the batter with a spatula.
7 – Spoon this batter evenly into your 12 cupcake liners. Fill each liner only half way full (roughly 2 ½ tablespoons of batter per cupcake liner).
8 – Bake for 22-28 minutes at 175 OC. For perfectly even heating, rotate your pan at the 11 minute mark. Be sure to check for doneness at the 20 minute mark; that is, if a bamboo skewer inserted in the middle of a cupcake comes out clean, they’re done.
9 – Remove the pan from the oven and cool it on a wire rack. Don’t remove the cupcakes from the pan till they come to room temperature. Once no longer warm, your cupcakes are ready for the next stage. Store them in an airtight container while you move on to Stage 2. If you don’t plan on filling and frosting your cupcakes immediately, keep them in an airtight container in the fridge. They will stay fresh(ish) for 3 days, although you will lose some moistness. Bring them back to room temperature before proceeding with any of the other stages.
Dulce de Leche is a Latin American origin confection that is made by slowly heating sweetened milk until it becomes the colour and consistency of “scoopable” caramel sauce. Homemade Dulce de Leche is a lot sweeter than the slow-simmered original, but it’s a close substitute. And while it looks like caramel and even tastes like caramel, it’s not caramel! Instead, it gets its colour and flavour by way of the ‘Maillard reaction’. See this to know more. Nervous about making it? Watch this video for a quick tutorial.
Ingredients
1. 200 gm can of sweetened condensed milk (must be still sealed in the can)
2. ½ tsp coarse salt
Materials
1. A pot that will fit the can fully submerged
2. Enough water to submerge the can by 2 inches
3. A kettle or vessel with at least 1 ltr of hot water
4. Large tongs
Method
1 – Remove any paper or plastic labels from your can of condensed milk.
2 – Take a large, heavy-bottomed pot. Place the can, standing, in the centre of the pot.
3 – Fill the pot with enough water to submerge the can by 2 inches.
4 – Set the pot to boil on high. As soon as the water begins to boil, lower the flame to minimum. Using tongs, carefully turn the can on its side and continue “cooking” the can for 3 hours. You will need to check the pot every half hour, to make sure that the can remains submerged by at least 2 inches of water at all times. Top up the level with hot water as needed.
5 – After 3 hours, turn off the stove. Remove the can from the water and let it come down to room temperature naturally. This may take 1-2 hours.
6 – Open the can and stir in the coarse salt. Keep this mixture in a sterilised airtight jar until it’s ready to be used.
This quantity of sweetened condensed milk yields enough Dulce de Leche to fill 24+ cupcakes. You will need roughly 12-14 teaspoons worth for the cupcake filling in this recipe. I make my Dulce de Leche in advance, and keep it refrigerated, ready for use, anytime. Leftovers make for a great spread on toast and will last indefinitely in the fridge or your pantry cupboard.
Stage 3: whipped blonde chocolate ganache
Part 1 – Turn your white chocolate, blonde
If you have blonde chocolate on hand, you can skip Part 1 entirely. Otherwise, like the rest of us mortals, you will need to “caramelise” white chocolate until it becomes blonde. Why have I put caramelise within double quotation marks? Because chocolate can’t actually be caramelised. Caramelising involves high heat, which would flat out burn it. In truth, white chocolate becomes caramel coloured & flavoured due to the ‘Maillard reaction’. So, it would be more accurate to say we’re “Maillarding the chocolate”! See this to know more. In this step, you’ll subject your chocolate to prolonged heating. That’s why it’s essential to use high quality couverture chocolate. Compound chocolate or candy melts will not work, as they will get dry, chalky, and burn. Clueless about “caramelising” chocolate in the microwave? Watch this video for a quick tutorial.
Ingredients
200 gm high quality couverture white chocolate (30-36% fat content)
Method
1 – Chop the white chocolate into small shards.
2 – Place the chopped chocolate in a medium microwave-safe bowl and set your microwave’s power to 900 watts.
3 – Microwave your chocolate for 60 seconds. Pull out your bowl and give it a stir. Your chocolate should be completely melted.
4 – Keep returning the bowl of melted chocolate to the microwave for 30 seconds at a time; stirring between each additional 30 seconds. What you’re aiming for is a colour and texture akin to very smooth and runny peanut butter. I had to return my bowl to the microwave 60 times to get the desired colour and consistency! That’s 60 x 30 second bursts. Depending on your microwave, you may be able to do it faster/slower. As your chocolate gradually browns, it will go through some massive textural changes; thickening, catching, drying out, become grainy and eventually re-emulsifying. Do not panic, this is perfectly normal. As long as you use top quality chocolate, heat it for just 30 second increments, and stir well after each increment, nothing will burn and all will be well.
5 – When you reach the desired consistency, line a small, shallow baking tray with some parchment. Pour your hot “caramelised” white chocolate into the parchment lined tray and leave it in a cool dry place to solidify overnight. Do not refrigerate. It won’t become solid like a chocolate bar, as it has not been ‘tempered’ correctly, but it will be perfectly fine to use in a ganache. Once it’s solid, your blonde chocolate is ready.
Part 2 – Make your ganache
Ingredients
1. 200 gm homemade blonde chocolate or 200 gm high quality couverture blonde chocolate
2. 85 gm heavy cream at room temperature
3. ½ tsp vanilla extract (leave out, if your chocolate already contains vanilla)
4. ½ tsp salt
Method
1 – Chop the chocolate into small chunks. Pour the heavy cream onto the chocolate chunks.
2 – Microwave this mixture at 450 watts for 30 seconds. Stir briefly with a spatula and then microwave it for another 20 seconds. Thereafter, keep microwaving the mixture in 10 second increments till the chocolate has completely melted into the cream. Make sure to stir between each additional 10 seconds. You’re looking to achieve a glossy, creamy emulsion with zero lumps.
3 – When your ganache has reached the correct consistency, stir in the vanilla and salt.
4 – Cover your bowl with cling wrap, making sure to press the plastic down onto the surface of the ganache. Let it rest on your counter until it cools to room temperature.
5 – Once at room temperature, place the covered bowl inside the fridge, where it will need to set until it gets to the spreadable consistency of peanut butter. I like to chill mine overnight.
Part 3 – Whip your ganache
1 – When you’re ready to frost your cupcakes, take the ganache out of the fridge and let it sit on your counter for 5 minutes or so. Stir the mixture with a spatula to ensure that it’s smooth and homogenous.
2 – We’re now going to transform that gooey beige paste into a fluffy, light, caramel-coloured frosting. Using the whisk attachment on your handheld mixer, start at low speed and then whip the ganache on high for 30-60 seconds, depending on how quickly the mixture becomes fluffy, light, and holds its shape.
3 – Your whipped blonde chocolate ganache is now ready to be piped. If you’re not going to frost your cupcakes right away, keep it covered in an airtight container in the fridge for up to 2 days. When you’re ready to frost, you will need to take it out of the fridge and let it sit until it’s at a pipeable consistency again. If you’ve lost some volume, you can lightly re-whip it for 10-15 seconds.
White chocolate ganache is usually made in a chocolate to cream ratio of 3:1, or 4:1 for extra stability in hot and humid weather. Blonde white chocolate ganache is made in a chocolate to cream ratio of 5:3, or 5:2 in hot weather. When working with chocolate, always take your time. Be mindful. Be vigilant. Be patient! Ganache frostings take a lot of effort and you could frost your cupcake with anything really. But take my word for it; a ganache frosting is infinitely superior to any kind of buttercream frosting.
Stage 4: salted caramel sauce
Ingredients
1. 220 gm white castor sugar
2. 120 ml water
3. 245 ml heavy cream at room temperature
4. 1 tsp vanilla extract
5. 1 heaped tsp coarse salt
Method
1 – Combine the vanilla and cream in a small jug.
2 – Take a large, heavy-bottomed steel saucepan. Put in the sugar and water and give it a stir.
3 – Place the saucepan on medium heat. You can stir the mixture at this point to encourage the sugar to dissolve. Once the sugar has dissolved, stop stirring and pop the lid on. This is the easiest way to prevent your mixture from crystallizing, as the condensation formed will drip down and melt any stray sugar particles on the sides of your pan. If you’re worried about uneven heating, swirl the entire pan on the hob. Do not stir wet caramel. Ever.
4 – Watch your saucepan like a hawk, lifting the lid to peek at the mixture every now and again. Once the water has completely boiled away, and the remaining sugar is a pure, clear liquid (160OC), lower the heat to minimum and take the lid off.
5 – As soon as the caramel turns amber (170-173OC), start paying close attention to the pan.
6 – Once the caramel is a nice medium-dark amber, (174-176OC) get ready to act. It doesn’t take long for caramel to go from sickly sweet, to perfectly bitter sweet, to burnt and unusable. We’re going to push the colour and flavour of the caramel right to very edge.
7 – When the caramel goes a dark amber colour (180 OC), take the pan off the heat. Mixing continuously, very slowly and carefully trickle in the cream (it will bubble and steam like crazy). Continue mixing, until you have a smooth, homogenous, velvety sauce.
8 – Lastly, add the coarse sea salt and stir until it’s fully dissolved. The sauce is ready. Bring it to room temperature before using.
9 – Once cooled, store it in an airtight jar.
If you’ve never made caramel before, read this and this. The amounts mentioned here yield enough salted caramel sauce to drizzle over all of your cupcakes and still have loads to spare. Store leftover sauce in a sterilised airtight container in the fridge, and it will keep indefinitely. Pour it on ice cream, whipped cream, yoghurt, just about anything that strikes your fancy.
Stage 5: Finale; cupcake construction & assembly
Components
1. Butterscotch cupcakes
2. Dulce de Leche
3. Whipped blonde chocolate ganache
4. Salted caramel sauce
Prep
1 – Transfer ½ cup of Dulce de Leche into a small piping bag. Keep it ready.
2 – Transfer ¼ cup salted caramel sauce into a small piping bag. Keep it ready.
3 – Re-whip your blonde chocolate ganache if it’s lost some volume. Transfer it to a large piping bag with a star piping tip. Keep it ready.
4 – Keep an apple corer handy. If you have a cupcake corer, even better!
Method
1 – Using an apple corer, go 2 ½cm downwards into the cupcake and remove its core. Take care not to go in too deep. Repeat for all 12 cupcakes. Don’t discard the tops! They’ll come in handy in a bit.
2 – Snip off the tip of your Dulce de Leche piping bag. Squeeze about 1 teaspoon’s worth into each cupcake cavity or until the filling just reaches the top.
3 – Trim the cored-out cupcake tops to a height of 1 cm. Plug the cupcakes with the shortened tops (and eat the scraps, you’ve earned it!).
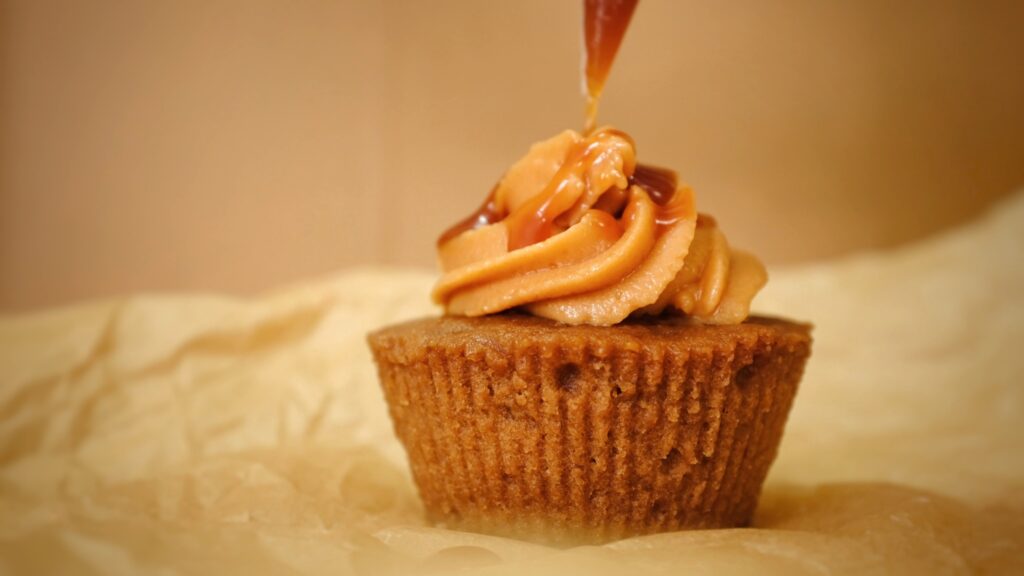
4 – Pipe a generous serving of frosting onto your cupcakes. Watch this to see how to frost a cupcake.
5 – Snip off the tip of your salted caramel piping bag. Drizzle each frosted cupcake with as much caramel as you like. You’re done!
Fully constructed, these will hold up relatively well at room temperature, although the whipped ganache frosting will get a bit flat and weepy on a hot and humid day. For best results, core and fill all the cupcakes ahead of time, but apply frosting and caramel sauce only to the cupcakes you’re going to eat immediately.