


Makes 4 servings
Summertime in Bombay is a heat-stroke waiting to happen. Thankfully the folks in these parts have found a way to beat the heat. Behold, nature’s twin coolants—coconut and kokum! Blitzed together, they form ‘Solkadi’ a magic potion that is 99% cold beverage and 1% spicy curry. In this episode of How I Hate the Stove in Summer, I’ve made a light entrée—where I’ve treated this chilled, tangy concoction as a dressing to accompany a quick pan-seared salmon, raw salad components, and some very cool home experiments with molecular gastronomy. Intrigued? Scroll on!
At a glance
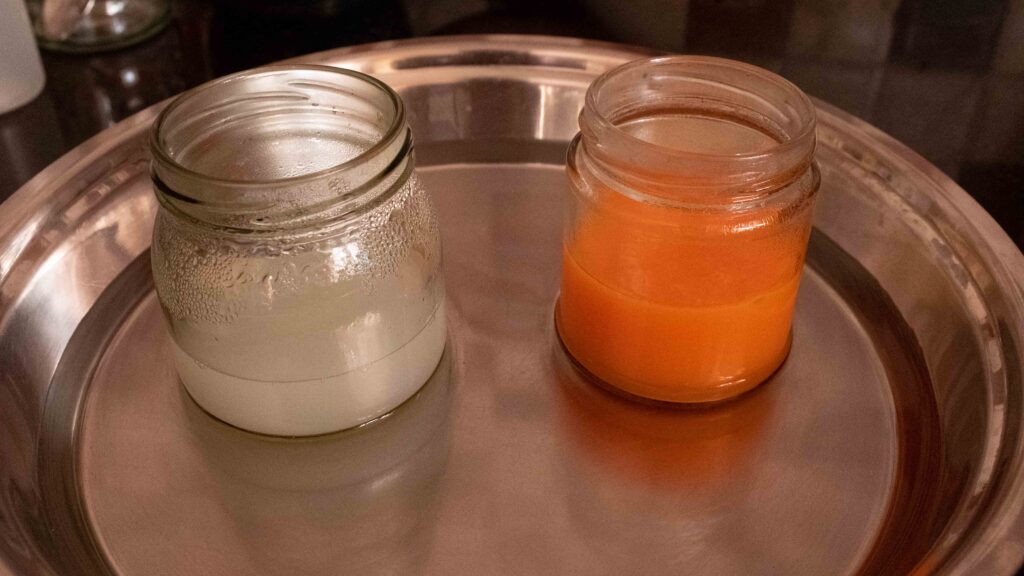
– This dish comprises pan-seared salmon + solkadi + coconut water caviar & mango juice caviar (optional) + fresh fruit, veg, greens and herbs.
– You will need a blender, some muslin/cheesecloth, a large fine-meshed sieve, a large non-stick frying pan, some tall glasses, and some squeeze bottles.
– This recipe has been broken into 5 stages for ease and comprehension. Please read the entire recipe from start to finish before beginning.
Stage 1: Solkadi
Consumed during Summertime in Maharashtra (and all along the Konkan coast), Solkadi/Kokum Curry/Goan Sol/Kokum Kadhi is the ultimate cold brew. Seasoned with cumin and black salt, it works like a digestif and can be served with or after a meal.
Ingredients
For the freshly extracted coconut milk:
1. 300 gm grated coconut flesh (from 1 medium-large mature coconut weighing 1-1.5 kg)
2. 500 ml plain water
For the kokum concentrate:
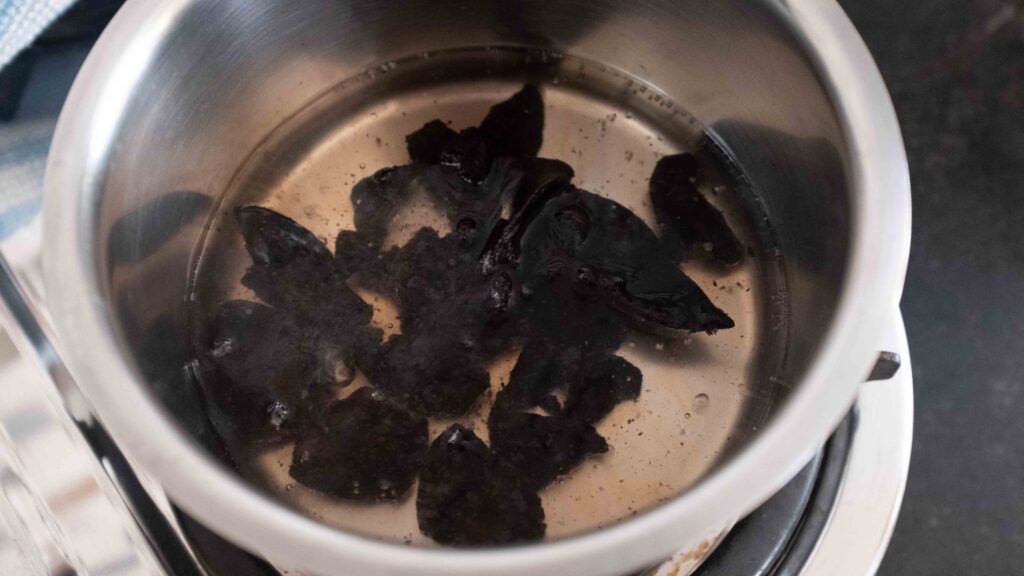
3. 15-20 wet kokum petals
4. 250 ml plain water
To mix with the concentrate:
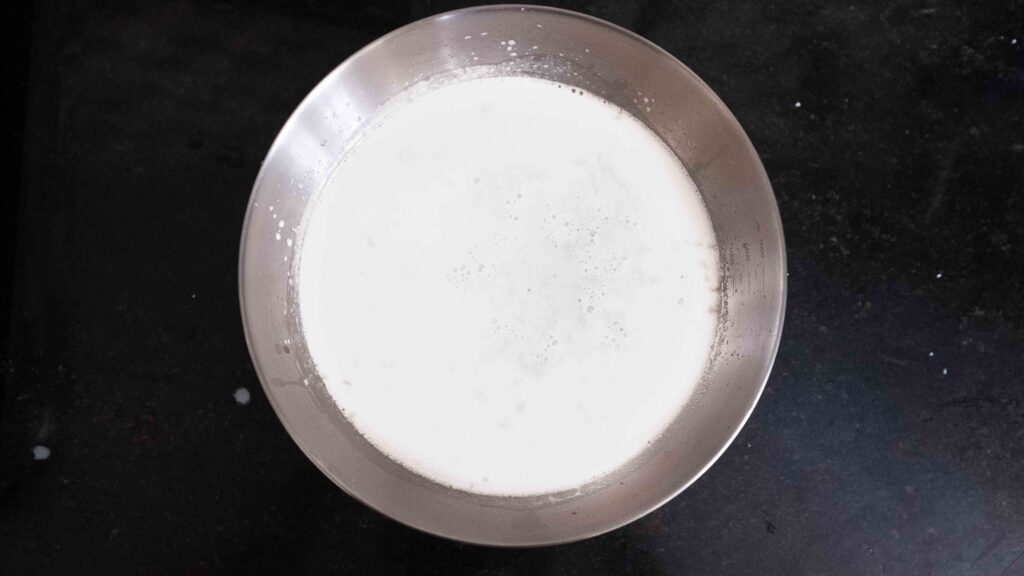
5. Freshly extracted coconut milk (roughly 650-700 ml)
6. 1 tsp cumin powder
7. 1 tsp sugar
8. ½ – ¾ tsp black salt
9. 150-250 ml plain water
10. 1 medium green chilli, slit in half
11. ¼ cup fresh coriander, finely chopped
For the tempering:
12. 2 tsp. vegetable oil
13. 1 tsp black/brown mustard seeds
14. 1 tsp cumin seeds
15. 10 fresh curry leaves
16. 1 medium clove of garlic, finely sliced
For this recipe, I use 50% thick milk (first extract) and 50% thin milk (second extract). When extracting coconut milk, always use room temperature water, as hot water will cook the coconut milk and neutralize the fresh taste. Watch this video to see how to extract fresh coconut milk. I can buy freshly grated coconut in my location, but if you cannot, you’ll have to break your coconut open, cut out the white flesh and then grate it. Here’s how. Remember to break the coconut open over a bowl to catch all the delicious coconut water. Drink it up immediately as a reward for your coconut-cracking skills. A medium-large coconut can weigh anything from 1-1.5 kg and yields anywhere from 280-380 gm coconut flesh, so buy your coconut accordingly. Keep in mind that freshly extracted coconut milk spoils very quickly and should be stored in the fridge and consumed within a day. Do not use packaged coconut milk to make solkadi as it is heat-treated to extend its shelf life, so it doesn’t taste fresh (or very nice) when consumed raw. Save the UHT or non-homogenised canned coconut milk for cooking! Most importantly, when sourcing your kokum, make sure the petals are of the wet variety and very fresh. Old petals will lack flavour and sourness—and they won’t import much colour either—resulting in an insipid Solkadi.
Prep
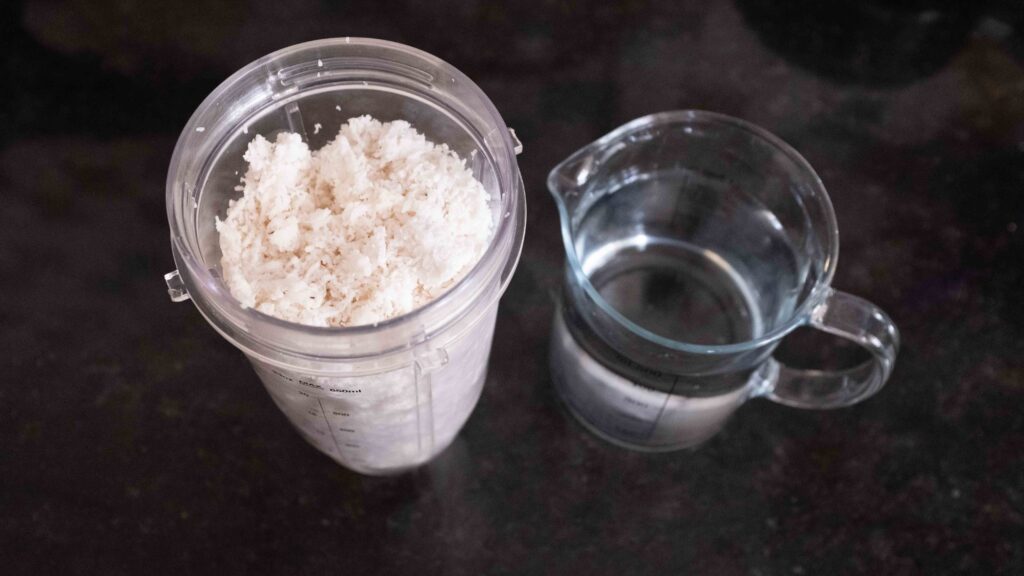
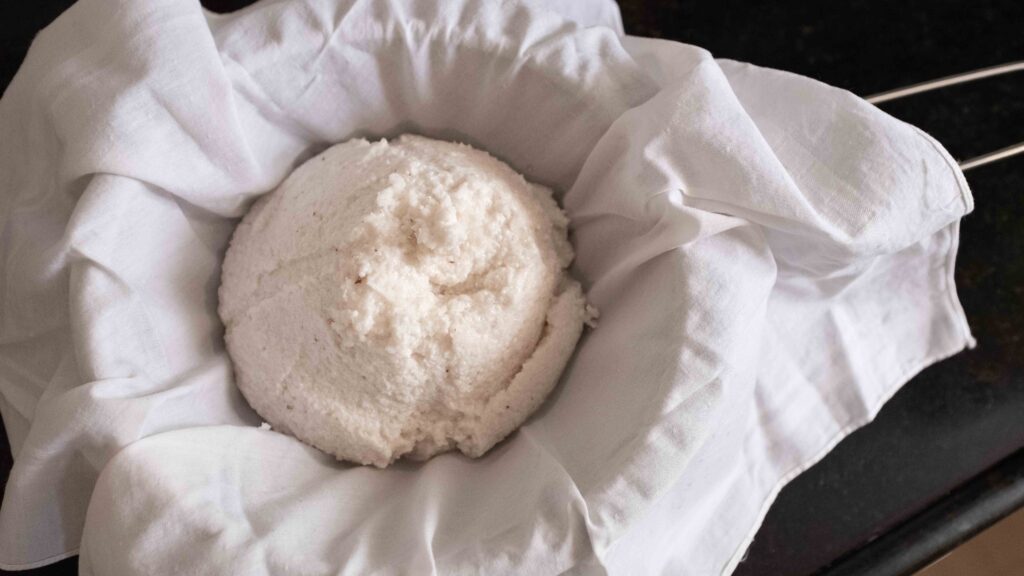
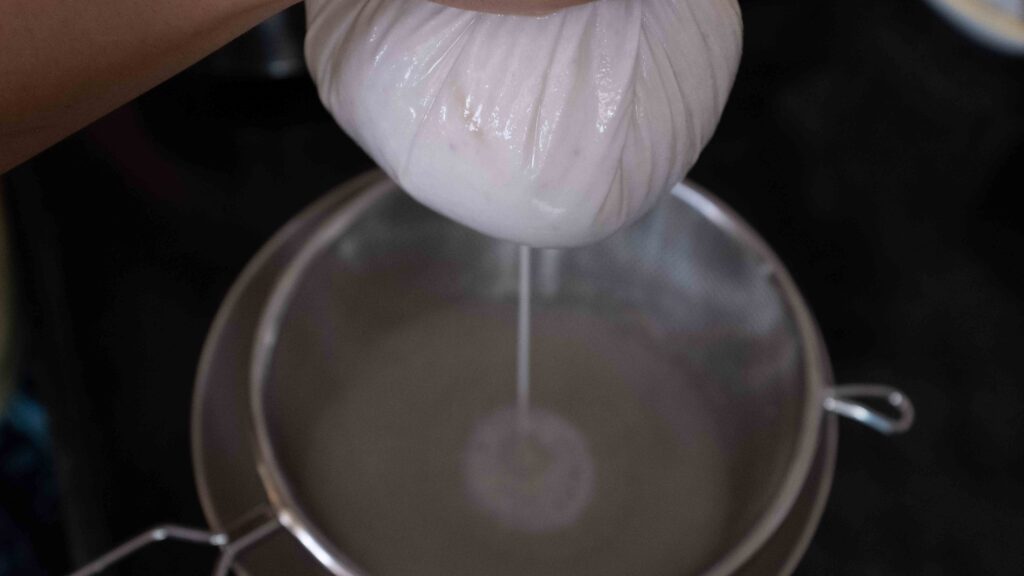
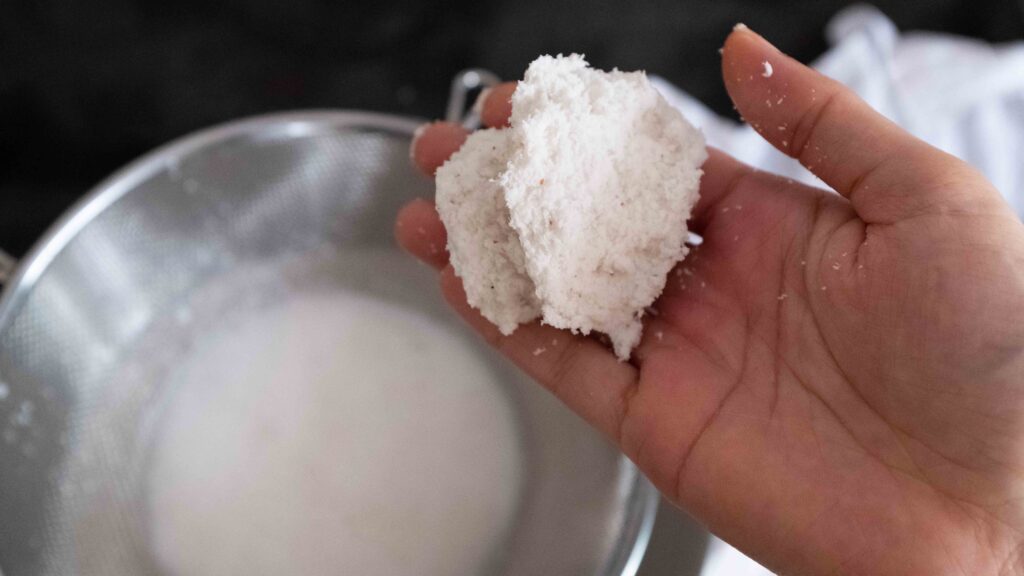
1 – To extract your coconut milk, place 300 gm grated coconut and 250 ml plain water to a blender jar. Blitz on high speed for 1 full minute. Transfer the blitzed coconut to a muslin-lined strainer, placed on top of a large bowl. Gather the 4 edges of the muslin, twist until you have a little bundle, and squeeze out as much liquid as is physically possible! This is your first extract or thick milk. Now, transfer all the grated coconut from the muslin bundle back into your blender jar and add another 250 ml plain water. Blitz once again on high speed for 1 full minute. Transfer the re-blitzed coconut back to the muslin-lined strainer. Gather the 4 edges of muslin and squeeze for all you’re worth for a second time. This is your second extract or thin milk. You should have roughly 650-700 ml coconut milk in total depending on how ‘juicy’ your coconut is and how much elbow grease you put in!
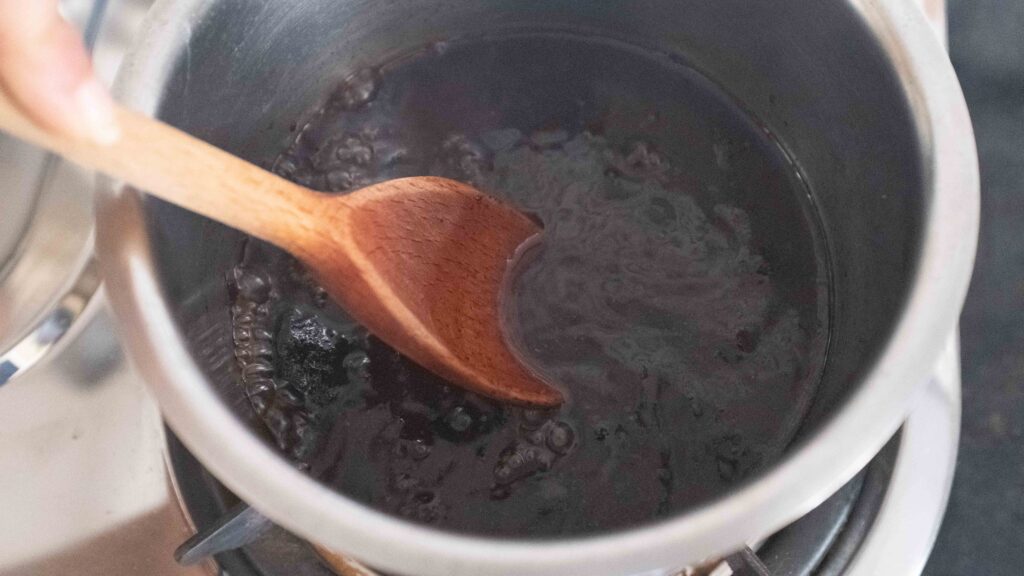
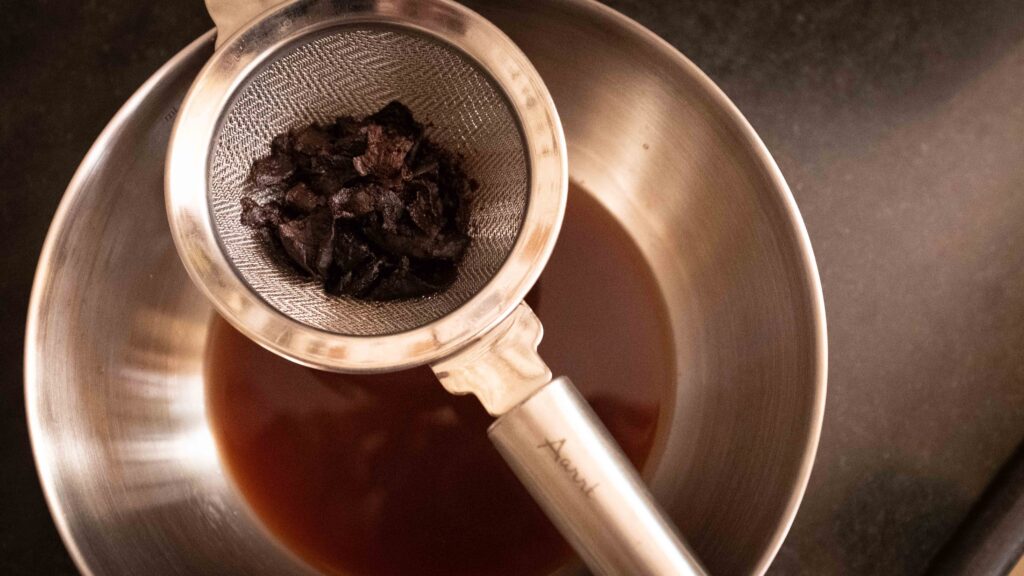
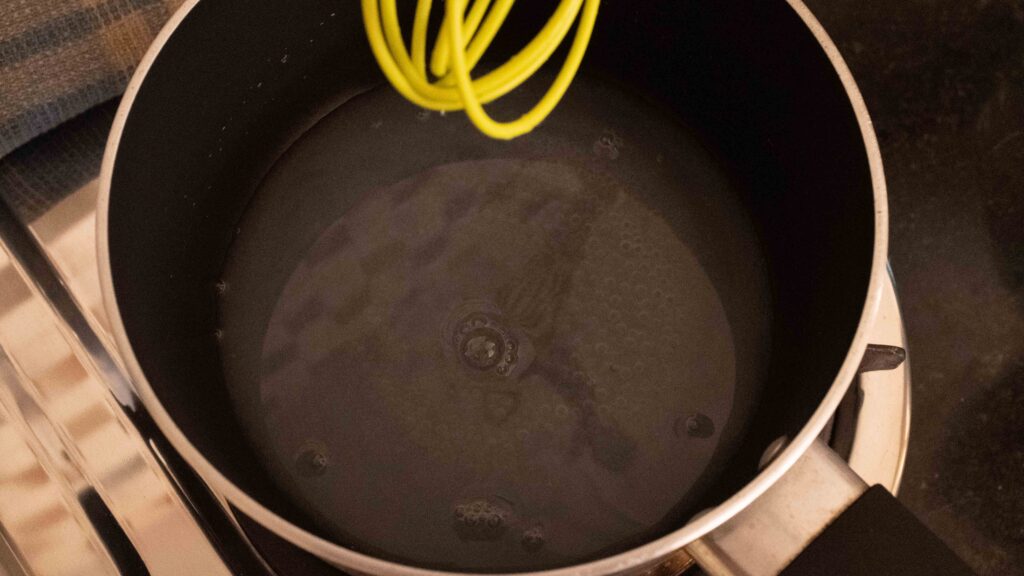
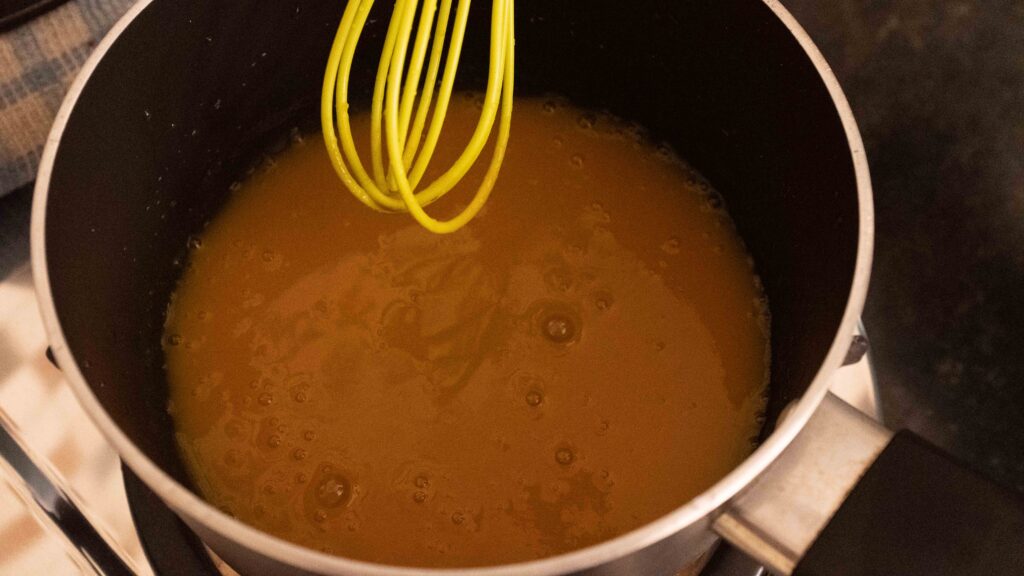
2 – To make the kokum concentrate, add 250 ml plain water to a pot and heat it on high, until small bubbles just begin appearing. As soon as you see small bubbles, add 15-20 kokum petals to the pot and wait for the water to reach a rolling boil. The more you add, the tarter the taste will be. Once the water comes to a boil, use a wooden spoon to mash and squish the petals to extract their pulp. Stir and continue boiling for 5 minutes. Thereafter, turn off the heat and allow the concentrate to come to room temperature. Once it’s cooled down, Strain the kokum concentrate through a muslin lined strainer placed over a large bowl. Then gather gather the 4 edges of muslin and squeeze as hard as you can to extract as much juice as possible.
Method
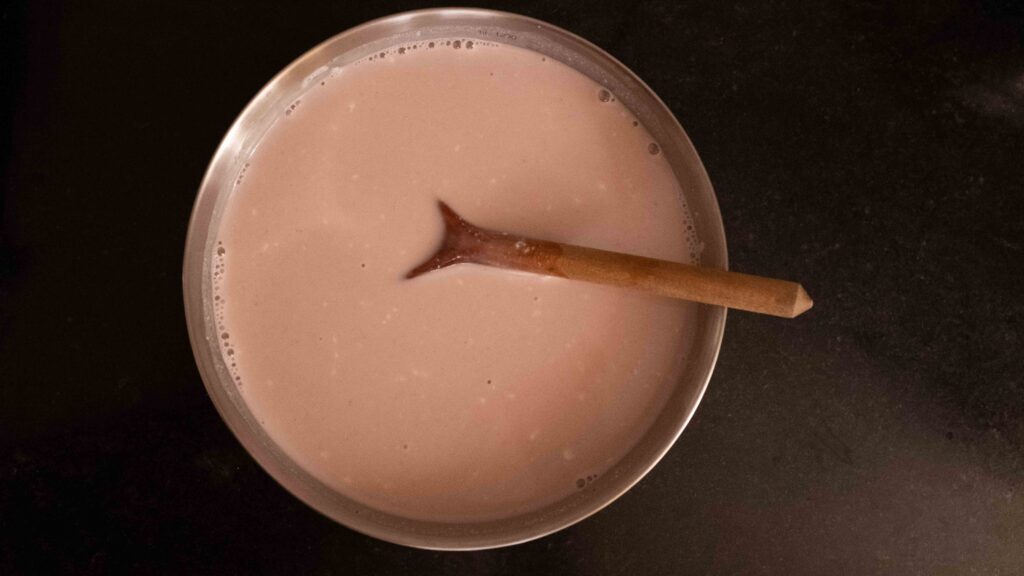
1 – In a large bowl, add all the freshly extracted coconut milk, the kokum concentrate, the cumin powder, the sugar and the black salt. Stir the mixture together, it will turn a gorgeous pink!
2 – Now taste the mixture. Because every coconut has a unique level of sweetness, every solkadi will taste a bit different. If you’re happy with the intensity of coconut flavour and the tartness of the kokum, don’t add any water. If the flavours are too concentrated, then add anywhere from 150-250 ml plain water until you’re happy with the taste.
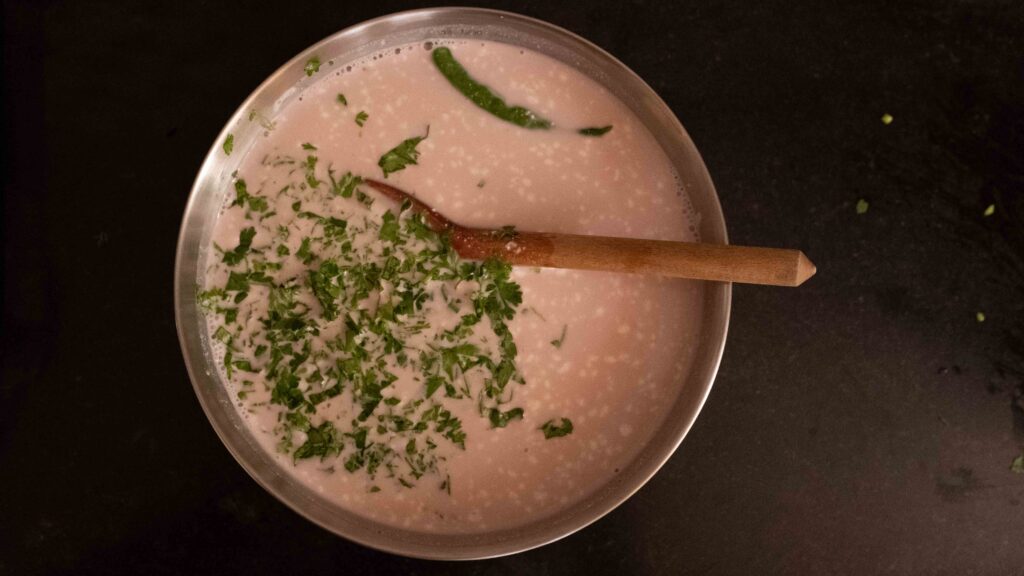
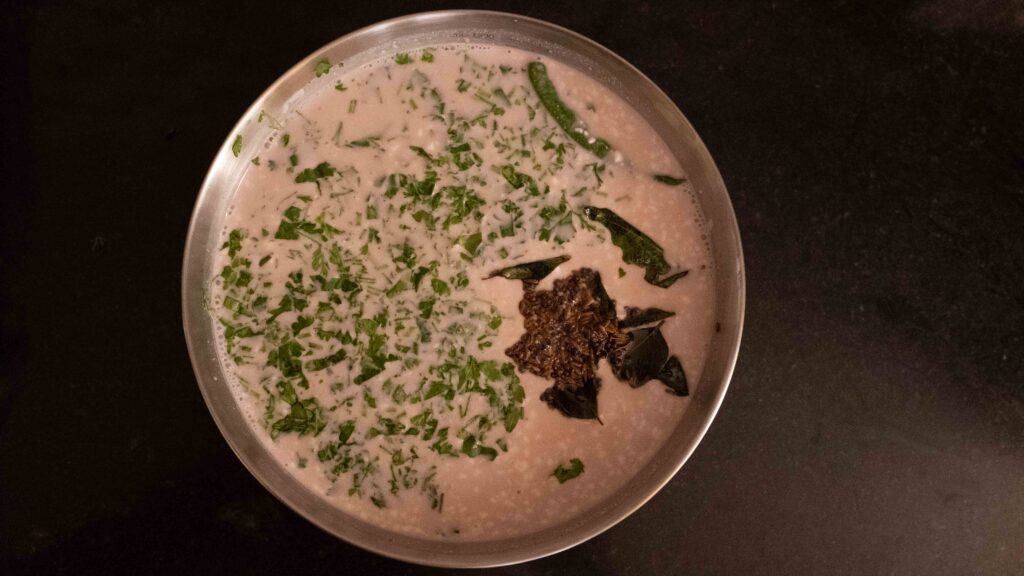
3 – Now add the finely chopped coriander and both halves of the green chilli.
4 – To make the tempering, heat up 2 teaspoons of vegetable oil in a small frying pan. As soon as the oil starts to shimmer (not smoke), add the mustard seeds, cumin seeds, curry leaves, and garlic slices. Be careful, it will sputter. As soon as all the ingredients have been added to the pan, turn off the heat.
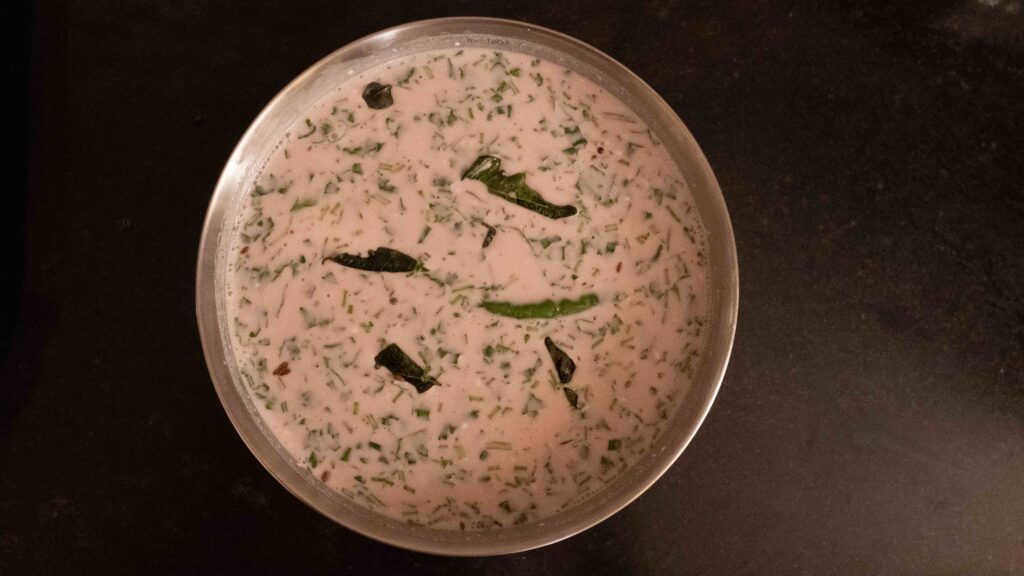
5 – Add the hot tempering to the coconut milk mixture and stir to combine.
6 – Do a final taste of the mixture and add more black salt and/or sugar if desired.
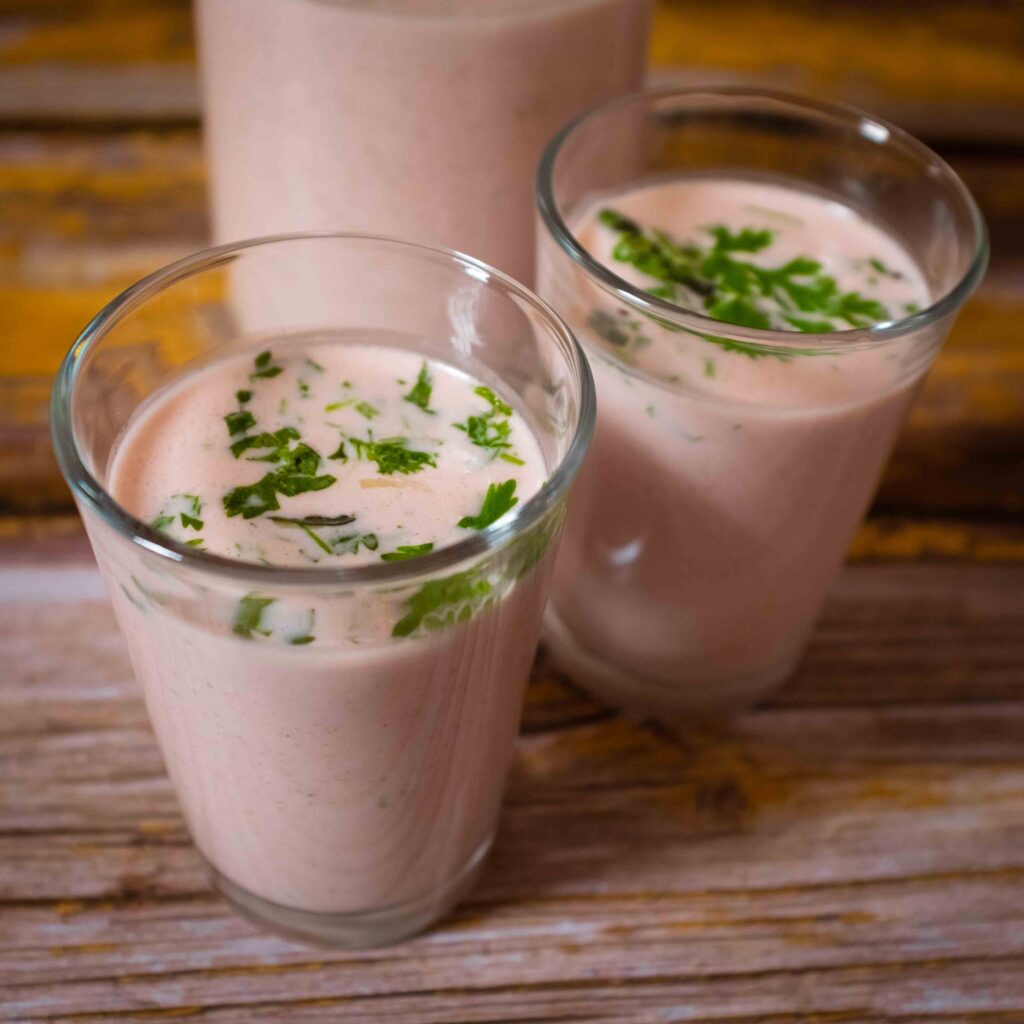
7 – Place the bowl in the fridge covered, and chill the mixture for at least 2 hours before serving. Solkadi ready!
8 – Before serving, take the solkadi out of the fridge and let it sit for about 15 minutes. Because it’s made with fresh coconut milk with zero emulsifiers, the mixture will be ‘split’ where the fattier coconut cream collects and floats on top and the thinner coconut milk sinks to the bottom. Whisk the mixture very well to re-emulsify it. While pouring into individual glasses, strain the chilled solkadi through a fine meshed sieve to catch all the herbs and whole spices. Garnish with more chopped coriander if you like.
Kokum (also known as aamsol) is a fruit indigenous to the southern states of India and is widely used for its culinary and medicinal properties. Typically used in Konkan, Maharashtrian, and Goan cuisine, it can also be found in dishes from Karnataka, Gujarat, and Assam. It is not the same as mangosteen, although both belong to the same family. When you buy kokum petals in the market, what you’re getting is the outer covering of the ripe fruit that has been dried. In this form, it can be used as a souring agent, akin to tamarind. However, rather than out-and-out sourness, kokum also brings a sweet, fruity-floral note to a dish. Additionally, it imparts a gorgeous purple-pink hue to any light-coloured liquid it touches.
Stage 2: coconut water caviar & mango juice caviar (optional)
This element is totally optional, but if you do leave it out, you’ll be missing out on some cool science – spherification through molecular gastronomy. It’s way easier than it sounds and if you’ve ever made snow globes or lava lamps, you’re already familiar with spherification. Generally, oil and water don’t mix. By adding agar agar to a water-based liquid, you give it gelling properties – or the power to turn from a liquid into a solid. When agar agar solution is dripped into cold oil, it gels up into little spheres. Science, bitches! Whichever caviar you make first, ensure that you don’t leave the 2nd solution around to cool at all. It should be hot when you’re pouring it, else the caviar won’t hold its shape.
Ingredients
for the coconut water caviar:
1. 100 ml coconut water from a tender coconut (packaged is fine)
2. 1 tsp. sugar
3. 1.5 gm (3/4 tsp) agar agar powder
for the mango juice caviar:
1. 90 ml packaged mango juice
2. 1 tsp water
3. 1 tsp freshly squeezed lemon juice
4. 1.5 gm (3/4 tsp) agar agar powder
to set the caviar:
1. 1 litre freshly boiled hot water
2. 1 litre very cold unflavoured vegetable oil
3. 2 litre lukewarm water
4. 2 litre chilled water
Materials
1. 2 large tall glasses (freezer proof)
2. 2 small glasses/bowls (heat proof)
3. A wide tray or dish (heat proof)
4. A small saucepan
5. A whisk
6. A squeeze bottle
7. A metal tablespoon
8. A fine-meshed sieve
9. 5 large bowls
10. Some absorbent kitchen paper
11. 2 small containers with airtight lids
Prep
1 – Pour 500 ml unflavoured vegetable oil into each of the two tall glasses. Then place the glasses in the freezer for an hour. The oil must get very cold (1.5OC). You’ll know when the oil is cold enough when it turns cloudy. Keep the oil in the fridge until you’re ready with your coconut and mango solutions.
2 – Chill 2 litres of water in the fridge for about an hour. Keep in the fridge until called for.
3 – Warm up 2 litres of water until 43OC. You should be able to dip your finger into the water without flinching. Keep covered and set aside until called for.
4 – Line two small containers with some absorbent kitchen paper.
5 – Pour 1 litre of freshly boiled water into a wide tray/dish or until the water level is at least 1 inch deep. Set aside.
6 – Make the coconut water solution; add the coconut water, the sugar, and the agar agar to a small saucepan. Whisk to blend, and then bring the mixture to a boil, whisking continuously. Pour the hot solution into a small heat proof glass and place the glass in the tray/dish with the hot water. This will keep the coconut water solution from setting. Wait 2 minutes for the mixture to slightly cool.
7 – Make the mango juice solution; add the mango juice, the lemon juice, the water, and the agar agar to a small saucepan. Whisk to blend, and then bring the mixture to a boil, whisking continuously. Pour the hot solution into a small heat proof glass and place the glass in the tray/dish with the hot water. This will keep the mango juice solution from setting. Wait 2 minutes for the mixture to slightly cool.
Method
for the coconut water caviar:
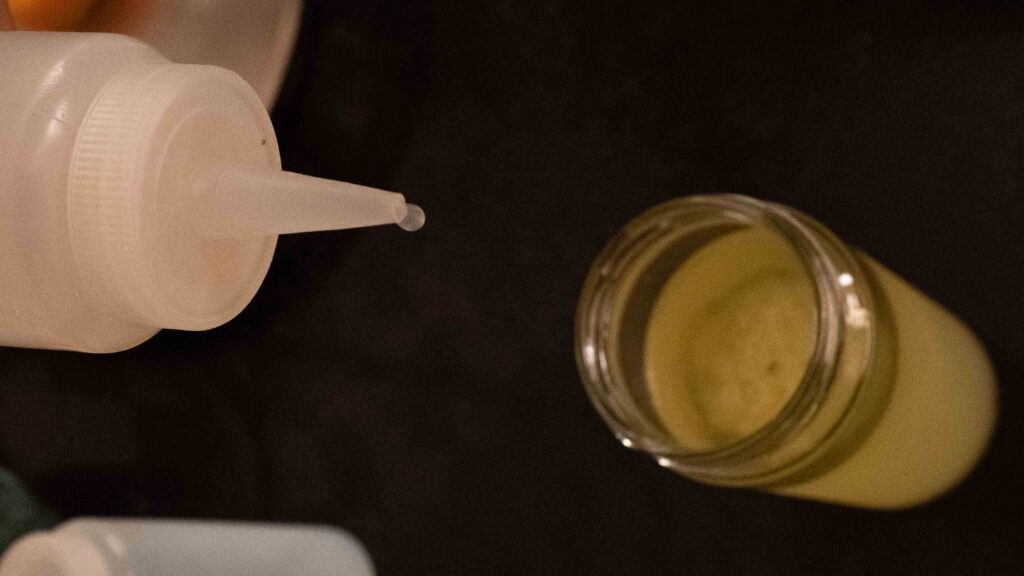
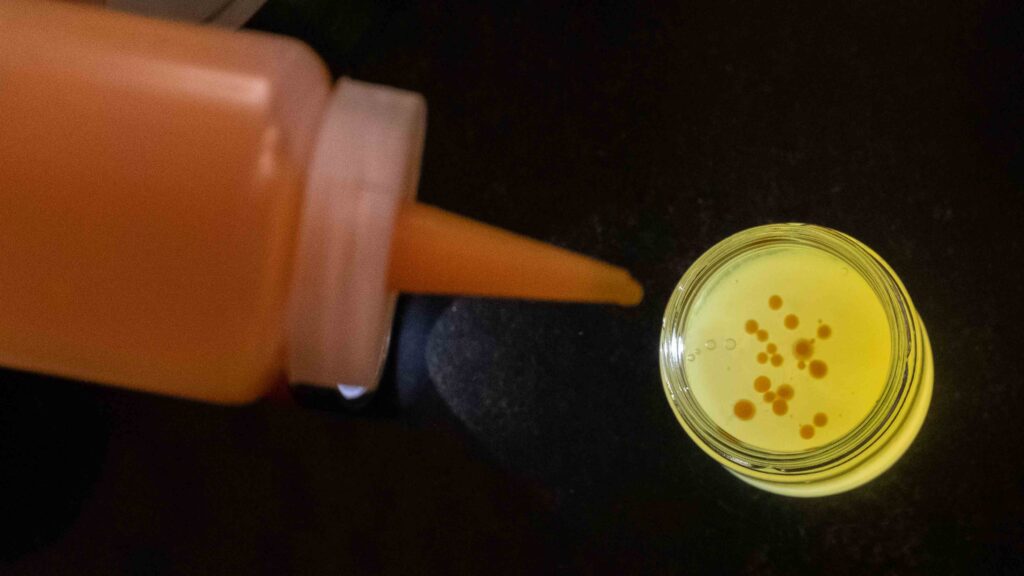
1 – Transfer the hot coconut water solution to a squeeze bottle. If the bottle is uncomfortable to handle, use gloves.
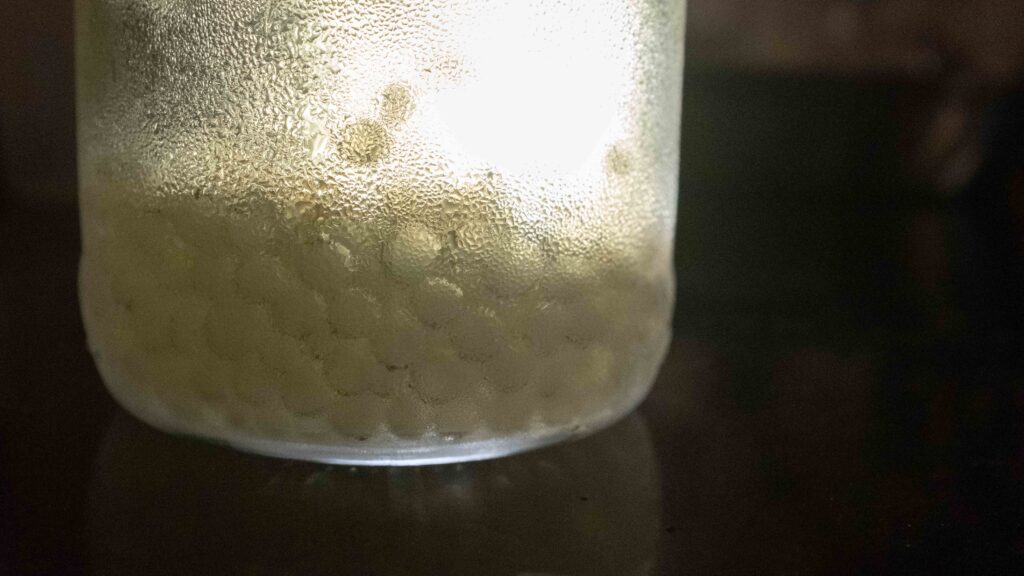
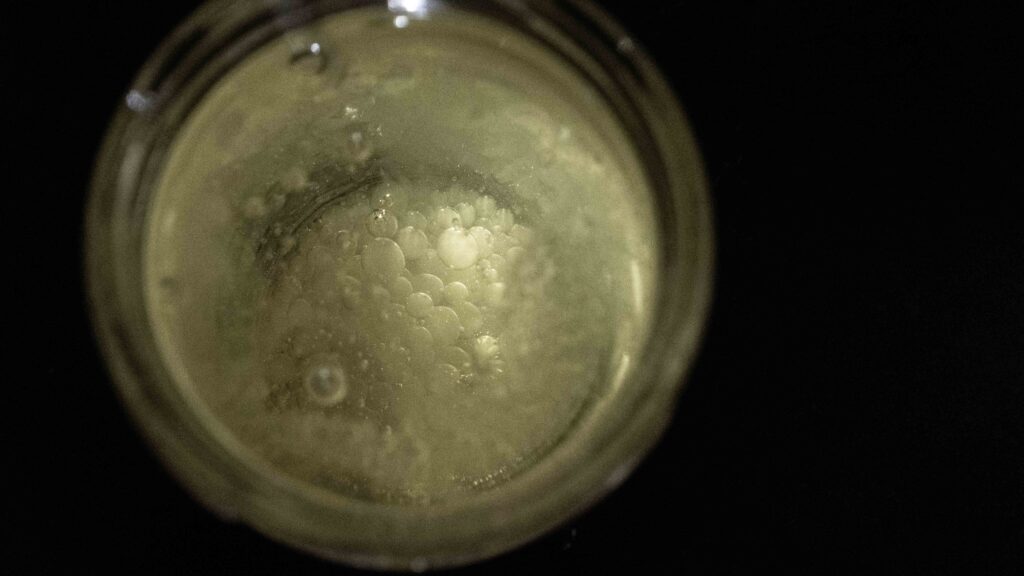
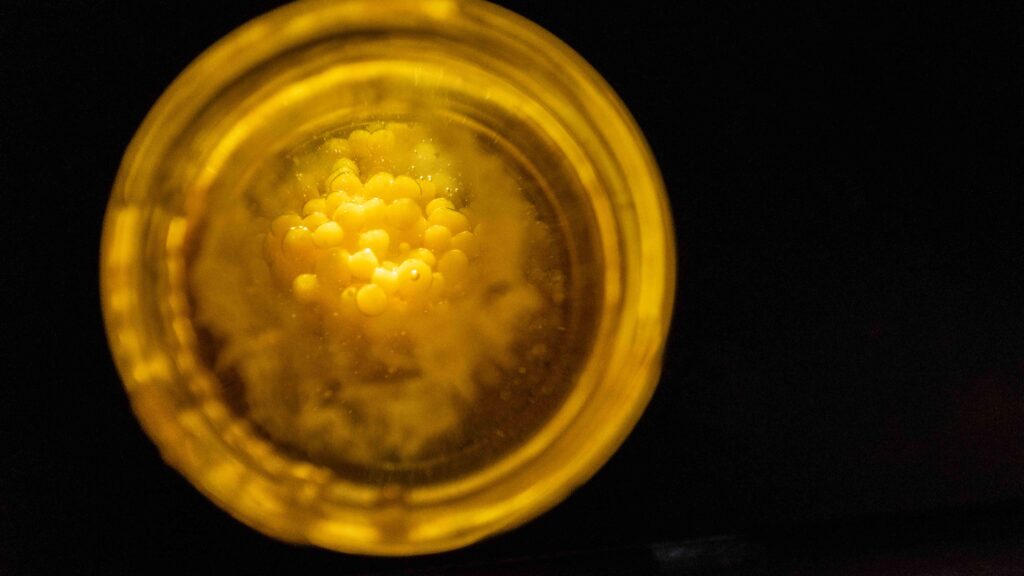
2 – From a height of about 8 cm, drip the solution 1 drop at a time into a glass of chilled vegetable oil. The drops will drip down from the surface and form into little caviar like spheres as the make their way down the oil to the bottom of the glass.
3 – Every 20 ml or so, gently give the oil a stir with a tablespoon to keep the spheres from clumping together.
4 – Repeat steps 1-3 until you run out of coconut water solution.
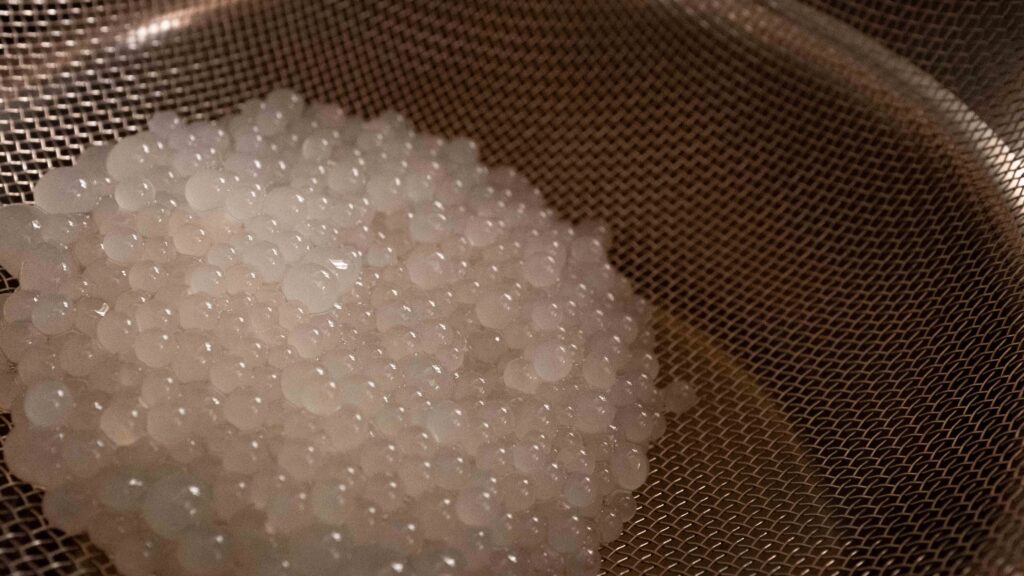
5 – Grab a large bowl and place a fine-meshed sieve on it. Tip the glass of oil with the spheres into the sieve. Gently shake the sieve and let the oil drain from the spheres for about 5 seconds (the oil is totally reusable. Transfer it to a bottle later and reserve it for cooking).
6 – Pour 1 litre of lukewarm water into a large bowl. Keeping the spheres in the sieve, dunk and swirl the sieve in the lukewarm water to rinse off the oil.
7 – Pour 1 litre of chilled water into another large bowl. Keeping the spheres in the sieve, dunk them in the bowl of chilled water to give them a final rinse and rid them of any residual oil.
8 – Tip the spheres onto some paper towels to briefly drain and then transfer them to one of the containers lined with kitchen paper. This will soak up any excess water.
9 – Cover the container with an airtight lid and place it in the fridge until needed. Coconut water caviar is ready! Set it aside and proceed with the mango juice caviar.

for the mango juice caviar:
1 – Transfer the hot mango juice solution to a squeeze bottle. If the bottle is uncomfortable to handle, use gloves.
2 – From a height of about 8 cm, drip the solution 1 drop at a time into a glass of chilled vegetable oil. The drops will drip down from the surface and form into little caviar like spheres as the make their way down the oil to the bottom of the glass.
3 – Every 20 ml or so, gently give the oil a stir with a tablespoon to keep the spheres from clumping together.
4 – Repeat steps 1-3 until you run out of mango juice solution.
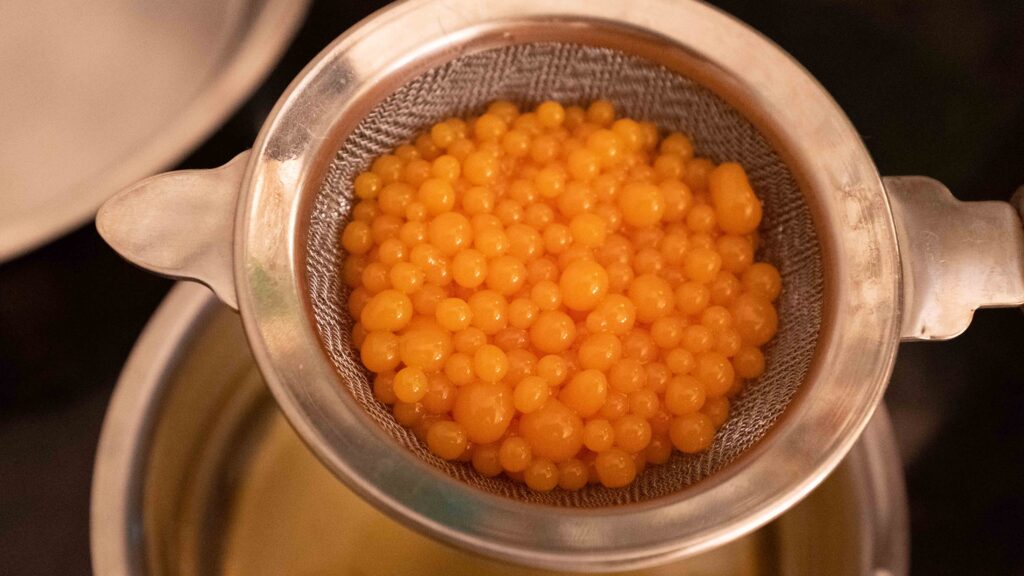
5 – Grab a large bowl and place a fine-meshed sieve on it. Tip the glass of oil with the spheres into the sieve. Gently shake the sieve and let the oil drain from the spheres for about 5 seconds (once again, the oil is totally reusable. Transfer it to a bottle later and reserve it for cooking).
6 – Pour 1 litre of lukewarm water into a large bowl. Keeping the spheres in the sieve, dunk and swirl the sieve in the lukewarm water to rinse off the oil.
7 – Place 1 litre of chilled water into a large bowl. Keeping the spheres in the sieve, dunk them in the bowl of chilled water to give them a final rinse and rid them of any residual oil.
8 – Tip the spheres onto paper towels to briefly drain and then transfer them to the other container lined with kitchen paper. This will soak up any excess water.
9 – Cover the container with an airtight lid and place it in the fridge until needed. Mango juice caviar is ready! Set it aside and proceed with Stage 3.

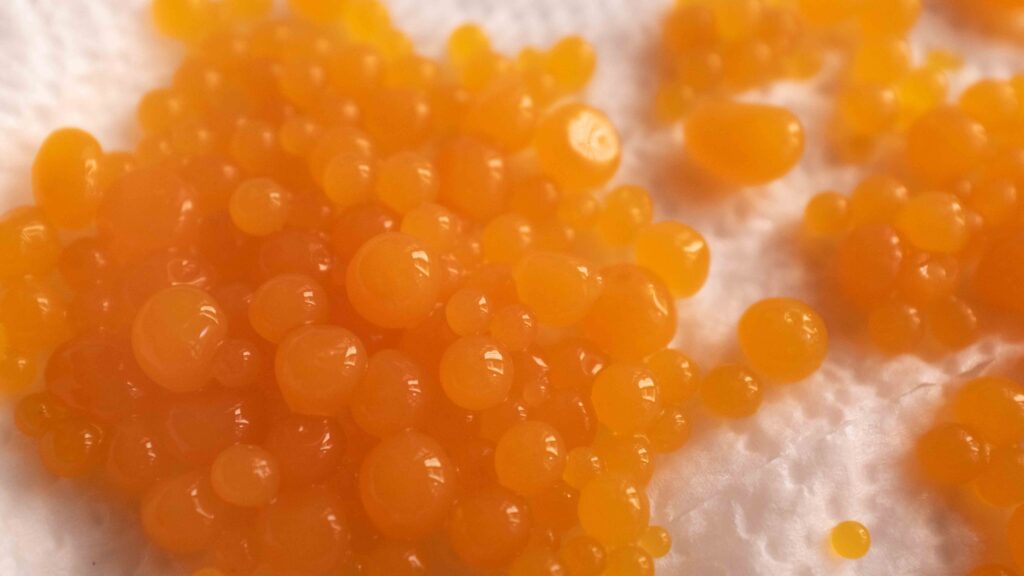
Together, this amount makes about 200 gm caviar. You will need 50 gm per serving. There are spherification recipes that use gelatine, but I haven’t tried them, so I can’t attest to them. If you’ve ever wondered why vegetarian jelly has such a different mouthfeel to non-veg jelly, the reason is agar agar or some other plant-based gellant. Solutions set with agar agar are texturally very different from gelatine-set solutions; the first melts on the tongue, while the second one bounces and jiggles. So, even though this caviar looks bouncy, it doesn’t have awesome jiggle-properties. The mango juice caviar tastes just like mango juice in gel form. The coconut water caviar, while it looks a treat, doesn’t possess much flavour. Now that you know the ratios and science, go ahead and make whatever flavour you like! Any water-based liquid will work with spherification, so try making caviar from different fruit juices, energy drinks, carbonated beverages, flavoured milks, condiments like ketchup, sriracha barbeque sauce, etc. Just add a little more water to thin out viscous liquids. You also want to ensure that you use a liquid with a pronounced flavour such as espresso coffee, cranberry juice etc. Once you’ve made your caviar, store it in a kitchen paper-lined airtight container in the fridge for up to 5 days, and add it to any drink or dish for a beautiful visual treat and some extra pops of flavour.
Stage 3: pan-seared salmon
For this part, we’re going to up our salmon game by brining it first. Why? Fish contains a protein called albumin. As it cooks, the flesh contracts, leeching albumin onto the surface. Brining your salmon fillets significantly reduces (if not eliminates), that slimy, unattractive white albumin. This is because the salt in the brine solution breaks down some of the muscle fibres around the surface of the fish. When it’s getting cooked, the fibres don’t tighten as much as they normally would, so, less albumin is pushed out. Moreover, brining results in a moister piece of fish and a uniformly seasoned fillet.
Ingredients
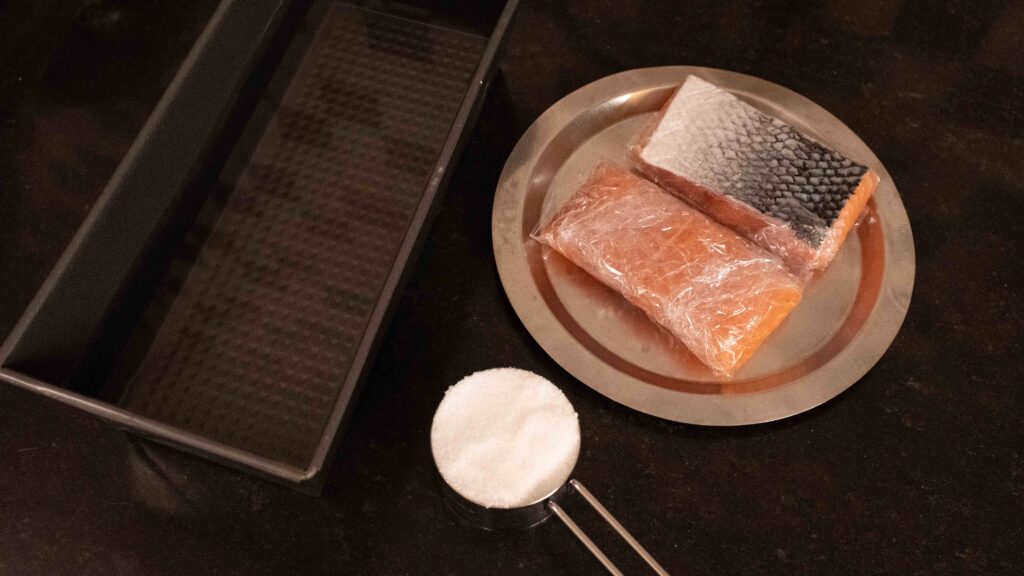
1. 4 x 100 gm salmon fillets with the skin on (cut into 11 x 5 cm fillets)
2. ½ tsp salt
3. ½ tsp freshly cracked black pepper
For the brine:
1. ¼ cup table salt
2. 4 cups plain water
Prep
1 – Take a deep container and pour in 1 litre of plain water. Dissolve ¼ cup salt in the water. This is our brining liquid.
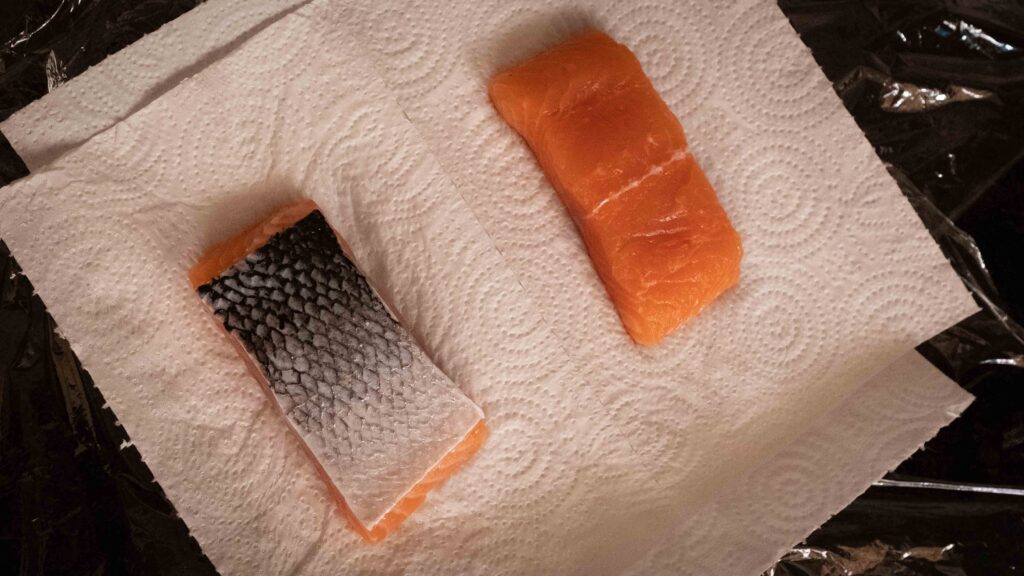
2 – Fully submerge the salmon fillets in the brine and cover the container. Leave it to stand covered at room temperature for 15 minutes.
3 – After 15 minutes, remove the fillets from the brining liquid and pat the fillets dry with some paper towels. Discard the brining liquid.
Method
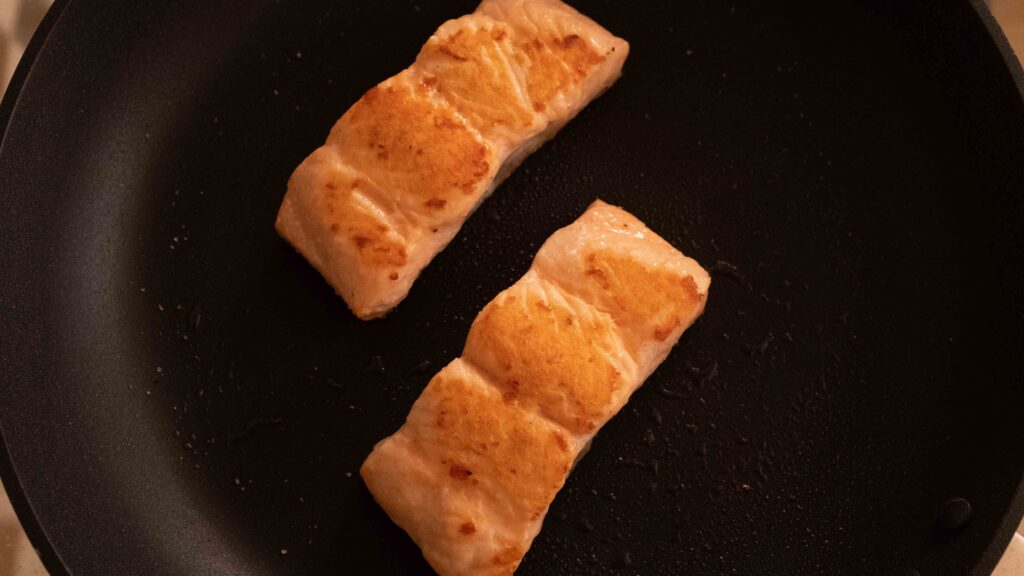
1 – Place a non-stick frying pan on the stove. Do not put the heat on yet. Evenly sprinkle ¼ teaspoon of salt and ¼ teaspoon of pepper on four sections of the pan. The fillets will sit on those four sections.
2 – Place the fillets on the beds of salt and pepper, skin-side down. Now sprinkle the tops of the fillets with ¼ teaspoon of salt and ¼ teaspoon of pepper.
3 – Begin heating the pan on medium-high heat and cook the fillets untouched for 5-6 minutes. Get ready to flip when the fats from the skin have rendered and are sizzling, and ¾ of fillet has turned opaque from the skin-side going upwards.
4 – Using tongs, immediately flip the fillets and continue cooking them untouched for another 1-2 minutes or until a meat thermometer reads 51-52OC.
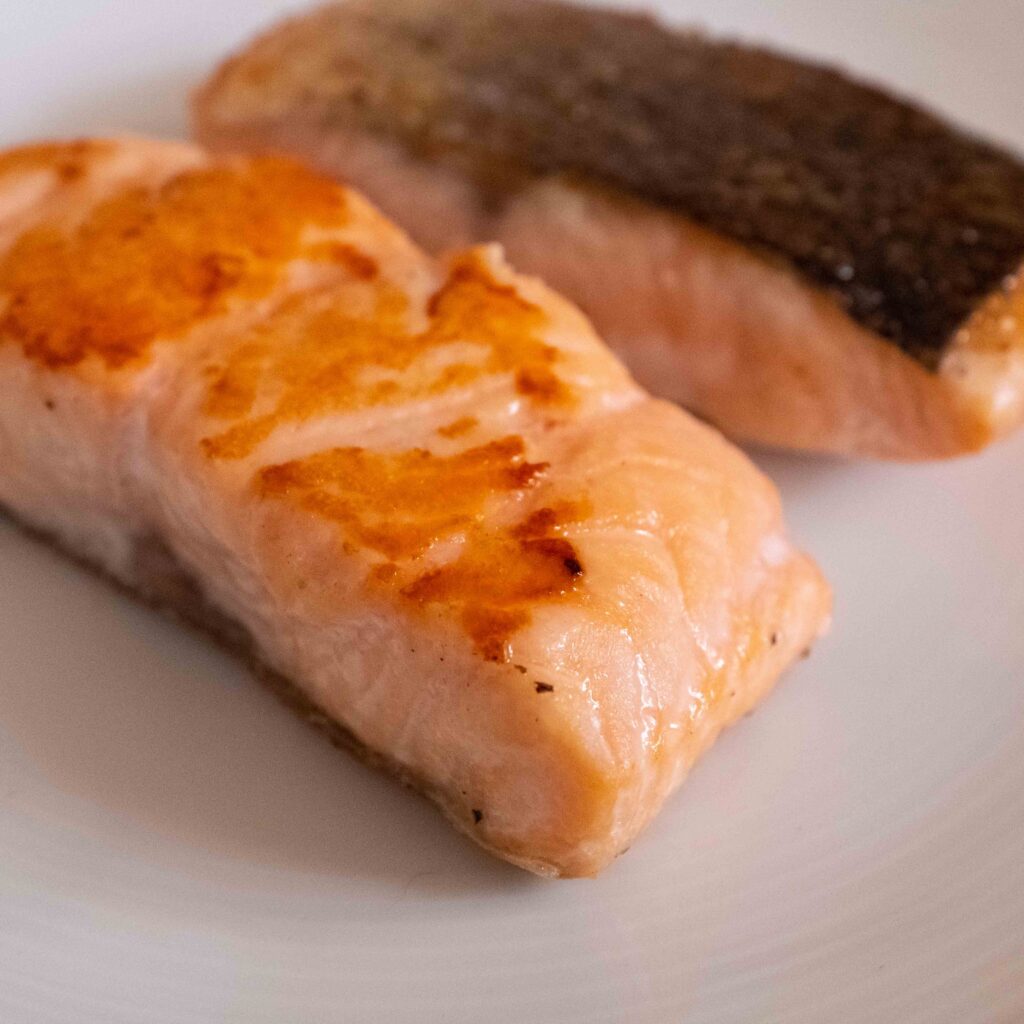
5 – Transfer the fillets from the pan and place them on a plate, skin side up. Rest the fillets for 5 minutes before plating up. Do not cover the cover the salmon to keep it warm because it will steam and the skin will lose its crispiness. If you don’t like fish-skin, simply remove it after cooking, but I do not recommend searing the fillets without the skin, as the skin adds tonnes of flavour and helps to keep the fillets moist.
Brining (soaking in a salt-solution) for at least 15 minutes or up to overnight is all it takes to ensure a great cook on your salmon. To brine any amount of salmon, you need only water and table salt, mixed in a ratio of 1 tablespoon of salt to 240 ml plain water. Always use cold water, and make enough brining liquid to fully submerge the fillets.

Stage 4: mise en place
While your salmon is resting, quickly prep the salad components.
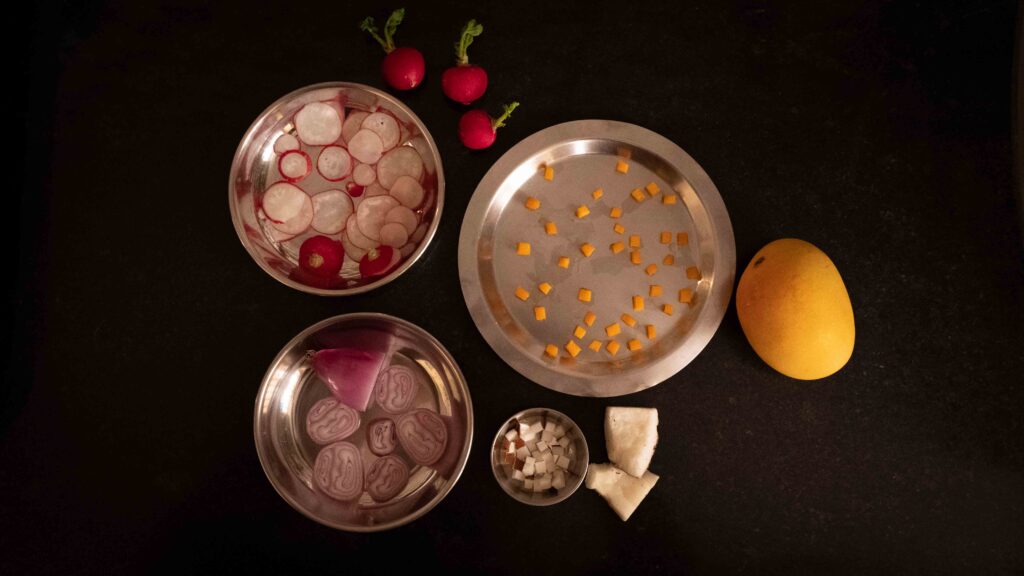
Ingredients
1. 2 baby radish
2. 1 shallot
3. 100 gm ripe Alphonso mango (from 1 medium Alphonso mango)
4. 50 gm coconut flesh ( from half a medium coconut)
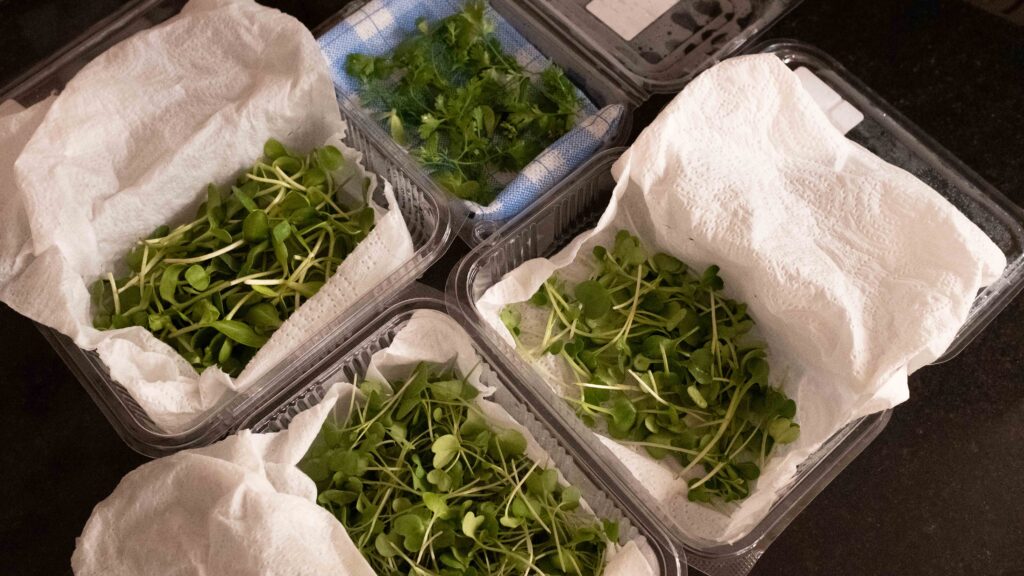
5. 80 gm radish microgreens
6. 80 gm sunflower microgreens
7. 40 gm mustard microgreens
8. Fresh coriander leaves from 4 sprigs
Method
1 – Finely cut the radish into wafer thin slices. A mandolin is helpful for this. Set aside.
2 – Finely slice the shallot into ¼ mm rings. Set aside.
3 – Finely dice the mango into 1 cm cubes. Set aside.
4 – Finely dice the coconut into ½ cm cubes. Set aside.
5 – Clean the microgreens and then toss them together. Set aside.
6 – Remove the coriander leaves from their sprigs. Set aside.
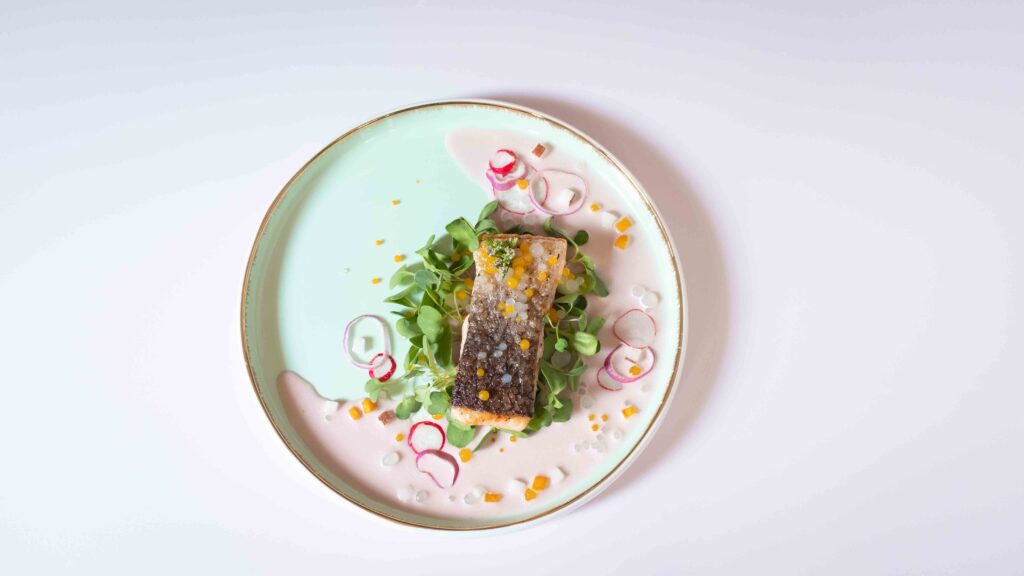
Stage 5: assembly & serving
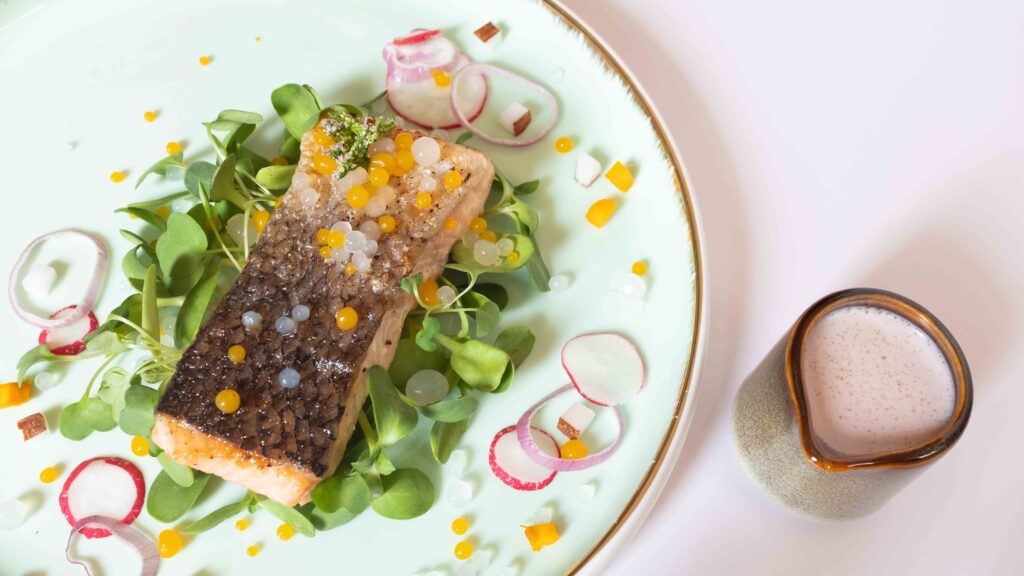
Components
1. Chilled solkadi from Stage 1
2. Cold coconut water caviar and mango juice caviar from Stage 2
3. Hot and rested pan-seared salmon fillets from Stage 3
4. Sliced baby radish from Stage 4
5. Shallot rondels from Stage 4
6. Cubes of mango from Stage 4
7. Cubes of coconut flesh from Stage 4
8. Mixed microgreens from Stage 4
9. Fresh coriander leaves from Stage 4
10. Salt to season
For the sake of a pretty picture, I was very restrained with the plating, but in reality, the plate is a lot more generous! When you’re plating up, please do follow the proportions mentioned in the recipe, rather than going by our website/Instagram images.
Prep
1 – Stir the solkadi well, and then strain 200 ml into a gravy boat. Strain the rest into 4 glasses. Discard the whole spices and herbs caught in the strainer.
Method
1 – Place ¼ of the mixed microgreens onto the centre of a plate. Lightly sprinkle about 1/8 tsp salt to season.
2 – Place one salmon fillet, skin-side-up on the bed of microgreens.
3 – Arrange ¼ the radish slices on the plate.
4 – Scatter ¼ of the shallot rondels on the plate.
5 – Arrange ¼ of the cubes of mango and coconut on each plate.
5 – Spoon ¼ of the coconut water caviar and mango juice caviar on top of the fish and scatter some on the microgreens.
6 – Arrange ¼ of the fresh coriander leaves on the plate.
7 – Pour about 50 ml of solkadi onto the dish.
8 – Serve the salmon salad with glasses of solkadi. Now eat!
Even though salmon is a fatty fish, as a whole, this dish eats as a really light summer entrée and shouldn’t be served as a standalone meal (unless you convert 4 portions into 2). Please remember, I was very restrained with the plating, but in reality, the plate is a lot more generous! This merits repeating; when you’re plating up, please do follow the proportions mentioned in the recipe, rather than going by our website/Instagram images.
Tips & Tricks
How to break open a coconut and remove the flesh
How to extract coconut milk