


Makes one 8 inch cake.
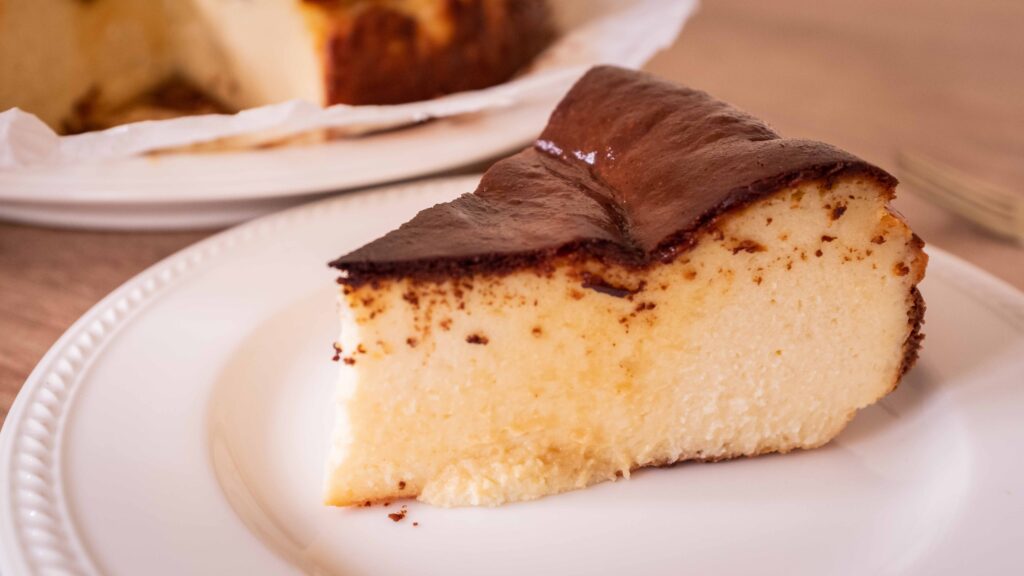
If you love a good flan or crème caramel, this effortless dessert is right up your alley. Those seeking the real deal—truth be told—this one’s more custard than cheesecake. In fact, with its silky texture, mellow vanilla notes, and bitter-sweet top, you’ll feel like you’re eating a firmly set crème brûlée. Ain’t nothing wrong with that. But here’s the best part. While this cheesecake looks an absolute stunner, it’s so easy to whip up, that it will become your default dessert for lazy as well as hectic days.
At a glance
– This recipe comprises cheesecake + sour cream sauce.
– You will need an 8 inch round x 3 inch high metal cake pan and parchment paper.
– This recipe has been broken into 2 stages for ease and comprehension. Please read the entire recipe from start to finish before beginning.
Stage 1: cheesecake
Ingredients
1. 680 gm full fat cream cheese (not cream cheese spread or the whipped stuff)
2. 200 gm white granulated sugar
3. ½ tsp salt
4. 1 tsp vanilla extract
5. 5 large eggs (Total mass = 255 gm)
6. 300 ml heavy or whipping cream (not the low fat stuff)
7. 28 gm all purpose flour
Prep
1 – Before beginning, ensure that all your ingredients are at room temperature.
2 – Grease your cake pan with nonstick spray.
3 – Then grease a big square of parchment paper (roughly 15 inch2) on one side only. You may have to overlap two sheets to achieve the size mentioned.
4 – Line your cake pan with parchment paper, greased side up. Press the paper into the bottom of the pan. Thereafter, haphazardly crease and flatten the paper to mould it against the inner sides of the pan. This will create the signature rustic, rumpled look of a basque burnt cheesecake’s sides. The parchment should poke up at least 1-2 inches over the pan’s edge. Trim the extra-long bits of paper so that the parchment height is the same all around the pan’s circumference.
5 – Preheat your oven to 200OC.
Method
1 – Place the cream cheese in a large bowl. Using a spatula, stir the cream cheese to ensure that it’s soft and spreadable.
2 – Add in the salt and granulated sugar. Cream the mixture till all the sugar has dissolved into the cream cheese, and everything is smooth and creamy.
3 – Switch to a handheld whisk. Pour in the vanilla extract and whisk it in.
4 – Add the eggs one at a time, whisking with each addition, until it is fully incorporated and has emulsified with the cream cheese mixture. Adding all of them in at once will cause your batter to split.
5 – Pour in the heavy cream and once again, whisk together to incorporate.
6 – Lastly, sift in your flour and whisk everything together until fully combined. Scrape everything down with a spatula for good measure and give it a final mix.
7 – Gently transfer this runny batter to your prepared cake pan, taking care not to pour from too much of a height, as this will create air bubbles in the mixture. To eliminate any large air bubbles, tap the pan gently against your counter, so that they rise to the surface and pop.
8 – Place your cake pan in the middle rack of your pre-heated oven and bake it at 200OC for 40 minutes. I like to rotate my pan by 180O at the halfway mark to ensure even baking.
9 – After 40 minutes, raise the temperature to 220OC and continue baking for an additional 10 minutes, or until the surface of the cheesecake is very dark brown. It will dome and puff. That’s exactly what you want.
10 – Pull your cheesecake out of the oven. It should still be very jiggly in the centre, but will continue to cook on your counter. Rest it on a wire rack until it reaches room temperature. The centre will sink and collapse to form a very shiny caved in top. Once completely cooled, it will no longer jiggle.
11 – Cover the entire cheesecake, pan et al with cling wrap and refrigerate it overnight. This cheesecake tastes best, chilled (not brain-freeze chilled, but cold).
Stage 2: sour cream sauce (optional)
Ingredients
1. 200 gm sour cream
2. 1 tbsp. white castor sugar
3. ½ tsp vanilla extract
Method
Simply whisk the sour cream, sugar, and vanilla together until it’s all smooth. Keep it in an airtight jar in the fridge until it’s ready to use.
Although this is an optional component, I highly recommend making it. Even a little smidgeon of sour cream enhances the tangy cream cheese notes in the cake itself—shifting the overarching experience towards cheesecake, and away from custard. Leave it off, if you prefer a vanilla custard flavour profile.
To serve
1 – Once your cheesecake has chilled overnight in the fridge; remove the cling wrap. Holding the sides of the parchment, lift the cheesecake out of its pan and transfer it to a serving dish.
2 – Carefully peel away the parchment from the sides. See those gorgeous brown wrinkles? Your cake is now ready to slice.
3 – Serve each slice with a generous dollop of sour cream sauce; on the side or slathered on top of its burnished dark surface.
For perfectly clean slices, dip your knife’s blade into a tall container of hot water, dry it off, and then cut downwards in one smooth motion. Wipe off the cake residue after each cut. Again; dip, dry, cut, wipe, repeat.
Tips & Tricks
How to slice a cheesecake: