


Makes 30 x 4 cm wide sandwiched macarons.
I tasted my very first macaron in France, from the legendary Ladurée in Paris. Crisp and airy on the outside with an ever so slightly chewy interior, those delicate meringue sandwich cookies set the bar impossibly high. While I’ve more or less used Ladurée’s recipe for my macaron shells, my filling is a completely original Christmas-flavoured cream, made with India’s favourite biscuit for hoomans and doggos alike—Parle-G. Festive, flavourful and fully decked, this classic French confection with an Indian heart is my very own Christmas miracle!
At a glance
– This recipe comprises Parle-G Xmas butter + French-method macaron shells + decorations.
– You will need too many things to fit here! Please scroll to each section for details.
– This recipe has been broken into 4 stages for ease and comprehension. Please read the entire recipe from start to finish before beginning.
Stage 1: Parle-G Xmas butter
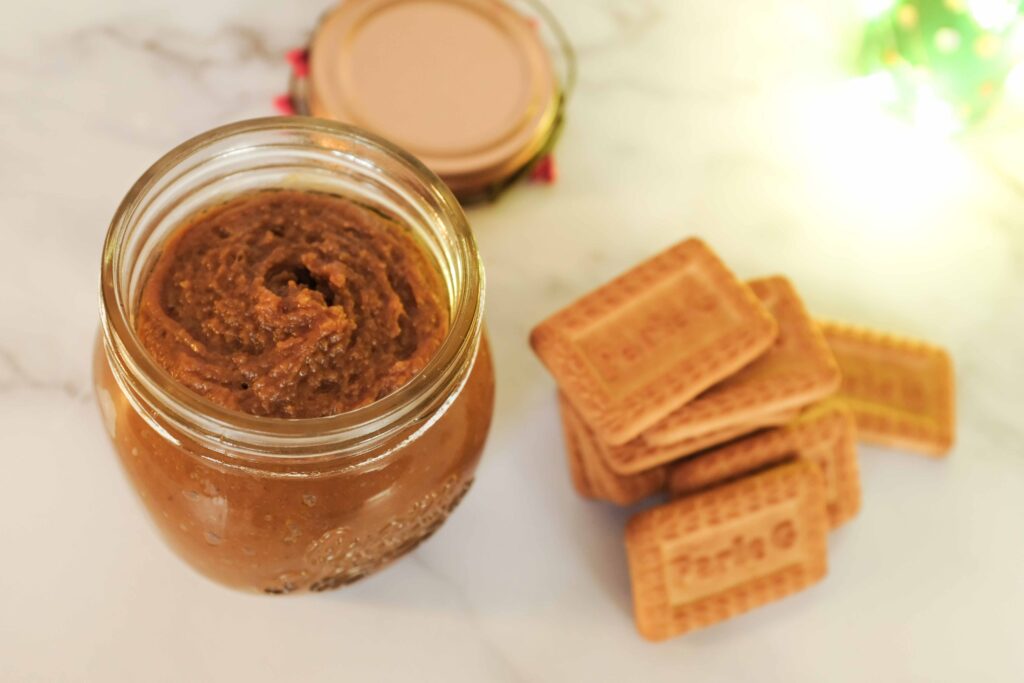
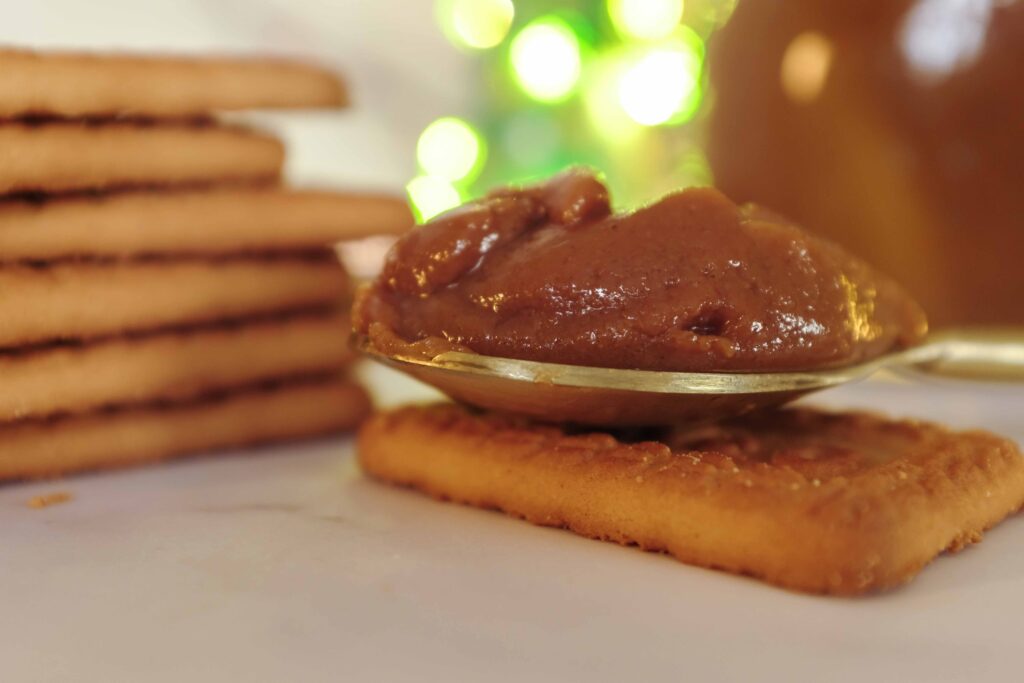
Parle-G is a national treasure. Available on every street corner throughout India, it is beloved for being tasty, wholesome, and remarkably inexpensive. From tea drinkers and stray dogs to busy commuters and broke students, this humble glucose biscuit has fed millions of hungry bellies, for just a few rupees. Watch comedian, Vir Das‘ hilarious segment on Parle-G here, and read this brilliant article about Parle-G here. There are various ready-made international cookie butters out there, and they’re all tasty. But I wanted to make something original with a brand that’s locally available and nationally loved. Parle-G already features a cookie butter recipe on its website. I promise you, my one’s very different. Creamy, molasses-y, and humming with warm spices, this Parle-G cookie butter is Christmas in a jar.
Ingredients
For the Xmas spice mix:
1. ¾ tsp finely ground Ceylon Cinnamon powder
2. ¾ tsp ginger powder
3. ¾ tsp grated nutmeg
4. 1/8 tsp all spice
For the cookie butter:
1. 200 gm Parle-G biscuits (32 biscuits)
2. 100 gm dulce de leche
3. 60 gm salted butter, melted and cooled
4. 30 gm dark muscavodo sugar
5. 25 ml milk + 25 ml more
6. 1/8 tsp pure vanilla extract
7. Pinch of salt
Prep
1 – Make your dulce de leche. Check out my recipe for 5-way Caramel Cupcakes to see how to make it or click here.
2 – Make your Xmas spice mix; add all the spices listed to a jar with a lid. Shake the jar to combine. Your spice mix is ready.
3 – Melt your butter and then leave it aside to cool.
4 – Break your Parle-G biscuits into small chunks for faster processing.
Method
1 – To the jar of a food processor, add the broken Parle-G biscuits, and pulse them until you have fine crumbs.
2 – Add 100 gm of dulce de leche, the melted butter, the dark muscavado sugar, and 25 ml milk to the jar of the food processor. Pulse together on high for 1-2 minutes or until you get a thick, pasty mixture. If the fats in the dulce de leche and the butter separate from the solids, don’t worry. This will be fixed in the next step.
3 – Add the other 25 ml milk, the vanilla extract, and 1 ½ tsp of the spice mix, and pulse together for 15-20 seconds. The mixture will come back together, as a thick, sticky cookie butter.
4 – Taste the butter and add a little salt or a tad more spice if desired. Pulse again to combine. Your Parle-G Xmas butter is ready! Transfer it to a sterilised airtight jar and store it in the fridge until ready to use.
This recipe yields roughly 450 gm cookie butter and will easily fill 30+ macarons. It can be made 2 weeks ahead of time and stored in the fridge. Leftovers (as if) can be spread on toast or spooned straight into your mouth! Bring the mixture to room temperature before transferring it to a piping bag and filling your macaron shells. As this is a homemade product and contains no artificial thickening agents, the fats in the cookie butter may separate in warm weather (25OC+). If this happens, simply give it a good stir and place it in the fridge for 15 minutes or so to set back up.
Stage 2: French-method macaron shells
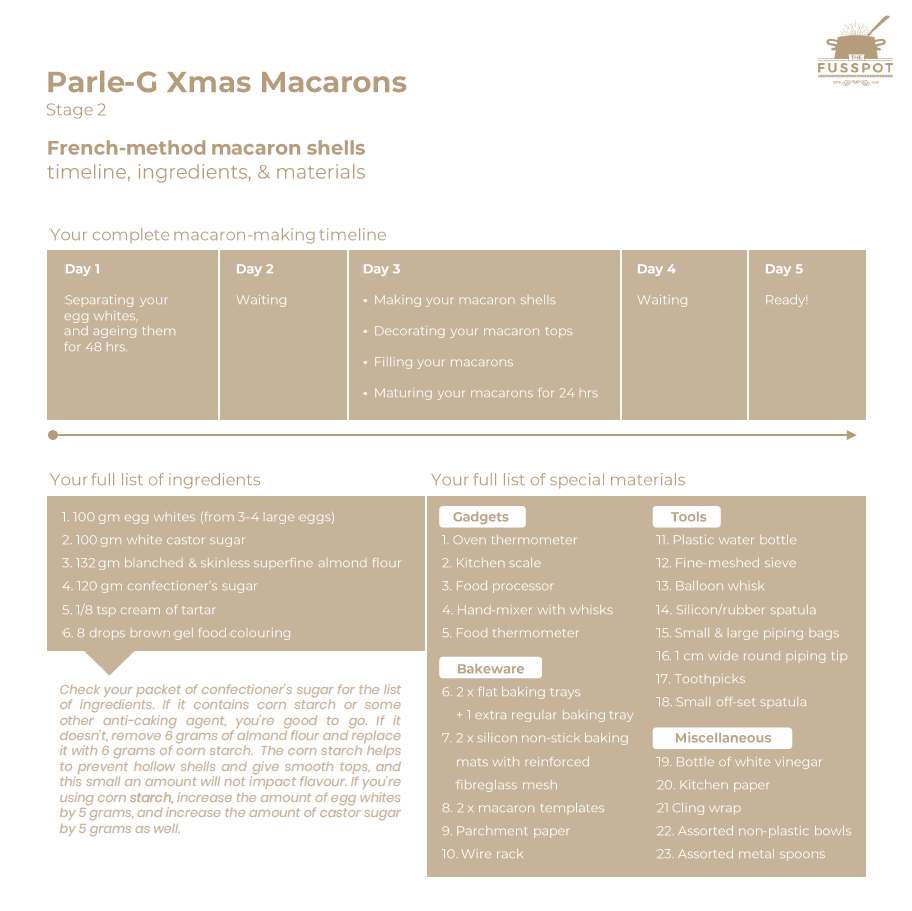
For my macaron shells, I’ve adapted the recipe from Ladurée Sucré. In a nutshell, a macaron is 2 almond flavoured meringue shells with a filling sandwiched between them. French-method macaron shells are made with French meringue; wherein raw egg whites are whipped with castor sugar. Sounds simple, but well-made macaron shells are a true technical accomplishment. Done right, macarons take 4-5 full days to make before they’re ready to eat! If you plan to serve these on any given day, you’ll have to begin 5 days in advance for optimum results. Before you even attempt this dish, watch all the links embedded inside and at the end of the recipe. Macarons are super technical to make, so you want to be prepared at every stage. Truth be told, there is no such thing as a universally fool-proof recipe. If you see such a recipe, it’s click bait! My recipe simply documents what worked in my kitchen, with my oven. When you make macarons, you will have to experiment in your kitchen with your oven. Do your own research and glean as much information and knowledge as you can. I highly recommend baking some test batches and taking copious notes about what worked and what didn’t. Once you’re confident about your macaron making abilities, take the plunge and have some fun!
Part 1 – Test your oven
Accurate oven temperature is key to making a successful macaron. Macarons typically bake at 150-160OC. Sometimes, ovens can be off by up to 20-30 degrees Celsius, which is a massive temperature difference. If your oven burns hotter or colder than what you set it to, then your macarons will not bake correctly. You could end up with flat shells, no feet, cracked tops, browned bottoms, etcetera, etcetera! Make sure you know your true oven temperature before baking your macarons.
Materials
1. Oven thermometer
Method
1 – Place/hang your oven thermometer in the centre of the middle rack of your oven.
2 – Preheat your oven to 180OC for 20 minutes.
3 – Look at the temperature reading at the 20 minute mark. If your heat setting matches the thermometer reading, your oven is correctly calibrated.
4 – If you see a stark temperature difference after 20 minutes of pre-heating, you will need to make modifications accordingly. For instance, if you set your oven temperature at 180OC but the thermometer displays 160OC, your oven runs cold and you will have to bake your macarons 20 degrees higher, or at 170OC instead of 150OC. Conversely, if you set your oven temperature at 180OC but the thermometer displays 200OC your oven runs hot, and you will have to bake your macarons 20 degrees lower, or at 130OC instead of 150OC.
Part 2 – Prepare your egg whites
This step involves separating your egg whites from the yolks. If your eggs are fresh, the whites will be thick and will need to be thinned. Why? Many macaron experts claim that thinner/drier whites from old eggs whip more easily to a higher volume than thick whites from, fresh eggs. Other macaron experts have debunked this, but as a beginner, I’m not willing to throw the dice! Determine the age of an egg by gently placing it in a glass of water (un-cracked). If the egg stands up on the bottom of the glass, it will be great for meringue and there’s no need to thin it through aging. If the egg lies on its side on the bottom of the glass, it’s very fresh and could do with some aging. If it floats, that means it has spoilt and is only good for the compost bin.
Ingredients
1. 3-4 large eggs, weighing roughly 57 gm each to give 100 gm egg whites
Materials
1. A bottle of white vinegar for cleaning
2. Some kitchen paper for cleaning
3. 1 recyclable plastic water bottle
4. Bowl 1; 1 small non-plastic bowl for cracking the eggs
5. Bowl 2; 1 medium non-plastic bowl for holding all the egg whites
6. Bowl 3; 1 medium non-plastic plastic bowl for weighing and storing the egg whites
7. 1 small bowl for holding the egg yolks
8. Kitchen scale
9. Cling wrap
Method
1 – Chill your eggs in the fridge for an hour. It’s much easier to separate cold eggs.
2 – Clean and dry your hands and utensils very well. Egg whites will not whip up properly in the presence of fats or water. To remove any residual oils, wipe down all utensils with some vinegar.
3 – After an hour, take the eggs out of the fridge. It’s time to separate the egg whites from the yolks.
4 – Take Bowl 1. Very carefully crack an egg into it.
5 – Using the plastic bottle, suction-up the egg yolk and transfer it to the bowl for the egg yolks. Here’s how.
6 – Then, transfer the egg white from Bowl 1 to Bowl 2, making sure it is absolutely clear of egg yolk.
7 – Repeat steps 4 through 6 for each cold egg, one by one, until you have separated all your eggs.
8 – Once you have separated all your egg whites, weigh out exactly 100 gm in Bowl 3, cover it with cling wrap and set it aside for 20 minutes or until the egg whites reach a temperature of 20OC. Move on to Part 3 while you wait for your eggs to come to temperature.
9 – If your eggs are fresh, proceed to thin them out by aging them in the fridge. Place the covered bowl in the fridge for at least 48 hours and no more than 4 days. Move to Part 3 only after the egg whites are done aging and you are ready to make your macaron shells. Before using the egg whites, take them out of the fridge and let them rest on your counter for 20-30 minutes or until they reach a temperature of 21OC.
It’s best not to use your hands to separate the whites from the eggs as your hands may transfer residual grease. Cracking each egg into a bowl separately will ensure that if any egg yolk mixes in with the whites, your entire portion of egg whites will not be compromised. If some yolk gets into the whites, try to scoop it out with a piece of egg shell. If you can’t, keep that batch aside and use it in another recipe, as it won’t work for a meringue. Store your egg yolks covered, in the fridge, and use them to glaze pies or to make custard or lemon curd.
Part 3 – Prepare your dry mixture
Even if your package of almond flour claims to be ‘superfine’, I still recommend doing this step to eliminate the risk of grainy/bumpy macaron shells. For this recipe, the ratio of almond flour to confectioner’s sugar is 1:1. However, I have accounted for roughly 12 gm wastage from the sifting of the almond flour, which is why I’ve written out the weighed measurement as 132 gm and not 120 gm.
Ingredients
1. 132 gm blanched & skinless superfine almond flour (before sifting)
2. 120 gm confectioner’s sugar
Materials
1. Food processor
2. Fine-meshed sieve
3. Balloon whisk
4. 1 large bowl
5. Cling wrap
Method
1 – While your eggs are coming to temperature, weigh out exactly 132 gm almond flour, and 120 gm confectioner’s sugar and add them to a large bowl. Using your whisk, gently combine the two.
2 – Place this dry mixture in the jar of a food processor. Pulse together for 3 x 3-second bursts. Then shake the jar well, so that the coarser powder rises to the top. Pulse again for 3 x 3-second bursts. Do not over-pulse, or you’ll end up with almond butter.
3 – Sift the mixture into the large bowl. Your goal is to collect the small powder, and not force any hard bits through. It’s fine to break up any large lumps with your fingers, but do not try to smash any lumps through the sieve. Remove the bits stuck in the sieve and keep aside.
4 – Return the mixture to the jar of a food processor and pulse for 3 x 3-second bursts. Then shake up the jar and pulse again for 3 x 3-second bursts.
5 – Sift the mixture into the large bowl for a second time. Once again, only collect the small powder, and do not force any hard bits through the sieve. Remove the bits stuck in the sieve and keep aside.
6 – The bowl of fine, sifted powder is your dry mixture. Cover it with cling wrap and set it aside. If you live in a humid climate, like me, keep it in the fridge until ready to use.
Please do not use homemade confectioner’s sugar in this recipe. Store-bought confectioner’s sugar has a finer texture and contains anti-caking agents such as corn starch, which helps in preventing hollow shells and in creating smoother tops. Make sure you do not process your almond flour without the confectioner’s sugar, as the oils from the almonds will release and you’ll end up with almond butter. Don’t throw away the 12 grams of lumpy stuff you’ve salvaged from the sieve. Instead, store it covered in the fridge, and use it to make frangipane or marzipan!
Part 4 – Make your macaron shells
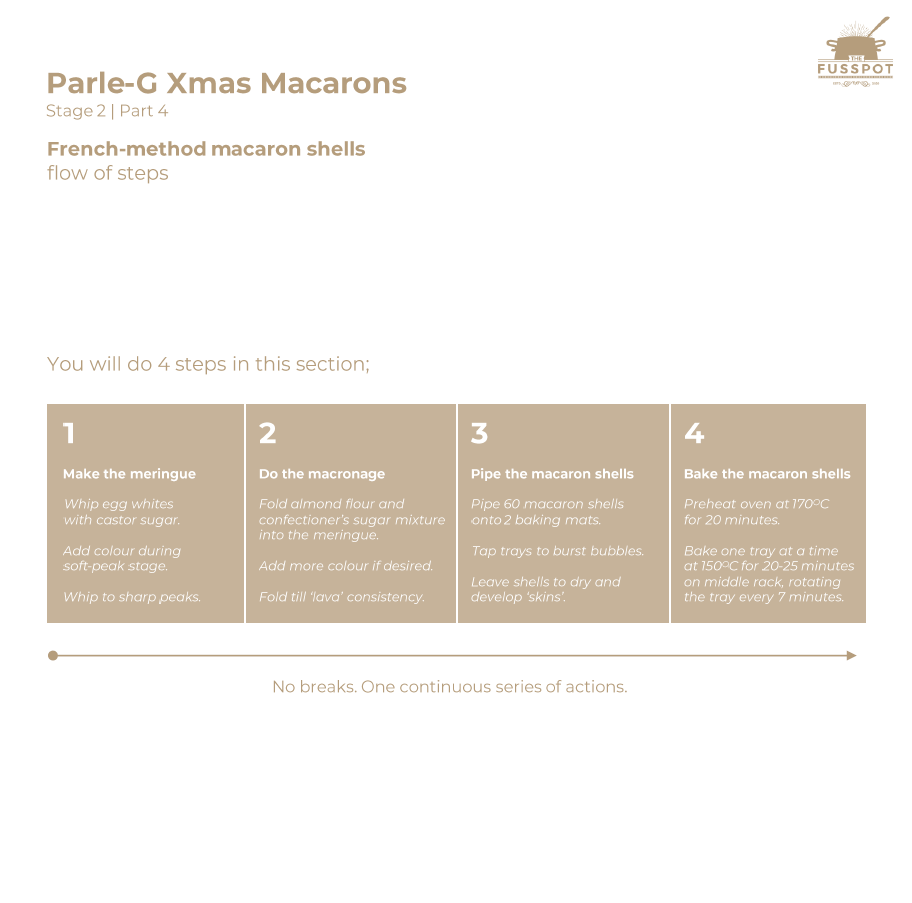
From the point you begin whipping your meringue to the point you finish piping your macaron shells, you will have to proceed in one continuous flow. Staying organised is key. Measure out everything, keep all your tools handy, and proceed calmly and swiftly. This recipe makes 30 x 4 cm sandwiched macarons, which means you’ll need 60 macaron shells. Once you make your macaron batter, you must pipe all of your shells in one go. You positively cannot leave any batter sitting around and pipe it later. However, because macaron shells require even heat to rise, you can only bake one tray at a time. Since the average home oven can accommodate about 30 macaron shells at a time, you will have to pipe 30 macaron shells on one baking tray + 30 more on a second baking tray. You could reduce the ingredients by half and pipe only one tray, but the meringue-whisking and macronage-folding timings will change. Also, are you going to be happy with just 15 sandwiched macarons on Christmas? Are you?! Didn’t think so. Ergo, if you have a medium OTG style oven but want 30 sandwiched macarons, you will need 2 of everything; 2 baking trays, 2 baking mats, 2 printable macaron templates. Capiche?
Ingredients
For the meringue:
1. 100 gm aged egg whites at 20OC (they may weigh a little less after aging)
2. 1/8 tsp cream of tartar
3. 100 gm white castor sugar
4. 8 drops brown gel food colouring
For the macronage:
5. Dry ingredients from Stage 2 | Part 3, processed and sifted twice
Materials
1. A bottle of white vinegar for cleaning
2. Some kitchen paper for cleaning
3. 1 large metal bowl
4. A hand-mixer with a whisk attachment
5. A fine-meshed sieve
6. A rubber or silicone spatula
7. A tall drinking glass
8. A large icing bag
9. 1 cm wide, round piping tip
10. 2 flat baking trays like this + 1 extra regular baking tray
11. 2 macaron mats like this, or 2 of these mats + 2 macaron templates
12. A couple of toothpicks
13. A small offset spatula
Prep
1 – Ready your trays; lay your baking mats on top of your flat baking trays. Your mats should lie flat, else your macarons will be misshapen. Flat baking trays guarantee even heating from all directions. You can even invert a regular baking tray and use the flat side. If you don’t have a macaron mat with the template already printed on it, print 2 copies of this macaron template and use them as guides under your baking mats. Print the templates without resizing them. Once printed, you can trim them to fit the dimensions of your baking trays. You could also draw 30 x 4 cm circles on some paper and use that as a template. Most of the experts recommend non-stick, fibreglass enforced baking mats for best results. If you cannot get such baking mats, use the guides under some parchment paper.
2 – Ready your piping bag; first attach your piping tip to a large piping bag. Then fold or twist the tip of the bag (this prevents batter from coming out the other end) and stand the piping bag in a tall glass. If your piping bag is long, fold its overhanging edges over the rim of the glass (like a cuff). This will make it easier to push the batter to the bottom of the bag. Set it aside.
3 – Keep your cream of tartar and brown gel food colouring close by.
4 – Ready your meringue tools; once again, clean and dry your hands very well. Then wipe down your large metal bowl and your metal whisk attachments with some vinegar to remove any residual oils.
5 – Use some more vinegar to clean the bowl in which you’ll measure out your castor sugar. Then weigh out your castor sugar.
6 – Check if your eggs are between 19-21OC. Yes? You’re now ready to begin making your macaron shells! If you live in a humid climate like me, move to a room with an air conditioner set at 21OC.
Method
1 – Place the egg whites in your large metal bowl. Using your handheld mixer, whisk on low speed until the egg whites get frothy and slightly lighter in colour. There will be small bubbles, and it will start to look foamy.
2 – While continuing to whisk on low, add 1/8 tsp cream of tartar and continue whisking until the mixture begins to tighten and have smaller bubbles, almost like shaving foam. You should also begin to see trails being left by the whisk attachments in the “foam”.
3 – While continuing to whisk, raise the speed to medium, and slowly add in 1/3 of the castor sugar and beat for 30 seconds.
4 – While continuing to whisk on medium, slowly add in another 1/3 of the castor sugar and beat for another 30 seconds.
5 – While continuing to whisk on medium, slowly add the last 1/3 of the castor sugar and beat for 1 minute and 30 seconds. The mixture will become properly foamy like thick shaving foam. Test your mixture to see if it has reached the soft peak stage. When the whisk is pulled out and held upright, the mixture on the tip of the whisk should gently curl back on itself like a wave.
6 – Add the brown gel food colouring. I added 8 drops of Papilon Chocolate Brown gel food colour. If you’re using another brand, remember to make the batter one shade darker than the desired colour, as the colour of the macarons will lighten with the incorporation of dry ingredients, as well as after baking. Continue to whisk on medium until all the colour is combined in the meringue. Stop the mixer and look at your bowl. The mixture should start to look creamy and gooey like melted marshmallows.
7 – Resume whisking the mixture on medium until you reach the stiff peak stage. Stop the mixer again to look at your bowl. The mixture will look smooth and shiny. When you lift the whisk up, the stuff on the whisk will stand up in one stiff peak.
8 – Resume whisking the mixture on medium until you reach the sharp peak stage. Stop the mixer and look at your whisk. When you lift the whisk up, the stuff inside the whisk should be balled up in a single clump, and the stuff on the whisk should have multiple, jagged peaks. When you tap the whisk on the bowl, the stuff trapped in the whisk should come out in a single, stiff, fluffy, bouncy clump. Take a bit of the mixture and rub it between your fingers. It should feel smooth and silky with zero traces of sugar granules. This is our meringue and it must be used immediately. Do not let it sit at all.
9 – It’s time to macronage, or fold your dry ingredients into your meringue.
10 – Get your bowl of dry ingredients (already sifted twice). Sift 1/3 of it over the meringue and then grab your spatula. While rotating your bowl, scrape the spatula around the sides and under the bottom of the bowl, and then cut through the middle of the batter with the spatula. This is 1 fold. Do this motion for 10 folds.
11 – Then sift in another 1/3 of the dry ingredients and do 10 folds to incorporate.
12 – Finally sift in the last 1/3 of the dry ingredients and do 10 folds. The dry ingredients should no longer be visible at this time.
13 – Now that all your dry mixture has combined with the meringue, do another 10 folds. You can also add a little more food colouring at this stage if you want a darker cookie. I did not.
14 – Do another 10 folds, and stop. It’s time to check if your batter is ready and whether you should stop folding.
15 – First look at the bowl. The batter should be thick and glossy. Lift up a large portion of batter with the spatula, and then tilt it back into the bowl and try to draw a figure 8 with the cascading batter. Look at the flow rate. If it falls in one tapering, continuous, jagged stream, your batter is ready. If the figure 8 you just made rests on the batter and takes about 30 seconds to flatten out, your batter is ready. Stop folding and immediately transfer your mixture to a piping bag. However, if the batter falls in broken clumps, the batter is not ready. Look in the bowl as well. If the bits that fell from the spatula into the batter remain in a rigid clump even after 1 minute, the batter is not ready. Fold another 2 times and check again (and again). I did a total of 65 folds.
16 – When you’re at the correct consistency, immediately transfer your mixture to a piping bag. Work quickly and do not over-handle your macaron batter. This technique is helpful.
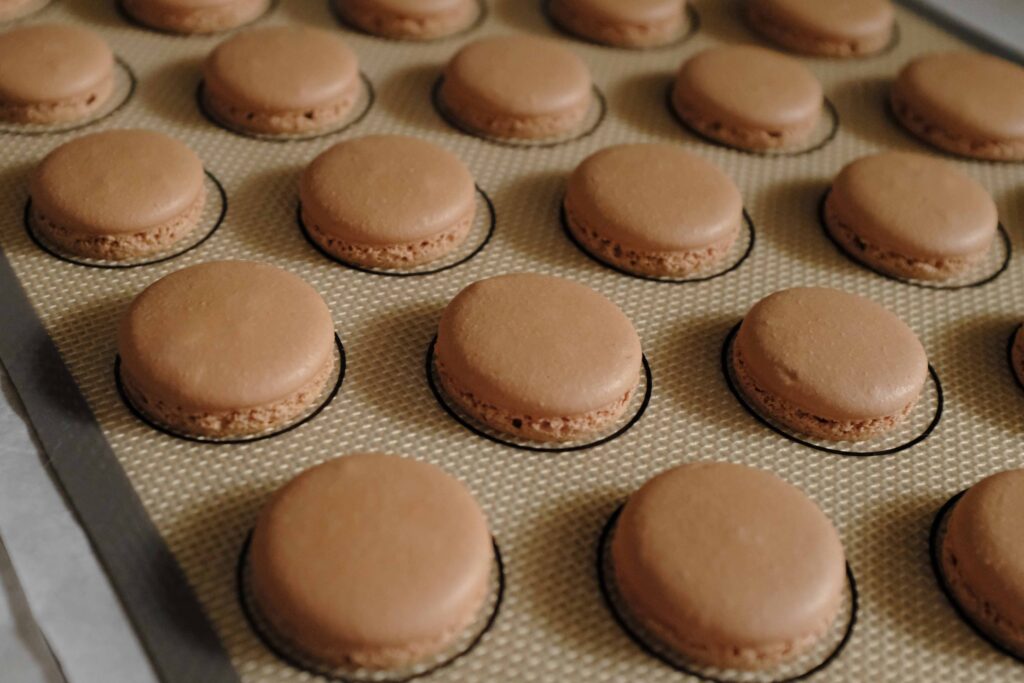
17 – It’s time to pipe your macaron shells. Get both your prepared baking trays. If using parchment, glue it to your baking tray with some batter. Hold the tip-end of the piping bag with one hand to steady it, and hold the twisted-end with your other hand to push the batter down. Hold the bag upright and perpendicular to the baking mat, and hover the tip 3/4 cm above the centre of a circular outline. Keeping the tip still, squeeze the end of the bag to push the batter out. Do not swirl the tip at all. See this video for the technique. When you’ve piped a 4 cm disc (just within the outer circle on your template), stop squeezing and swiftly lift the tip up to stop the batter from coming out. Move on to the next circular outline and repeat till you have piped all 60 macaron shells.
18 – If using templates, remove them from under your baking mats or parchment paper.
19 – Hold your baking tray and firmly and rap it on your counter 3-4 times. This will bring any rogue bubbles to the surface of the piped macaron shells. Do this for both trays.
20 – Using a toothpick, carefully tease out any bubbles that have emerged on the surface of your macarons.
21 – Leave your trays of macaron shells to dry for 30-60 minutes and develop ‘skins’. This is absolutely crucial in creating the signature macaron ‘feet’. Without the skin—when the shells are placed in the hot oven—air will escape from the tops of the shells instead of the bottoms, and the shells won’t ‘grow’ their signature feet. Heat escaping from the top may also crack the surface of the shells. Mine took 30 minutes with an air conditioner set at 21OC. To check if the skin has developed, first see if the tops have gone from wet and shiny, to dull and matte. If they have, lightly run your finger along the top surface a few shells. If your finger remains clean, the shells are ready to bake.
22 – Remember that extra baking tray I added to the list of materials? You’ll need it now. Because macarons are so temperature sensitive, it’s advisable to shield them from below to prevent their bottoms from turning too brown before their tops have cooked. If you only have a top heating source, you may need to shield the macarons from above by placing the extra baking tray on the top rack of your oven. Read this for more information. Place your extra baking tray in the middle rack of your oven. Begin pre-heating your oven to 170 OC. It must pre-heat for a full 20 minutes.
23 – After 20 minutes of pre-heating, lower the oven temperature to 150OC. Place Macaron Tray 1 on the pre-heated tray (already set in the middle rack of your oven). Bake at 150OC for 20-25 minutes, rotating the tray every 7 minutes, until fully set.
24 – After 20 minutes of baking, open your oven and test one shell. Fully set, the top should look dry and shiny, and feel firm when you lightly tap on its surface, while the bottom should be crusty and have the tell-tale ‘feet’. Gently place your finger on the shell and lightly rock your finger back and forth. If the top is wiggly, it needs another minute or two to bake. After 20 minutes has passed, check the shells every 45 seconds, with the ‘finger-rocking’ test.
25 – When you’re happy with Macaron Tray 1, take it out of the oven and place it on a wire rack. After 15 minutes, you can remove the mat from the baking tray. Do not forcefully peel the macarons from the baking mat. Let them cool completely and they will release easily. You may need to gently slide an offset spatula under each one to release it.
26 – Take this opportunity to check the macaron shells by sacrificing one shell and cutting into it to see if it has fully developed or has hollow bits. A tiny gap will fill with maturing, but a large gap will stay that way.
27 – If you’re happy with your first tray of macarons, then bake the second tray in exactly the same way. Else read this and tweak your oven settings. Pre-heat your oven once again at 170OC for 20 minutes. Then lower the oven temperature to 150OC. Place Macaron Tray 2 on the pre-heated tray (already set in the middle rack of your oven). Bake at 150OC for 20-25 minutes, rotating the tray every 7 minutes, until fully set.
29 – Once all 60 macaron shells are out of the oven and resting, you can too! Dance, have a drink, breathe!
30 – If you don’t wish to decorate your macarons, skip ahead to Stage 4. However, if you want to decorate the tops of your macarons with festive embellishments, you will have to do that before filling them.
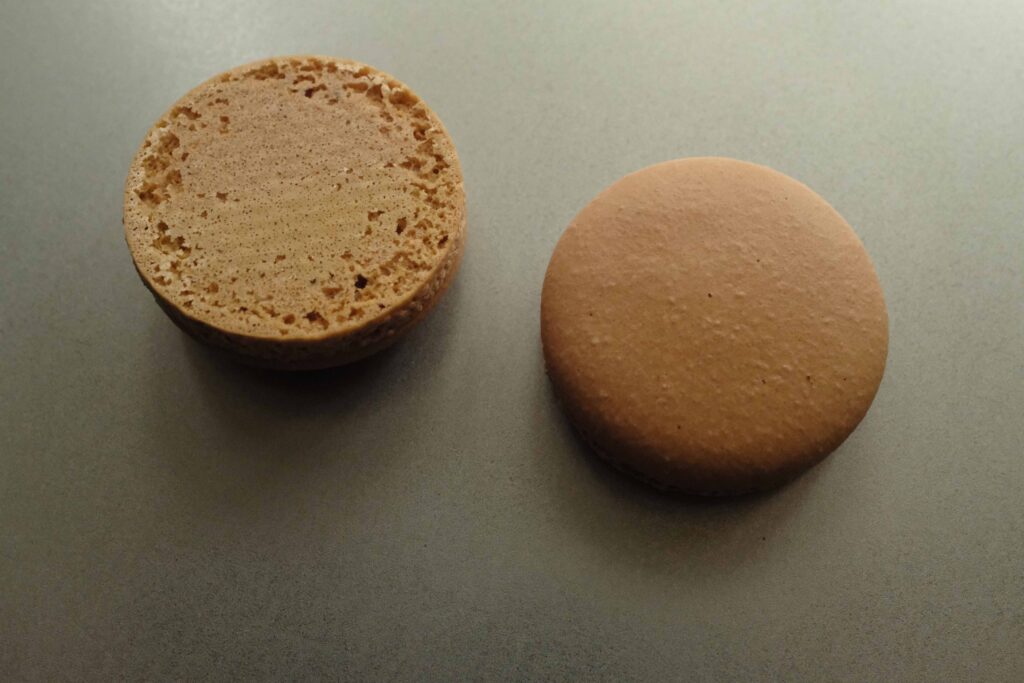
This batter is enough to pipe 60 x 4 cm macaron shells as well as about 10 extra shells to run as testers. Please keep in mind that this was my very first attempt at making macarons and I am not a macaron expert. The temperatures and bake time reflect what worked in my oven. Your oven will probably give you different results. I tested macarons baked on parchment as well as silicon baking bats. The parchment macarons spread more on tapping the tray, baked faster at the same temperature, and released very easily even when hot. However, because the piped batter spread more freely, the macarons were kind of misshapen. The silicon mat macarons all looked perfectly round, but took longer to bake and had to fully cool before they could be removed. If you’re using silicon mats with thick baking trays, you may not need to double-tray at all. I needed to, since I used very thin cookie sheets as baking trays. Full disclosure, out of 60 macaron shells + 10 tester shells, I got 15 hollow shells. All of these shells were located along the far left and far right sides of my baking trays. My guess is that the sides of my oven don’t get as hot as the centre, so the macarons in those areas under baked and collapsed on cooling. Don’t be too disappointed with hollows. As long as they’re not burnt or undercooked, your macarons will taste great, even if they don’t look perfect. Did I get perfect macarons? No. Did they taste amazing? Yes! Should you take the plunge? Hell yes!
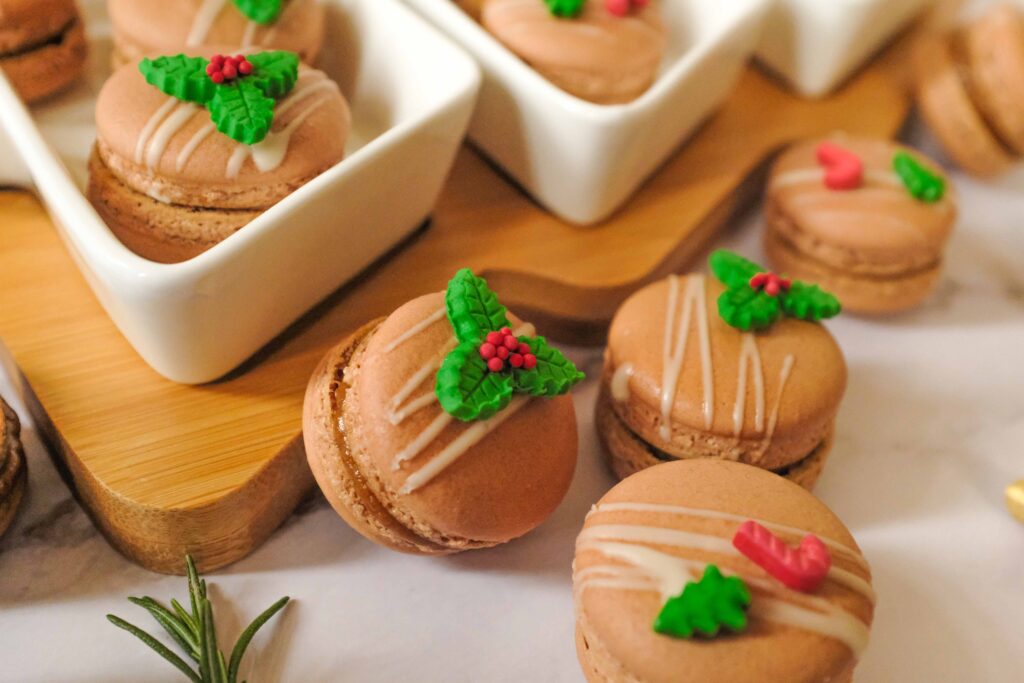
Stage 3: decorations (optional)
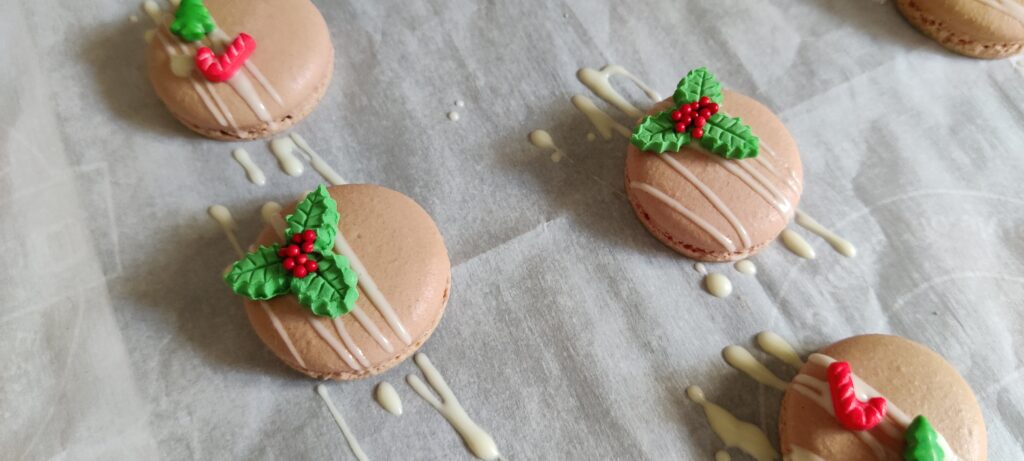
Once the shells are done, this is when you get to kick back and add some festive flair to your macarons. Ready-made sprinkles look great and take minimum effort. And after all that work, decorating should be relaxing.
Ingredients:
1. Assorted Christmas themed sprinkles
2. 50 gm white chocolate
Materials
1. Parchment paper
2. Small piping bag
Method
1 – When the shells are all cool, peel them from the baking mats and match similar sized shells with each other. Each pair will make a sandwich.
2 – Lay down some parchment. Arrange the paired shells in two rows on the parchment. Keep the top row for the top shells (rounded-side up), and the bottom row for the bottom shells (flat-side up). Remember, only the top shells will be decorated.
3 – Melt the white chocolate. Cut your white chocolate into small shards and place it in a microwave safe plastic bowl. Microwave at 450 watts for 30 seconds. Stir briefly with a spatula and then microwave it for another 20 seconds. Thereafter, keep heating the mixture in 10 second increments till the chocolate has completely melted, making sure to stir briefly each time. The temperature of the white chocolate should reach no more than 29OC. It’s ready when most of it has melted and you can still see a few lumps, which will melt in the residual heat on stirring.
4 – Transfer the melted chocolate to a small piping bag.
5 – Make a tiny snip at the end of the bag and then drizzle the top shells with 5-6 lines of white chocolate.
6 – While the chocolate lines are still wet, place the sprinkles directly on top of them. Let the chocolate dry fully at room temperature, for about an hour. Once it’s dry, the sprinkles will be stuck to the shells. Let the chocolate fully dry before attempting to fill the macarons, else you may smudge the lines!
Stage 4: Finale; macaron filling, assembly, and maturation
Components
1. 30 decorated macaron top shells + 30 undecorated macaron bottom shells
2. Parle-G Xmas butter
Materials
1. Piping bag
2. 1 cm wide, plain round piping tip
Prep
1 – Take the cookie butter out of the fridge and bring it to a pipeable consistency.
2 – Once it’s pipeable, add the cookie butter to a piping bag fitted with a 1 cm round piping tip. If you’re not bothering with a piping tip, snip the tip of the piping bag so that you have a 1 cm wide opening.
Method
1 – Pipe a 3 cm wide dollop of cookie butter in the centre of the flat side of your bottom shells. Then top it with its matching decorated shell.
2 – Gently press the two shells together like a sandwich, so the filling spreads till the edges of the shells. See this as a guide.
3 – Fine. Go ahead and eat one, but for the optimum macaron experience, you must mature the macarons in the fridge for at least 24 hours. This will allow the filling to soften and flavour the shells to give the ultimate, soft, chewy macaron. Moreover, if your macaron shells have that pesky little top gap, maturing them in the fridge for about 24 hours will fill that gap back up! Store the filled macarons, decorated-side up in an airtight container in the fridge for 24-48 hours.
4 – After 24-48 hours, take the macarons out of the fridge and let them rest for 30 minutes before serving. NOW DEVOUR THEM AAAAAAAAAAALLLOLOLOLOHOHOHO!
Additional decorations

The gingerbread men and candy canes pictured were made out of homemade coloured marzipan, pressed into silicon moulds. To make a small batch of marzipan, pulse 100 gm almond flour with 200 gm confectioner’s sugar in a food processor. Drizzle in 1 egg white (approx. 30 gm) in thirds, pulsing for a few seconds after each addition until you get a dough. Add 1 drop of almond extract and ¼ tsp clear vanilla extract and give it one final pulse. Place the mixture on a microwave-safe plate, cover it with cling wrap and then microwave it on full power for 4 x 10 second bursts. Keep the wrap on and leave the marzipan onto your counter to cool. Once cool, portion out your marzipan, add food colouring to the different portions and then knead them individually with a little extra confectioner’s sugar until you have different colours of marzipan. Colourless marzipan must still be kneaded with a little confectioner’s sugar, as it will be too sticky to handle after microwaving. Marzipan will dry stiff (like fondant) when exposed to air. Hand-shape it, add it to moulds, or do what you like with your delicious homemade marzipan! To store marzipan, wrap it tightly with cling wrap and keep it in an airtight container in the fridge. It will keep for a good 2-3 months. The white detailing was made with a tiny amount of easy royal icing. To make, measure out 5 tbsp. (50 gm) sifted confectioner’s sugar + ¾ tbsp. egg whites + ½ tsp fresh lemon juice, and stir together in a non-plastic bowl. Transfer to a small piping bag, and decorate away!
Tips & Tricks
How to whip meringue for French method macarons:
How to macronage for French method macarons:
Step by step French macaron making videos:
Useful articles:
https://foodnouveau.com/recipes/how-tos/how-to-make-french-macarons/
https://bakingbutterlylove.com/french-macarons/
Troubleshooting:
https://www.indulgewithmimi.com/macaron-troubleshooting-guide/
https://foodnouveau.com/recipes/desserts/macarons/macaron-troubleshooting-guide/
https://www.piesandtacos.com/macaron-troubleshooting/
https://bakealish.com/guide-to-a-perfect-french-macaron/