


Makes 6 servings.
This Diwali, I played with fire and torched something sweet. My target? Sweet curd—or as it is better known, mishti doi. An intensely popular Bengali dessert, it is made by fermenting caramel-tinted, reduced milk. Traditional mishti doi does not contain cardamom, jaggery, or nuts—and is perfect, without the bells and whistles. In my version, I honour all the classic flavours, and then amplify them with fire! When you have a culinary torch, why only light up a crème when you can also light up a curd?
At a glance
– This dish comprises sweet set curd + caramelised sugar topping
– You will need a deep vessel (2 litre capacity), a tall saucepan with a lid, 6 oven proof ramekins, aluminium foil, and a culinary torch.
– This recipe has been broken into 2 stages for ease and comprehension. Please read the entire recipe from start to finish before beginning.
Stage 1: Sweet set curd
An authentic, traditional sweet curd or mishti doi comprises nothing but full-cream milk, cane sugar, and starter curd. Its characteristic rich and creamy texture is neither achieved by overly reducing the milk, nor by adding thickeners like heavy cream and milk powder. Moreover, it is set the old-school way, with time and patience, not by being baked or steamed.
Ingredients
1. 1 litre fresh, whole/full-cream buffalo milk (not UP or UHT milk)
2. 100 gm white granulated sugar (for the milk) + 100 gm white granulated sugar (for the caramel)
3. 60 ml + 60 ml water (for the caramel)
4. Hot water (as needed)
5. 350-300 gm unflavoured curd (4.5-6 gm fat per 100 gm) with active lactic culture, to yield 180 gm strained curd
6. Pinch of salt
Prep
1 – Strain your curd; place a strainer over a vessel. Line the strainer with a cheesecloth or muslin.
2 – Place the curd on the cheesecloth. Gather the 4 edges of the cheesecloth and lightly squeeze out the excess whey.
3 – Put the cheesecloth bundle back on the strainer. Let this sit on your counter for an hour, dripping away. Thereafter, your strained or thickened curd is ready to be used. This is our starter curd which will be used to ferment and set our sweet curd.
For your starter curd or ‘dahi ka jamun/dahi ka saancha’, it’s very important to use curd that contains at least 4.5 gm of fat per 100 gm, as well as active lactic culture. Otherwise your sweet curd won’t set up. In Bengal, you simply hop to your nearest Sweet Shop and ask for some ‘tok doi shaancha’ [tawk doh-ee shah-chah]. Here in Mumbai, I have to check the curd packaging to make sure I’ve got the correct stuff. Curd/dahi, is not the same thing as yoghurt, which is made with very specific culture strains and through a different process. Do not buy flavoured yoghurts or even unflavoured Greek yoghurt as you will not get the desired outcome. Always taste your starter curd to check if it’s viable. If your starter curd smells overly sour or fizzy, your set curd will take on the same flavour as well! Don’t throw out the whey. It can be added to curries, dals, and soups or even used to knead flour. Simply store it in the fridge and use it up within a day or two at the most.
Method
1 – Take a deep vessel and pour in 1 ltr of milk. Place it on the stove and begin heating the milk on medium-high. Stir continuously.
2 – Once the milk comes to a boil, lower the heat to medium and add in 100 grams of sugar. Give it a stir.
3 – Place a bamboo skewer in the centre of the pot and mark the depth of the milk. Take the skewer out and mark another spot, 1/4th of the way down. You will be reducing the milk to this mark.
4 – Stirring continuously, simmer the milk on medium heat for about 10-15 minutes or until the milk has reduced by 1/4th its volume, that is; 1 litre has reduce to 750 ml. Use your bamboo skewer marker to confirm the depth of the reduced milk. Don’t reduce it any further than this, else you will get ‘kheer doi’ or even ‘shor doi’ rather than traditional mishti doi (both delicious, but not quite what we’re going for). Turn the heat off.
5 – It’s time to caramelise the sugar. Put 100 gm sugar and 60 ml water in a small saucepan and give it a stir to make sure all the sugar crystals are well coated with water.
6 – Place the saucepan on the stove and begin heating this sugar mixture on medium. You can stir the mixture at this point to encourage the sugar to dissolve. Once the sugar has dissolved, stop stirring and pop the lid on. Using a lid is the easiest way to prevent your sugar from crystallizing, as the built up steam will drip down and melt any stray sugar particles on the sides of your pan. If you’re worried about uneven heating, swirl the entire pan on the hob. This a wet caramel, so do not stir it at all.
7 – Watch your saucepan like a hawk, lifting the lid to peek at the mixture every now and again. Once the water has completely boiled away and the remaining sugar is a pure, clear liquid (160OC); lower the heat to minimum and take the lid off.
8 – As soon as the caramel turns amber (170-173OC), take it off the stove as it will continue to darken.
9 – Once the caramel is a nice medium-dark amber (174-176OC) add a splash of water (60 ml or so) and stir vigorously (be very careful as it will sputter and steam). Adding water will stop the caramel from cooking as well as cool it down, which is essential before adding it to the milk.
10 – Once the caramel is a bit cooler (roughly 170OC), add it to the hot milk and stir very well. Also add in a pinch of salt at this point. Stir.
11 – Put the milk back on the heat and cook the mixture for an additional 2-3 minutes on low heat or until all the caramel has fully combined with the milk. Don’t worry if you still see hard bits of caramel. Just add in a splash of hot water and continue heating and stirring until they dissolve.
12 – Take your vessel off the heat. Whisk the hot milk vigorously. This will break down the cream and disperse it into the milk, resulting in a thicker, homogenous curd. Set it aside until it comes down to a temperature of 44OC (slightly hotter than ‘blood warm’).
13 – In the meantime, transfer your strained curd to a medium bowl and whisk it until it is lump free, smooth, and creamy.
14 – Get your 6 ramekins. Put 1/4th teaspoon of whisked curd into each ramekin. Set them aside.
15 – Cut 6 squares of aluminium foil measuring 5×5 inches. Set them aside.
16 – Once your milk has cooled to 44OC, work fast. Ladle about half a cup of warm milk into your bowl of whisked curd. Whisk it together until it is well combined and smooth. This will temper the milk and prevent it from curdling. Add the rest of the milk in half cup increments until you run out of milk, whisking well between each addition to ensure that the mixture is homogenous.
17 – Divide the warm mixture among your 6 ramekins (roughly 155 ml per ramekin). Using a small whisk or a milk frother, whisk the mixture in each ramekin to combine it with the quarter teaspoon of curd you had added earlier on.
18 – Immediately cover each ramekin tightly with a square of aluminium foil. Quickly but carefully transfer the ramekins to a warm, stable spot to set. Wrap them snugly in some towels for extra cosiness and then leave them alone. They need to peacefully incubate so that the fermentation process can occur undeterred. It can take anywhere from 10-24 hours for your sweet curd to set. Be patient! Mine took 20 hours to set up, and I live in a warm climate!
19 – Once they have set, place them in the fridge for 4-12 hours to further set up. Overnight is best. They’re then ready for Stage 2.
Not all milks are suitable for this recipe. Curd cultures require milk that has not been treated beyond simple pasteurization and homogenization. Sweet curd is even trickier. The first time I tried to make mishti doi, I used UHT milk from a reputed company. It was a spectacular fail! To make it successfully, you need to use fresh whole/full-cream milk—the kind that has been only minimally treated. Contrary to popular belief, the signature ‘laal’ or warm brown colour of mishti doi is achieved with caramelised sugar and not with date palm jaggery, which is available only during winter. I have never made a jaggery flavoured curd, as it could cause the curd to have issues setting, resulting in a watery output. Additionally, this is a Crème Brûlée style dessert, so the caramelised cane sugar top pairs well with the cane sugar caramel in the curd itself. Some recipes instruct you to first make your caramel and then add your milk to the hot caramel. While this may seem like an easier method; adding milk to hot caramel can cause the milk to curdle. Yes, it’s happened to me! To avoid this, I recommend first boiling and reducing your milk and then adding slightly cooled caramel to the hot milk.
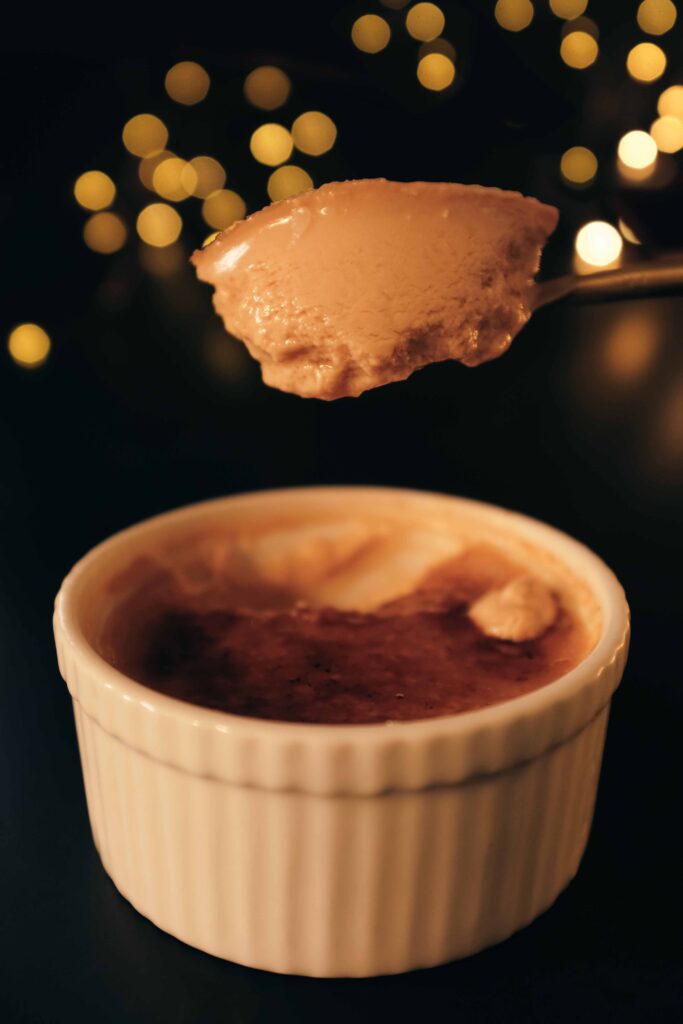
Stage 2: Caramelised sugar topping
Components
1. 40gm castor sugar or baker’s sugar
2. 6 ramekins of sweet set curd
Method
1 – Remove the ramekins from the fridge at least 15 minutes prior to browning their tops.
2 – Sprinkle 1 teaspoon of castor sugar on the surface of each curd. Try to get as even a layer of sugar as possible for even caramelisation.
3 – Use a culinary torch to brown the sugar topping on your curd. Slowly sweep the flame back and forth, taking care not to stay too long in one spot. You’ll begin to see a nice, caramel-coloured, speckled glaze form on top of the curd. When you’re done, you’ll have a hard, glass-like coating of caramelised sugar on top. Never caramelised sugar with a torch before? Watch this.
4 – Once you’re done, wait 5 minutes for the sugar to harden before serving. If you want to re-chill the curd, place the ramekins back in the fridge, uncovered, for 30 minutes. If you live in a humid climate, your caramel tops won’t stay hard for very long, especially once they’ve been removed from the fridge and attract condensation. Crack into each sweet curd brûlée quickly and devour!
Do not use large granulated sugar for your brûlée topping as it won’t caramelise fast enough or evenly. I have not tried to brown these sweet curds using my oven’s broiling mode as there’s a risk of melting/liquefying the curd underneath.
Tips & Tricks
Although it contains just 3 ingredients, sweet curd or mishti doi is a technically difficult dish to pull off. Anyone who claims that making it is easy, is either incredibly skilled, or is lying. Most recipes out there are vague, lack helpful instructions, and even outright misguide. After multiple failed attempts at replicating the exact texture, colour, and flavour of sweet shop mishti doi based on others’ recipes, I did my own research, testing, and troubleshooting. To give yourself the best shot at making this dessert, do follow all the instructions and tips below. They cover everything I wish I’d known before I made my first substandard mishti doi!
Ingredients troubleshooting
Will UHT/UP milk work if it’s whole/full-cream milk?
No. To make it shelf-stable or long-life; ultra-high temperature treated milk (UHT), or ultra-pasteurized milk (UP) is cooked to 135OC or higher. This denatures the proteins and makes it unsuitable for culturing and curdling. Fresh milk, either raw or pasteurized/semi-pasteurized works best.
Can I use low fat or skimmed milk for this recipe?
No. Making homemade curd requires fat to thicken and set. Sweet curd needs it even more owing to the sugar content. Without whole/full cream milk, you’ll end up with a loose, watery curd.
Can I use cow or goat milk for this recipe?
I have always used buffalo milk to make this, as it’s the creamiest of them all. My guess is that cow or goat milk will result in a less-thick sweet curd.
Can I use any kind of yoghurt as a starter?
Ideally, no. Yoghurt is made with very specific culture strains and through a different process. Whenever I have used yoghurt as a starter, my curd has gotten a ‘slim/gooey’ texture. Look for a curd with active lactic culture and at least 4.5-6 gm fat per 100 gm serving. Remember, your starter curd needs to be sour and not sweet!
Can I use homemade curd/dahi as a starter?
Definitely! Just make sure it was made with full cream/whole milk, and smells and tastes fresh. Homemade curd normally contains more whey than store bought curd, so you may need to start with a bigger amount of curd to get 180 gm of strained curd.
Why do I need so much starter curd?
Regular curd only requires 15 gm (1 tbsp.) of curd starter per 250 ml of milk. Owing to its high sugar content, sweet curd requires 4 times the amount of starter to set. That’s 60 gm (4 tbsp.) of starter per 250 ml of milk, or 180 gm in total for 750 ml of milk.
Do I need to add this much sugar?
You are free to use less, but it won’t taste like store bought mishti doi. I have experimented with a smaller amount of sugar and the sweet curd tasted too sour.
Can I use gur/jaggery rather than sugar?
Sure, but it won’t be a traditional mishti doi. Jaggery can only be added to milk after the milk has been cooked and the heat is off. Otherwise the milk can split. Jaggery also thins out the texture of the milk, so you’ll need to compensate by over-reducing the milk to get the curd to set.
Method troubleshooting
Is straining the curd the same as hanging the curd?
Not quite. Straining entails draining out the whey for just an hour or so. The process of making hung curd is much longer (4-24 hours depending on the type of curd), where the whey is drained out completely. What you’re left with is a thick spreadable, almost cream cheese like product. This is perfect for dips, stuffing inside kebabs, and making shrikhand and bhapa doi; but unnecessary for mishti doi.
Do I reduce my milk by 1/4, 1/2, or 3/4?
The internet is filled with recipes that point you in different directions. So which way should you go? I’ve gone in all, and only one direction is correct.
Let’s take 1 litre of milk.
3/4th volume reduction = 250 ml milk remaining. That’s practically a rabri. Not the texture you want here.
Now a 1/2 volume reduction = 500 ml milk remaining. That’s how you make evaporated milk. Factor in the sugar and you’ve got condensed milk. Again, not the consistency you want here.
Finally, 1/4th volume reduction = 750 ml remaining. Must be right, right?
To add authority to my experiments, I contacted the Bengali sweets stalwarts at Balaram Mullik. Here’s what they had to say, “If you use fresh, whole/full-cream buffalo milk, you may not have to reduce it at all. If you must, reduce the milk by no more than 1/4th.” FYI, they make 3 types of sweet curd using buffalo milk; normal Mishti Doi (no milk reduction), Kheer Doi (1/2 milk reduction), and Shor Doi (3/4th milk reduction). Rasmalai is their only sweet dish that is made with cow milk.
Can I make caramel without constantly monitoring the temperature?
Yes, you can eyeball it; as long as you have some experience in making caramel, you watch your pan like a hawk, and have quick reflexes and good hand-coordination. Caramel can go from sweet to just right to bitter to burnt in under 15 seconds. Never use dark pans while making caramel as you won’t be able to gauge the colour correctly. Because caramel can burn easily or splutter with the addition of liquids, always use tall, heavy-bottomed pots when making it. 3-5 ply stainless steel pots are ideal. Non-stick cookware should be avoided at all costs as they’re not designed to take the high heat of caramel. To learn more about caramel, read this and this.
Can I follow the dry caramel method?
Sure. Feel free to make the caramel the way you know how. I always start with a wet caramel because my sugar never crystalizes with this method. Just remember to bring the temperature of the caramel down with a splash of water before you add it to your reduced milk.
Can I make my caramel first, and then add milk to it?
You could, but it’s risky. Caramel gets extremely hot, and becomes slightly acidic at high temperatures. When you add room temperature or even warm milk to very hot caramel, it can curdle the milk, no matter how steadfastly you whisk. When this happens, the milk proteins will congeal and you’ll see small, brown, spongey bits suspended in your milk. This happened to me, and no amount of going at it with an emersion blender could save it. To err on the side of caution, get your milk hot first, then make your caramel. Thereafter, cool your caramel with a splash of water and then add it, bit by bit to your hot milk. It’s better to wash one extra pan than ruin an entire litre of milk.
What if my caramel clumps up and hardens when I add it to the milk?
This can happen if the milk has cooled down too much. Don’t worry if you still see hard bits of caramel floating around in the milk. Reheating the milk on low will gradually melt the caramel. This may take a good 12-15 minutes of reheating and stirring, so you may need to add a splash of hot water to top up your milk and keep it from over-reducing (1/4th reduction only, remember?). If you’re still stuck with some stubborn clumps of hard candy even after 15 minutes of heating and stirring, strain them out of your milk and devour them as a revenge snack!
Why must my reduced milk be at 44OC?
To ferment milk into curd, it’s necessary to create a warm environment for the active lactic culture to do its work. If your milk’s too hot you’ll get a runny, liquidy curd, and if your milk’s too cold, your curd won’t set at all. Unsweetened curd will set if your milk is at ‘blood-warm’ temperature or 40OC. However, because sweet curd requires more starter curd than normal to set, the temperature of the milk will drop a lot more with the addition of the starter. Therefore, your milk must be slightly hotter than just ‘blood warm’. If you don’t have a food thermometer, you must rely on your instincts and do the ‘finger’ test. Feel the vessel first. If it’s still hot-ish to the touch, carefully dip a clean finger into the milk. You should be able to keep your finger suspended in the milk for 5 seconds without fighting the urge to yank it back.
What’s the best vessel in which to set my sweet curd?
Hands down, earthen clay pots. The porous nature of this material allows extra water to leech out, resulting in a thicker curd than if you were to use any other non-porous materials such as glass, ceramic, steel, or plastic. I used ceramic ramekins in my recipe because of the brûlée aspect only.
Why do I need to be quick when it’s time to wrap the curd and leave it to set?
When it comes to setting sweet curd, timing and temperature go hand in hand. Active lactic culture needs warmth (incubation) and stillness, to ferment the milk into curd. If the milk cools down before you leave it to set, the culture will prematurely perish and your curd won’t set.
Can’t I just bake the curd or steam it like a custard?
No. A baked or steamed sweet curd is called a Bhapa Mishti Doi and calls for completely different ingredients and techniques.
Does it seriously take 14-24 hours to set?
Yup. I live in a warm climate and it took mine 20 hours to set up. If you live somewhere cold or it’s wintertime, create a warm, cosy environment, by pre-heating your oven for 10 minutes at 180OC. Then put your covered ramekins inside your warm oven and place a towel over and around them, and leave them to set.
Can I check on my curd every hour or so?
No. For the same reason that you shouldn’t open the oven door every 5 minutes to check if your cake is baked. Just as you lose heat every time the oven door is opened, constantly removing the towel and lifting the foil on your curd will result in loss of warmth and a halt to the setting process. Check your curd only after 10 hours of incubation. If it doesn’t look close to set, check it again after 4 hours and so on. Do not incubate your curd for more than 24 hours, as it will become overly sour and unpleasant. Fully set, it should have just the faintest jiggle. Refrigerate your curd only once it has set.
What happens if the curd hasn’t set even after 24 hours?
To quote the immortal Aaliyah, “if at first you don’t succeed, dust yourself off and try again”. In the meantime, sniff your unset curd. If it doesn’t smell spoilt—all is not lost—you could whisk it up, pretend it’s thin, sweet lassi and drink it!