
")
")
")
")
")
")
Makes a two-tiered 9 inch layered cake.
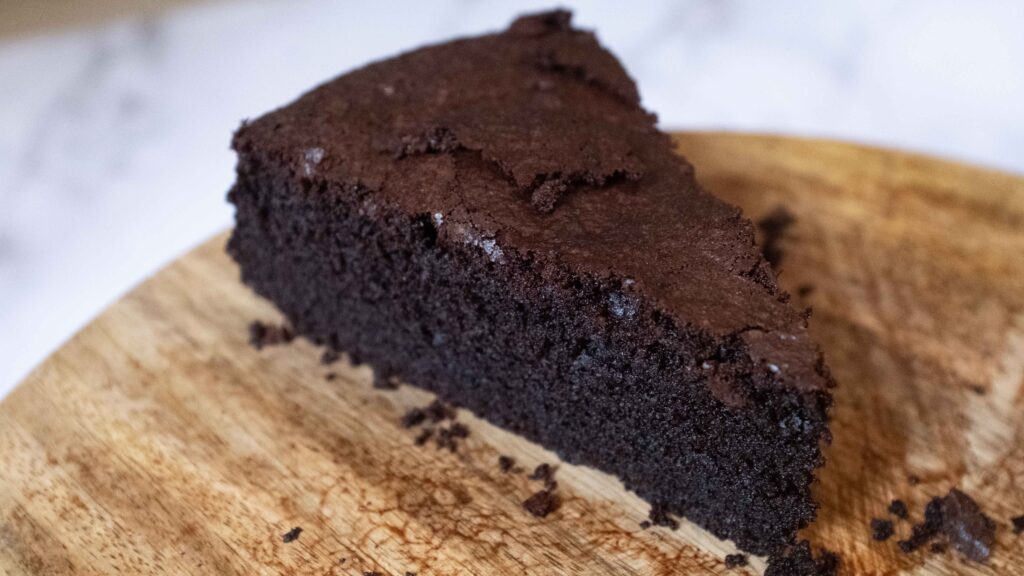
There’s chocolate cake, and then there’s this chocolate cake; a heavenly creation that merits unwavering worship. Possessing a moist, airy crumb and a bitter-sweet creamy ganache—by some supernatural force—it is at once light and darkness. One bite will send your conscience into battle. Can something this good, be bad for me? Can something be sinful if it tastes so divine? Set your conscience aside and raise your fork. Like its namesake, this cake is both devil and angel.
At a glance
– This recipe comprises 2 kinds of chocolate cake; light & moist or rich & buttery + whipped dark chocolate ganache
– You will need one 9×2 inch round cake pan, parchment paper, and some piping bags.
– This recipe has been broken into 3 stages for ease and comprehension. Please read the entire recipe from start to finish before beginning.
Stage 1: chocolate cake
Now, there are 2 types of chocolate sponge that can be used in a Devil’s Food Cake. One is light and moist, and the other is rich and buttery. This recipe offers you both types! Pick and bake the type you prefer and keep the whipped dark ganache recipe as is.
type 1; light & moist
Light on the palate and low on sweetness, this soft, airy chocolate sponge cake is the perfect platform for rich ganache frostings and sweet buttercream icings. Because of the low fat content, it is not intended to be eaten on its own. But, if you’re looking for a moist for days, light as air, chocolate sponge that balances out a decadent filling or topping, choose this type. We don’t like overly rich desserts, so this is our go-to chocolate sponge when we make Devil’s Food Cake.
Ingredients
1. 200 gm all purpose flour
2. 310 gm white granulated sugar
3. 50 gm natural, dark, unsweetened cocoa powder
4. 1 ¾ tsp baking soda
5. ¾ tsp baking powder
6. ½ tsp salt
7. 1 large egg (60 gm/egg in-shell weight) at room temperature
8. 80 ml neutral flavoured vegetable oil + extra for greasing
9. 1 tbsp. vanilla extract
10. 190 ml buttermilk
11. 190 ml boiling water + 2 tsp instant espresso coffee granules
While my brownies contain Dutch process cocoa powder, my chocolate cake demands natural cocoa powder – which is acidic and reacts with baking soda to leaven it. Here, we’re using both baking soda and baking powder as raising agents. Because cocoa powder is so drying, it needs all the moisture and softness it can get by way of oil and buttermilk. If you cannot get your hands on cultured buttermilk; soured milk can work as a substitute. To make your own “buttermilk” – put 3/4 tablespoon of fresh lime juice or white vinegar into a liquid measuring cup with volumetric markings. Thereafter, top the cup up with whole milk till you reach the 190 ml mark. Stir gently and set it aside for 5-10 minutes to thicken. It’s then ready to use. In baked goods, this buttermilk substitute adds sourness and moistness like cultured buttermilk, although it lacks the same ‘yoghurt’ like taste. Why the coffee? Much like in my brownie recipe, it enhances the cocoa notes without imparting its own flavour.
Prep
1 – Grease your cake pan and line it with parchment. Remember to grease the parchment as well.
2 – Ready your dry ingredients; In a large bowl, sift the flour, salt, cocoa powder, baking soda, and baking powder. Then add the sugar to the mixture. Using a balloon whisk, whisk everything together well to aerate and combine.
3 – Ready your wet ingredients; In another large bowl, place the egg, oil, vanilla, and buttermilk. Whisk/beat together well to combine.
4 – Boil your hot water and measure it out. Add the coffee granules to it and give it a stir to dissolve.
Method
1 – Start preheating your oven at 175OC.
2 – Pour the wet ingredients into the dry ingredients. Using your whisk, stir the mixture together until it just comes together as a batter (30 seconds or so).
3 – Pour in the hot brewed coffee and gently mix the batter again for another 10-15 seconds, until it is glossy and smooth. The batter will become very runny. Do not over mix it!
4 – Pour the batter into your prepared cake pan and place it inside your preheated oven.
5 – Bake your chocolate cake for 40-45 minutes at 175OC. For perfectly even heating, you may need to rotate your pan at the 20 minute mark. Be sure to check for doneness at the 40 minute mark; that is, if a bamboo skewer inserted in the middle of your cake comes out clean, it’s done.
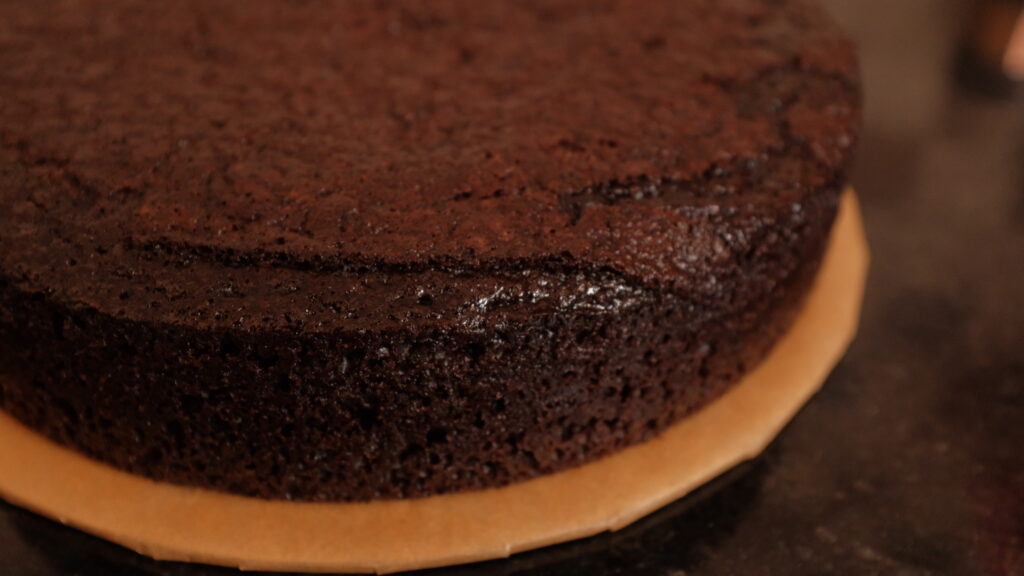
6 – Remove the cake pan from the oven and cool it on a wire rack. Don’t remove the cake from the pan until it’s cool enough to handle, or you will risk breaking it. Once no longer warm, your cake is ready for the next stage. Remove it from the pan, and wrap it in cling wrap to keep it from drying out, while you move on to Stage 2. If you don’t plan on filling and frosting your cake immediately, cover it in cling wrap and keep it in an airtight container in the fridge. It will stay fresh for 3 days. I like to frost my layer cakes after the sponge has chilled in the fridge overnight, as it is firmer and more structurally sound.
My oven cannot accommodate two 9 inch cake pans in one go. I make one cake and then cut it in 2 layers. If you’re using 2 cake pans, evenly divide the batter between them, and adjust the cook time to 25-30 minutes. Always strive for even heating with cakes. My oven has both top and bottom heating sources, so I always place my cakes on the middle rack, unless a recipe specifies otherwise. If you’re serious about baking, get to know your oven, and all its “hotspots”. This is essential to evenly cooked baked goods. If your cakes tend to rise unevenly, or get cracks, or dome rapidly and then sink, your oven doesn’t heat up evenly. To compensate for these irregularities, you’ll need to lower the temperature and/or move your pan around during the baking process. Keep in mind, if your oven has a convection mode, avoid using it for cakes if you can. Although it may speed up your overall bake-time, it will also dry out your sponge, and you definitely don’t want that.
type 2; rich & buttery
Intense, sweet, and rich, this buttery chocolate sponge hits the spot all on its own. Kept beautifully moist with just a little oil, this one’s a treat even if you leave off the frosting. We make it when we’re craving a good ol’ chocolate sponge without the frills. Layered and covered with frosting, it really is Devilishly decadent, so pick this type only if you want an ultra-rich Devil’s Food Cake. It’s also really versatile, so read the recipe notes below for details on how to make adjustments.
Ingredients
1. 120 gm cake flour (or 105 gm all purpose flour + 15 gm cornflour)
2. ½ tsp baking soda
3. ¼ tsp salt
4. 150 gm unsalted butter at room temperature + extra for greasing
5. 60 ml neutral flavoured vegetable oil
6. 250 gm white granulated sugar
7. 90 ml boiling hot water + 1 tbsp. instant espresso coffee granules
8. 40 gm natural, dark, unsweetened cocoa powder + extra for dusting
9. 60 gm 70% cocoa couverture chocolate (baking or eating chocolate)
10. 90 ml sour cream or thick unflavoured yoghurt
11. 2 large eggs (60 gm/egg in-shell weight) at room temperature
12. 1 tbsp. vanilla extract
While my brownies contain Dutch process cocoa powder, my chocolate cake demands natural cocoa powder – which is acidic and reacts with baking soda to leaven it. Because this is a denser cake owing to the amount of eggs, butter and chocolate, it requires a softer crumb which is achieved with cake flour. Cake flour is hard to procure, which means adapting and making your own cake flour substitute. Whenever you make homemade cake flour – measure out 1 cup of all purpose flour, and then remove 2 tablespoons. Then, add 2 tablespoons of corn flour to the all purpose flour. Sift them together three times. This is your cake flour substitute. It’s not quite the same as store bought cake flour, but it does give a lighter, more tender crumb than if you were to use all-purpose flour only. Sour cream and full-fat unflavoured yoghurt can be used interchangeably in this recipe. Why the coffee? Much like in my brownie recipe, it enhances the cocoa notes without imparting its own flavour. If you want an all butter sponge, omit the oil and increase the butter by 50 gm. If you want more sweetness, use couverture chocolate with 50% cocoa solids instead of 70%. And if you want it fudgier, add 20 gm more couverture chocolate and an extra egg yolk (just remember, a fudgy cake will be harder to torte and stack).
Prep
1 – Make your homemade cake flour substitute if you don’t have cake flour.
2 – Grease your cake pan with butter and line the bottom with parchment. Then grease the parchment and dust your entire pan with coco powder.
3 – Chop your couverture chocolate into small chunks and place them in a medium microwave-safe bowl. Microwave the chocolate at 450 watts for 30 seconds. Stir briefly with a spatula and then microwave it for another 20 seconds. Thereafter, keep heating the mixture in 10 second increments until the chocolate has completely melted. Cool to room temperature or just warm.
4 – Boil water to brew the coffee.
5 – Start preheating your oven at 175OC.
Method
1 – Ready your dry ingredients; In a large bowl, sift together the flour, the salt and the baking soda. Using a balloon whisk, whisk everything together well to aerate and combine.
2 – Measure out your hot water, add the coffee granules to it and give it a stir to dissolve. Then immediately add the cocoa powder to the brewed coffee. This ‘blooms’ the cocoa. Mix together the cocoa powder and hot liquid until you get a thick, smooth, lump-free paste. It will have the consistency of scoopable ganache.
3 – Add the room temperature/just warm melted chocolate to the cocoa powder+coffee brew mixture and stir together to combine.
4 – Finally add the sour cream/thick unflavoured yoghurt to the chocolate+coffee brew mixture and stir together to combine; these are your wet ingredients.
5 – Place the butter, oil, and sugar in a large bowl. Using a handheld mixer, cream the fats and sugar together on high speed for roughly 4-5 minutes or until pale and fluffy and most of the sugar has dissolved. Periodically scrape down the sides of the bowl to ensure that everything is being mixed properly.
6 – Add in the eggs one at a time, and beat on high speed for roughly 20 seconds with each new addition.
7 – Add the vanilla extract and beat for another 20 seconds. Remember to periodically scrape down the sides of the bowl to ensure that everything is being mixed properly. Put the mixer down.
8 – Grab the bowl of dry ingredients and the bowl of wet ingredients. Add the dry ingredients and the wet ingredients to the batter in two additions, alternating between dry and wet, and ending with wet (that’s half dry then half wet, followed by remaining dry and then remaining wet). Fold each fresh addition into the batter with a spatula until just incorporated.
9 – Once just-combined (you should see no floury pockets or liquidy pools), stop mixing the batter! Overmixing will result in a dense, stodgy cake. The batter should be homogenous and semi-thick.
10 – Pour the batter into your prepared cake pan, gently smooth out the top with an off-set spatula and then firmly tap it on your counter to pop any air bubbles.
11 – Bake your chocolate cake for 40-45 minutes at 175OC. The top may bubble and crack, this is expected! For perfectly even heating, you may need to rotate your pan at the 20 minute mark. Be sure to check for doneness at the 40 minute mark; that is, if a bamboo skewer inserted in the middle of your cake comes out clean, it’s done. Ours took exactly 40 minutes.
12 – Remove the cake pan from the oven and cool it on a wire rack. Don’t remove the cake from the pan until it’s cool enough to handle, or you will risk breaking it. Once no longer warm, your cake is ready for the next stage. Carefully remove it from the pan, (the top-crust is delicate, almost like a brownie ‘skin’) and wrap it in cling wrap to keep it from drying out, while you move on to Stage 2. If you don’t plan on filling and frosting your cake immediately, cover it in cling wrap and keep it in an airtight container in the fridge. It will stay fresh for 3 days. I like to frost my layer cakes after the sponge has chilled in the fridge overnight, as it is firmer and more structurally sound.
My oven cannot accommodate two 9 inch cake pans in one go. I make one cake and then cut it in 2 layers. If you’re using 2 cake pans, evenly divide the batter between them, and adjust the cook time to 20-30 minutes. Always strive for even heating with cakes. My oven has both top and bottom heating sources, so I always place my cakes on the middle rack, unless a recipe specifies otherwise. If you’re serious about baking, get to know your oven, and all its “hotspots”. This is essential to evenly cooked baked goods. If your cakes tend to rise unevenly, or get cracks, or dome rapidly and then sink, your oven doesn’t heat up evenly. To compensate for these irregularities, you’ll need to lower the temperature and/or move your pan around during the baking process. Keep in mind, if your oven has a convection mode, avoid using it for cakes if you can. Although it may speed up your overall bake-time, it will also dry out your sponge, and you definitely don’t want that.
Stage 2: whipped dark chocolate ganache
Ingredients
1. 300 gm high quality couverture dark chocolate (70% cocoa)
2. 150 ml heavy cream at room temperature
3. Good pinch of salt
Look for a couverture chocolate with 70-80% cocoa. Any less and it will be too sweet. Any more and it becomes unpleasantly bitter. Whatever you do, don’t use compound chocolate or candy melts, ever!
Method
1 – Chop the dark chocolate into small shards.
2 – Place the chopped chocolate in a medium microwave-safe bowl. Pour the heavy cream onto the shards.
3 – Microwave this mixture at 450 watts for 30 seconds. Stir briefly with a spatula and then microwave it for another 20 seconds. Thereafter, keep heating the mixture in 10 second increments till the chocolate has completely melted into the cream, making sure to stir briefly each time. Do not overheat or over-stir! It’s better to go low and slow rather than have a split ganache on your hands. You’re looking to achieve a shiny, thick emulsion with zero lumps.
4 – Add salt to the hot ganache and stir.
5 – Cover your bowl with cling wrap, making sure to press the plastic down onto the surface of the ganache. Let it rest on your counter till it cools to room temperature.
6 – Once at room temperature, leave the bowl outside overnight, for the ganache to reach a thick fudge like consistency. If you’re in a hurry, place the covered bowl inside the fridge, where it will need to set until it gets to the right consistency. This will take about 30-60 minutes.
7 – When you’re ready to frost your cake, take the ganache out of the fridge and let it sit on your counter for 5 minutes. The ganache should be thick and set, but not hard. You should be able to scoop it cleanly with a spoon.
8 – We’re now going to transform that dark thick, dark fudge into a fluffy, lighter whip. Using the whisk attachment on your handheld mixer, start at low speed and then whip on high for 30-60 seconds depending on how quickly the mixture becomes fluffy and holds its shape. Do not over-whip, or the ganache could separate or become grainy.
9 – Your whipped dark chocolate ganache is now ready to be used. If you’re not going to frost your cake right away, keep the ganache covered in an airtight container in the fridge. When you’re ready to frost, you will need to take it out of the fridge and let it sit until it’s at a spreadable consistency again. If you’ve lost some volume, you can lightly re-whip it for 10-15 seconds.
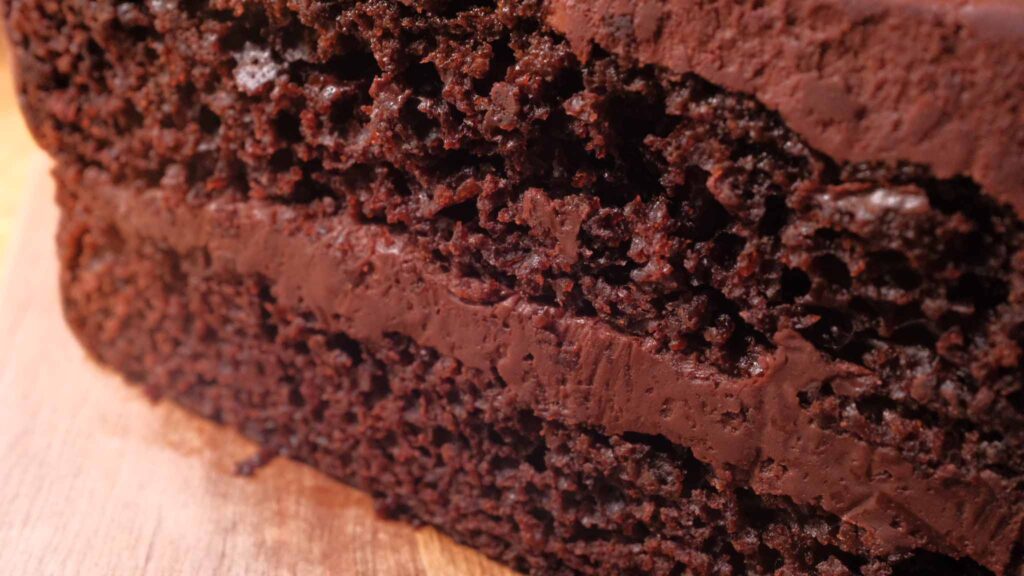
Chocolate ganache is a confection that consists of chocolate and cream, in varying ratios, depending on how it will be used. For a thick, pipeable ganache that’s perfect for truffles, the chocolate to cream ratio is 2:1. For fillings and frostings or thick glazes, you want a 1:1 ratio. Finally, for thin glazes or drips and dipping, a ratio of 1:2 is required. Read about ganache here. Because I live in a hot and humid location, I toggle with the ratios, whereby I increase the amount of chocolate, for extra stability. In this recipe, I have used the ‘truffle ganache’ ratio to make my frosting as it was an exceptionally warm day. To give yourself the best chance at success, use fresh, high quality couverture chocolate, always. Even when you source the best ingredients, things can still go wrong. A big enough difference in cream and chocolate temperatures, overheating your ganache in the microwave, or even overmixing and over-whipping—anything can result in a greasy, split mess. Err on the side of caution. Be mindful. Be vigilant. Be patient! If you run into trouble with your ganache, read this. You could cover your cake with any sort of frosting, but a ganache frosting is infinitely superior to a buttercream frosting.
Stage 3: Finale; cake construction & assembly
If you’ve made the rich & buttery type of chocolate sponge, be more gentle while assembling your cake layers, as it is crumblier than the light & moist type of chocolate sponge.
Components
1. One 9 inch chocolate cake
2. Whipped dark chocolate ganache
Prep
1 – If the top of your cake is uneven, level it with a large serrated knife.
2 – Torte/split your cake into two layers. Skip this step if you already have 2 cake layers.
3 – Ready your decorating surface. A cake turntable with a cake board is ideal for this. Place the board in the centre of your turntable.
4 – Fill piping bags with ganache frosting for quick application. Snip the tips about 2 cm wide.
5 – Keep a straight palette knife and an off-set spatula handy.
Method
1– Spread a small bit of frosting on the centre of your cake board. This will be the glue that holds the first cake layer in place.
2 – Place your bottom cake layer on the frosting, base side down.
3 – Going in a circle from the inside out, pipe 1/3rd of the frosting onto the cake’s top surface.
4 – Place your top cake layer atop the frosting, top side down. Lightly press down to secure.
5 – Rotate your cake turntable to check that both layers are aligned around the entire circumference of the cake. If they’re not, gently manoeuvre them back into alignment.
6 – It’s time to frost the top and sides of the cake. Use the palette knife to spread frosting on the top. While rotating your turntable, apply and spread frosting on the sides of the cake with the offset spatula. Use up all the remaining frosting.
7 – Use the offset spatula to make rustic swirls and waves on the ganache.
8 – Place your cake in the fridge for 20 minutes to set the frosting.
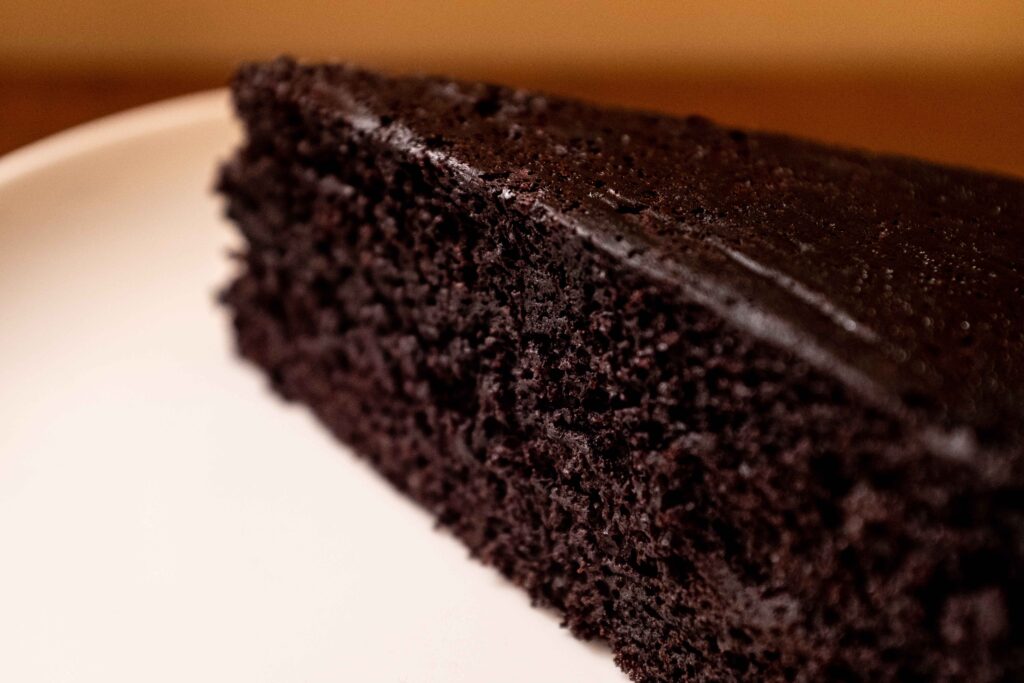
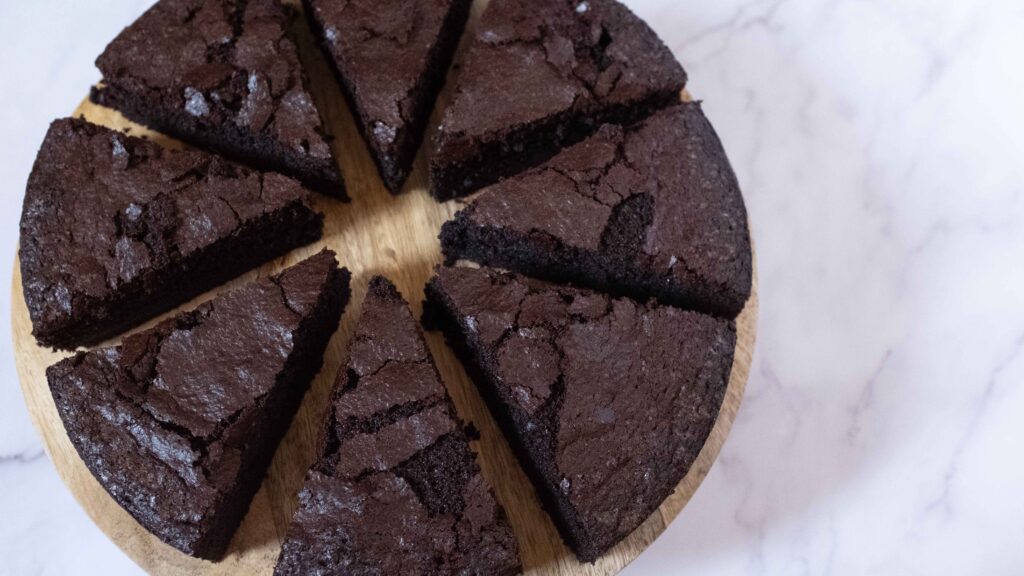
9 – After it has lightly chilled and just set, take it out of the fridge. Slice large wedges and serve. Now eat!
If you don’t have a turntable you can use a regular platter, but it will take a lot more manoeuvring to decorate your cake. Fully constructed, this cake can stay out at room temperature for an entire day. Thereafter, it’s best to store it in the fridge, in an airtight container. Chilled cake slices must be brought to room temperature before serving, to soften the ganache.
Tips & Tricks
How to line a round cake pan
How to cut cake layers with floss