


Makes one double-crust 9 inch pie
Like many, we haven’t been able to travel home in over a year. Home. Just the word brings comfort. To us, home is languid lunches and evening snacks and heavy dinners. If home had a flavour, it would be of browned mutton—or Kosha Mangsho—an incredibly rich and tender Bengali meat curry that is made specially for us when we visit. This dish is the comforting flavour of home, baked in the ultimate comfort food—pie. For the most special person in my life. My home away from home. My comfort. My husband, you’re my Kosha Mangsho Pie.
At a glance

– This pie comprises kosha mangsho filling + savoury pie crust
– You will need a 3-4 litre cooking vessel (cast iron/iron/stainless steel) with a lid, a small saucepan, a 9 inch pie dish (preferably glass), and some aluminium foil.
– This recipe has been broken into 4 stages for ease and comprehension. Please read the entire recipe from start to finish before beginning.
Stage 1: kosha mangsho filling
In India, mutton refers to goat meat rather than lamb. Kosha Mangsho, literally translates to ‘browned mutton’, where to do ‘koshano’ is to brown something in a pan. In Hindi, the equivalent is to ‘bhuno’.
Ingredients
1. 1 kg boneless mutton pieces (cut into 5 cm chunks)
2. 1 medium-large potato (or 150 gm equivalent)
For the marinade:
3. 1 medium red onion (or 100 gm equivalent)
4. 3-4 small pods of garlic
5. 100 gm full fat curd
6. 1 tbsp. salt + a pinch for the potatoes
7. 1 ½ tsp turmeric powder + a pinch for the potatoes
8. 1 tsp shahi garam masala like this
For the cook:
9. 2 tbsp. mustard oil
10. 3 Indian bay leaves (keep whole)
11. 4 large red onions (or 400 gm equivalent)
12. 1 ½ tsp garlic paste
13. 3 tsp ginger paste
14. 3 medium dark green chillies
15. 1 tsp cumin powder
16. 1 tsp coriander powder
17. 1 tsp Kashmiri red chilli powder
18. 100 ml water
19. 200 gm full fat curd
20. 1 ¼ tsp salt
21. 1 tbsp. granulated sugar
22. ¾ tsp shahi garam masala
23. 2 ltr recently boiled water, kept hot
24. 1-2 tbsp ghee
For the thickener (optional):
25. 25 gm all purpose flour
26. 125 ml plain water
Prep
1 – Make the marinade; roughly chop your onion and garlic and then add it to a blender jar. Then add the curd, turmeric powder, shahi garam masala, and salt. Grind the contents until you get a smooth paste. Pour this marinade over the mutton and massage well into each piece. Cover the bowl of mutton with cling wrap and leave it to marinate in the fridge overnight. The following day, take your mutton out of the fridge and leave it on your counter to come to room temperature. In the meantime, prep the rest of the ingredients for the cook.
2 – Cut your onions into 2 mm wide slices. I use a mandolin for speed and consistency. Set aside.
3 – Finely grind your green chillies in a pestle and mortar. Set aside.
4 – Peel your potato, cut it into 4 cm chunks and coat the pieces with a pinch of turmeric powder and salt. Set aside.
5 – Make a spice paste; put the coriander powder, cumin powder, and Kashmiri red chilli powder in a small bowl. Add 100 ml of plain water to the bowl and stir to make a thin paste. Set aside.
Method
1 – Add the mustard oil to a large cooking vessel. Place it on your stove and heat it on high until the oil begins to smoke and ‘thins’. Then turn the heat to low.
2 – Add the bay leaves and sauté for 10 seconds until lightly fragrant.
3 – Add the potato chunks and fry them on low heat until golden brown on all sides, roughly 8-10 minutes. Remove them from the vessel and set aside.
4 – Add the sliced onions and fry them on low-medium heat for about 15 minutes or until light brown.
5 – Then, add the garlic paste, the ginger paste and the green chilli paste, and sauté for 5 minutes.
6 – Next, add the spice paste. Continue to fry the mixture on low-medium heat for 15 minutes.
7 – At this point, your onions should be a reddish-brown and the spices should no longer smell raw. Scrape off any onions from the bay leaves and discard the leaves; they’ve done their job.
8 – Your marinated mutton will have come to room temperature by now. Add all of the mutton with the marinade to your vessel and raise the heat to high. Fry the mutton in the onions, tossing them together in the vessel until they are well combined. Fry the mixture for 15 minutes on medium-high heat, stirring frequently to prevent it from sticking to the sides and bottom of the vessel.
9 – Whisk the 200 grams of curd with the sugar and salt until it is smooth and lump-free. Add it to the vessel and give everything a good mix.
10 – At this point, the curry will have a lot of moisture. Continue to simmer it on medium-high heat for 20-25 minutes, or until most of the moisture has evaporated, and the curry stops bubbling and stewing and begins frying and browning. Now, lower the heat to medium.
11 – For the next 1 ½ to 2 hours you will carry out a ‘controlled browning’ or ‘koshano’ of the curry by way of the Maillard reaction. This step is what gives kosha mangsho its deep brown colour and unmatched depth of flavour. First add 2 tablespoons of hot water to the curry and stir it in, then cover the vessel with a lid and leave it to cook for a minute, lastly uncover the vessel and scrape the browned bits from the vessel and mix them into the curry. Repeat these 3 steps for 1 ½ to 2 hours or until the mutton is cooked and a dark brown colour (think semi-dark chocolate).
12 – When the desired colour is reached, add in the fried potato chunks, ½ a teaspoon of shahi garam masala and 500 ml of hot water, and stir. Place the lid on the vessel and cook on low until both mutton and potatoes are fork tender. Mine took 15 minutes. Remember to stir intermittently.
13 – Once the potatoes are cooked, turn the heat off and remove the lid. Fish the potatoes out of the curry and while they’re hot, roughly mash them with a fork and then add them back into the vessel.
14 – Then, add ¼ tsp of shahi garam masala and 1 tablespoon of ghee. If your meat is very lean, add in another tablespoon of ghee; toss everything together and turn off the heat. Cover the vessel with a lid and let the flavours infuse for 15 minutes.
15 – Remove the lid and check the meat. Some of chunks will be falling apart, while some will still be whole. Leave them as is. This is what the final filling will taste like. Taste it and make adjustments if necessary.
16 – If the filling is too runny, you will need to thicken it. This is an important step because it will prevent the fats in the filling from leaking out and making the pie crust soggy or greasy. To thicken, put the vessel with the mixture back on medium heat.
17 – Make a slurry with 25 gm all purpose flour + 125 ml plain water and stir well to dissolve all the lumps. As soon the meat mixture on the stove begins to simmer, pour the slurry into the vessel in one slow steady stream and stir everything together for a minute, until thickened and glossy.
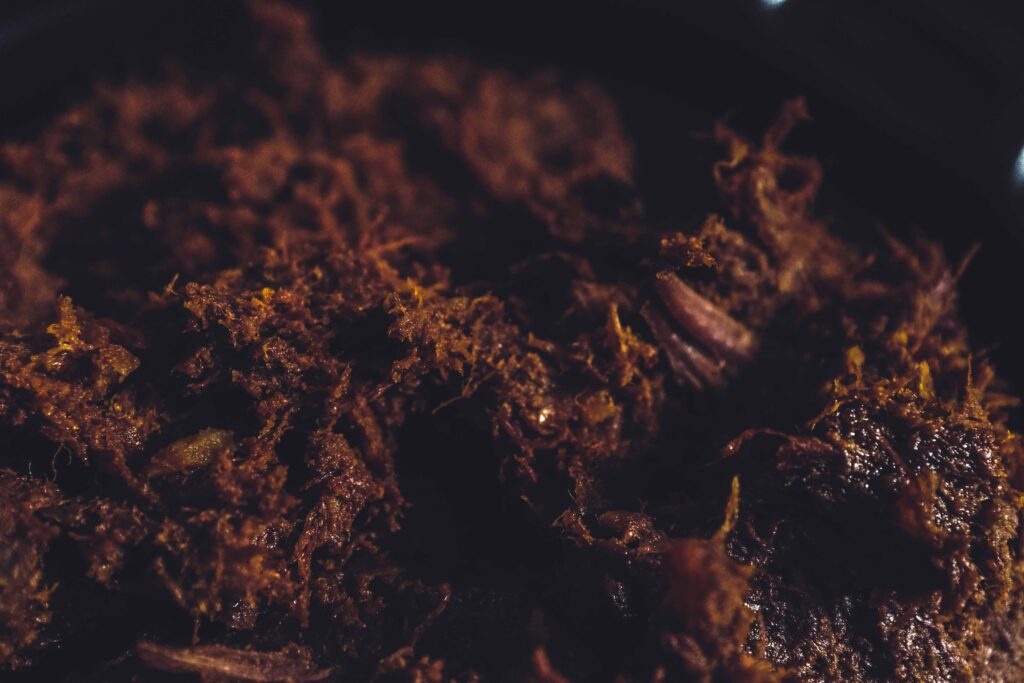
18 – Turn off the heat. You will have a luscious, semi-chunky, semi-smooth mixture, which is the colour of dark chocolate. Your kosha mangsho filling is ready!
19 – Cool the filling fully before storing it in the fridge and proceeding with Stage 2.
While I always prefer cooking meat on the bone, (it stays juicier and more flavourful that way) I didn’t want to risk any shards of bone getting mixed in with the filling. When procuring boneless mutton, try to get a good mix of leg and shoulder with some fat on it. Kosha Mangsho gets its heat from 2 sources; shahi garam masala—a warming type of heat, and green chillies—a fresher, mouth-tingling type of heat. This browned meat filling is about 80% less spicy than traditional Kosha Mangsho, which is really quite blow-your-head-off spicy. I have significantly cut down on the overall masala as well as number of chillies used in this dish, as being a pie, it should be comforting and not pungent. Keep in mind that green chilli heat depends on the variety you use, so always test one chilli before deciding on how many you will use. The time taken to brown your curry depends on the kind of vessel you use. If you use a non-stick vessel it will take up to 3 hours to achieve the desired colour.
Stage 2: savoury pie crust
Every great pie starts with a great pie dough. That means no shortening whatsoever! I went all-butter for this one for maximum flavour, but omitted the eggs because the filling itself is so rich. Traditionally, pie dough does not contain baking powder or any chemical leavening agents. However, as I use a glass pie dish (glass = slippery edges), a little baking powder prevents the dough from sagging and losing height while baking. Replacing some of the water with vodka and vinegar makes the dough easier to roll without encouraging gluten formation—resulting in a tender crust.
Part 1 – Make your pie crust
Ingredients
1. 435 gm all purpose flour + extra flour for dusting
2. 1 ½ tsp table salt
3. 1/3 tsp baking powder
4. 1 tsp shahi garam masala
5. 305 gm cold unsalted butter
6. 80 ml ice water + extra
7. 60 ml cold vodka
8. 20 ml vinegar
Prep
1 – Cut the butter into 1 cm cubes – keep in the freezer for 30 minutes.
2 – In a large bowl, whisk together the flour, the table salt, the baking powder and the shahi garam masala. Remove 1 cup of this dry mixture and place it in another bowl. Place both bowls in the fridge to chill for 30 minutes.
3 – Combine the water, vinegar and vodka in a bottle and place it in the freezer to chill. Also keep ice cubes ready.
Method
1 – From the fridge, take out the bowl with the larger amount of flour. Add the cold chopped butter to the bowl.
2 – Using a pastry cutter or two butter knives, cut the butter into the flour until you get a coarse texture similar to large bread crumbs.
3 – Then, add the remaining 1 cup of flour that’s been chilling in the fridge. Once again, use your pastry cutter to blend the mixture until you achieve a crumbly texture akin to coarse cornmeal with dabs of pea-sized butter chunks evenly distributed throughout. If you feel things getting a bit soft or melty, immediately place the bowl in the fridge for 30 minutes.
4 – It’s time to add the cold water-vodka-vinegar mixture. Always start with less and add only as much liquid as is required to make the dough workable. Too much and it will become sticky. Too little and it will be crumbly and won’t hold together. Drizzle the mixture into the dry ingredients, starting with half the amount. Using a rubber spatula, press the dough into itself.
5 – Do the pinch test; hold some of the dough in your palm and make a fist. If it holds its shape, it’s ready. If it crumbles apart, add 2 to 4 more tablespoons of water and continue to gently press the dough into itself with a spatula until it comes together. Stop adding liquid when the dough begins to pull away from the sides of the bowl just a bit, to form large, shaggy clumps. I added all the water + 2 more teaspoons of ice water. Once again, if you feel things getting a bit soft, immediately cover the bowl with cling wrap and place it in the fridge for 30 minutes.
6 – Transfer the dough to a very lightly floured surface. The dough should come together easily and should not feel sticky. Using floured hands, gather the dough and squeeze it lightly into itself until the flour is fully pressed into the fats. Do not knead it or over-handle it.
7 – Form the dough into a ball and then cut the ball down the middle so that you get equal halves.
8 – Put two sheets of cling wrap on your work surface. Place each piece of dough onto a sheet of cling wrap. Flatten and shape each piece into a 1-inch-thick disc, and then wrap them up individually in cling wrap.
9 – Chill the discs in the fridge for 1 hour, or for half an hour in the freezer.
10 – Once the dough is well-chilled, remove one disc from the fridge and let it sit on your counter for 5 minutes. This will be the bottom crust.
11 – Lay down a sheet of parchment and lightly flour it. This parchment is your best friend as it will help you move the dough around on your work surface without handling it. Additionally, if the dough gets too soft while rolling it, you can grab it with the help of the parchment, place it on a cookie sheet, and quickly transfer it to the fridge to firm up.
12 – Unwrap the disc and place in the middle of your floured parchment. Then dust an even sprinkling of flour on top of the disc. Keep the flour handy in case your dough starts to stick to the counter. Dust your rolling pin as well.
13 – Using gentle pressure, roll your chilled dough with the parchment directly underneath it. Place your rolling pin in the centre of the disc and roll outwards in all directions, using gentle pressure. Turn the dough by grabbing the edge of the parchment, giving it a quarter turn, and then rolling the dough as you go. If your dough starts cracking on the outer edges, gently push the cracks back together, else they’ll continue to widen. Keep rolling in all directions until you get a circle, roughly 13-14 inches across and 1/8th inch thick. Check for size, by inverting and holding your pie dish above the rolled dough. Your rolled dough should be at least 3-4 inches wider than the pie dish to account for the dish’s depth as well as the width of the lip. Since my 9-inch dish was 2 ½ inches deep with a 1-inch wide lip, I had to roll a 13-inch wide circle.
14 – Brush off any extra flour from the surface of your dough. Then, use whatever means necessary (the rolling pin method works for me), to transfer the dough to your 9 inch pie dish so that it’s loosely lying on top of the dish.
15 – Gently lift and ease the dough into the dish, letting it drop into the creases. Instead of pushing or pinching it in, take a little bit of scrap pastry and use it like a makeup sponge to ‘dab’ the dough into the sides of the dish. Do not stretch the dough, as this will cause it to shrink and break as it bakes. Using scissors, evenly trim the extra pastry around the dish, making it flush with the rim of the dish. Seal any cracks inside the dish with the scraps.
16 – Cover your dish with cling wrap and place it in the fridge for 30 minutes or up to a day. Thereafter it’s ready to be filled. But before, that, let’s create our pre-fabricated lattice top.
17 – Take out your second disc of dough and rest it on your counter for 5-10 minutes. This will make the pre-fabricated lattice top. Repeat steps 11 through 13 for your second disc of dough. Don’t stress if it’s not a perfect circle, as long as it’s 13-14 inches across. If required, cover and place your rolled top pie crust in the fridge to chill for 10-15 minutes.
18 – Using a pizza wheel/pastry wheel, cut 12 x 1-inch wide strips. These 12 strips will be used to create your lattice pie crust. Cover the strips with cling wrap and place them back in the fridge, while you get on with the next step.
Part 2 – Make your pre-fabricated lattice pie crust
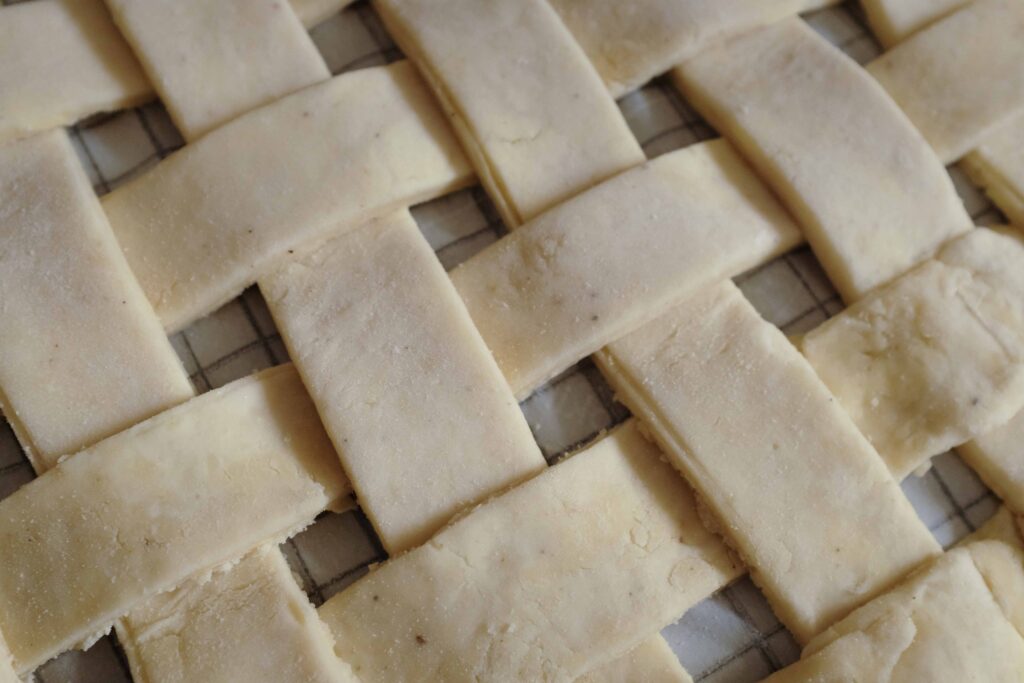
Instead of weaving my lattice on top of the filled pie, I prefer putting together a pre-fabricated lattice—which I then slide onto the top of the pie. This lets me shift the strips around and still work cleanly, since I don’t have to worry about transferring any grease from the pie filling onto the crust.
Materials
1. A cookie sheet
2. Parchment paper
3. A marker
Prep
1 – Ready your work surface. Draw a circle on your parchment to match the diameter of your pie dish, edge included. This outline will let you see exactly where to place your strips, to perfectly fit your pie dish.
2 – Turn the parchment over (so that it’s marker-side down) and place it on your cookie sheet. The lattice will be constructed on top of the parchment with the circle as a guide mark.
Method
1 – Before starting, watch this video.
2 – Now, get your strips of pastry out of the fridge and follow this guide.
3 – Once you’re done with the lattice pie crust top, cover it with cling wrap and place it in the freezer until you’re ready to fill and cover your pie.
Hot and humid climate? Make your pastry dough in an air-conditioned environment with the temperature set to 21OC. If you don’t have access to an air conditioner., you will have to work quickly and pop the dough back into the fridge multiple times throughout these steps. Discs can be made in advance and frozen for up to 3 months. If using frozen pie dough, thaw it in the fridge overnight and then proceed. Save leftover raw pastry dough in the freezer as it gets discoloured in the fridge and becomes unusable.
Stage 3: Finale; construction and final bake

Components
1. 9 inch pie dish layered with a bottom pie crust
2. Chilled kosha mangsho filling
3. Egg wash 1 (1 egg white + 1 tsp water)
4. Egg wash 2 (1 egg yolk with 1 tsp milk)
5. Extra flour
6. 1 tbsp. large, coarse granulated sugar
7. Pie crust shield
Prep
1 – Make both your egg washes. Mix the egg white with the water and lightly beat. Set aside. Mix the egg yolk with the milk. Set aside.
2 – Grab your 9 inch pie dish with the bottom crust. Brush the base and sides of the crust with Egg wash 1. Do not brush the rim. Place the dish in the fridge for 15 minutes.
3 – If you don’t have a pie crust shield, you will need to create your own using aluminium foil. Here’s how.
4 – If you live in a hot and humid climate, I highly recommend moving to an air-conditioned room when constructing your pie. This will prevent condensation from messing with the texture of your pie crust.
Method
1 – Get your pie dish out of the fridge. Spoon all the cooled filling into the pie shell.
2 – Brush a layer of Egg wash 2 all around the rim of the pie crust.
3 – Get your pre-fabricated lattice out of the freezer. Gently slide it onto your pie and adjust it so that it’s centred.
4 – Working your way around the circumference of the dish, use scissors to trim any excess lattice strips flush with the bottom crust.
5 – Wait 5-10 minutes for the lattice crust to soften slightly before pressing the strips lightly to the bottom crust to make sure they’re stuck together. Optional; for a rustic/shabby chic look, crimp the edge of the pie with a fork. Dust a fork in some all purpose flour and then gently press the prongs all around the rim of the pie crust like this. This is a great way to make the dough adhere to the dish, so that there’s less crust shrinkage during baking.
6 – Then, loosely cover the pie with some cling wrap and place it in the fridge for at least 60 minutes before baking. The colder, the better. I left mine to chill overnight.
7 – When you’re ready to bake, place a baking tray in the lowest rack of your oven. Preheat your oven for 20 minutes at 200OC with both the top and bottom heating elements on.
8 – After the oven is done preheating, take the pie out of the fridge. Brush any exposed pie crust with Egg wash 2. Finally, sprinkle a little coarse granulated sugar on top of the crust for some sparkle and texture. The sugar enhances the flavour of the spiced meat as well.
9 – Immediately place your pie on the pre-heated baking tray in the lowest rack of your oven. Bake your pie at 200OC for 15 minutes.
10 – After 15 minutes, place your pie shield on top of the pie so that the crust’s edges are covered. This will prevent the sides from browning too quickly. Now move the pie to the middle rack of your oven. Lower the temperature to 170 OC and continue baking for 60 minutes or until the crust is fully cooked and evenly golden-brown. Your crust may take longer or shorter to cook depending on the type of pan you’re using as well as your true oven temperature.
11 – Transfer the pie dish to a cooling rack. Let it cool for at least 60 minutes before serving. This will prevent the juices from running out when you slice into the pie.
12 – Because of the all-butter crust, this pie is too flaky and crumbly to even attempt demoulding it, so don’t bother! When you’re ready to eat, slice a generous wedge of just warm pie and serve it with large glass of merlot. Now eat!
If you plan to make a completely covered pie and not the lattice top crust, remember to cut some steam vents in the top. The escaping moisture will help prevent your crust from getting soggy. Be sure to chill your fully-assembled pie for at least 60 minutes before baking it, as this helps the gluten to relax and the fats to firm up, resulting in a flakier crust. For the flakiest crust with the neatest edge, preheat the oven for at least 20 minutes before baking. Use a pie crust shield to keep the crust’s edges covered and protect it from browning too quickly or burning. If you use a metal or ceramic dish, you may need to raise your oven temperature 14-18 Degree Celsius higher than what this recipe specifies. I use a glass dish for pies as it radiates heat for a longer duration and makes for a lovely, evenly golden crust. Plus, the transparent material lets me keep an eye on the sides of the crust, which inevitably takes much longer to cook than the top and bottom. While it’s fine to place an oven-proof glass dish directly from the fridge into a hot oven, never place a hot glass pie dish on a cold surface, or the glass may shatter. Always rest your baked pie for at least 60 minutes before cutting into it so that the starches in the filling can reabsorb any hot liquids. This will make for a more homogenous filling and consequently, a cleaner slice of pie when you cut into it. Keep any leftover pie in the fridge, covered. The next time you want some, cut cold slices and reheat them as needed.
Tips & Tricks
How to transfer rolled pastry dough to a mould: