


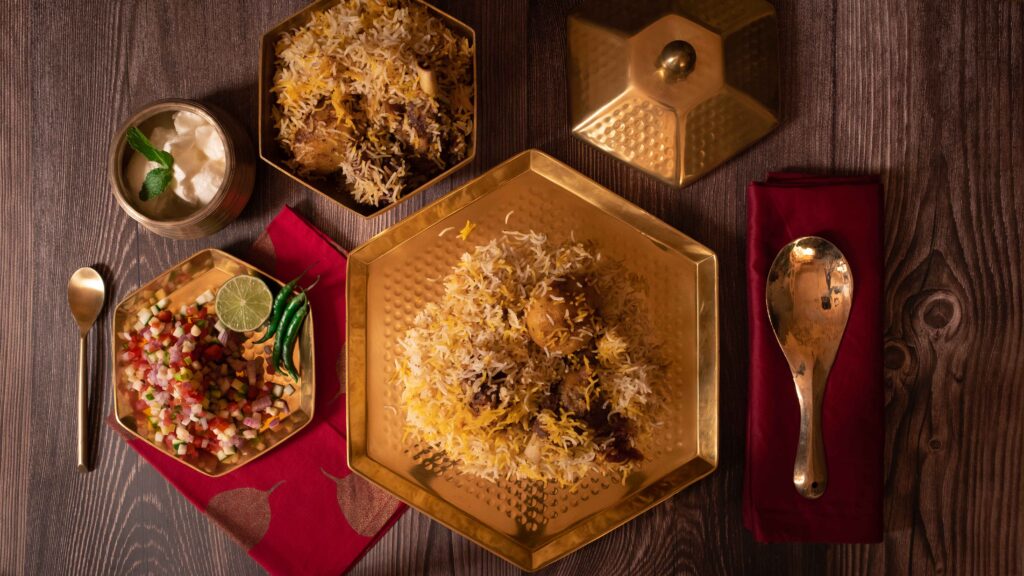
Makes 5 servings.
A mélange of Awadhi cooking techniques, Mughlai flavours, and Bengali sentiments, Calcutta biryani is a true culinary masterpiece. Low on heat and high on flavour, it is undeniably my favourite type of biryani. Back when I was 16 in Calcutta, a bawarchi (masterchef) came to our house to make mutton biryani for a hundred guests. I observed, as over an entire day, he transformed 36 individual ingredients into the best biryani I’ve ever eaten. A blend of tender goat meat, aromatic rice, and buttery potato, this recipe is pieced together from memory and a biryani grocery list from 2001.
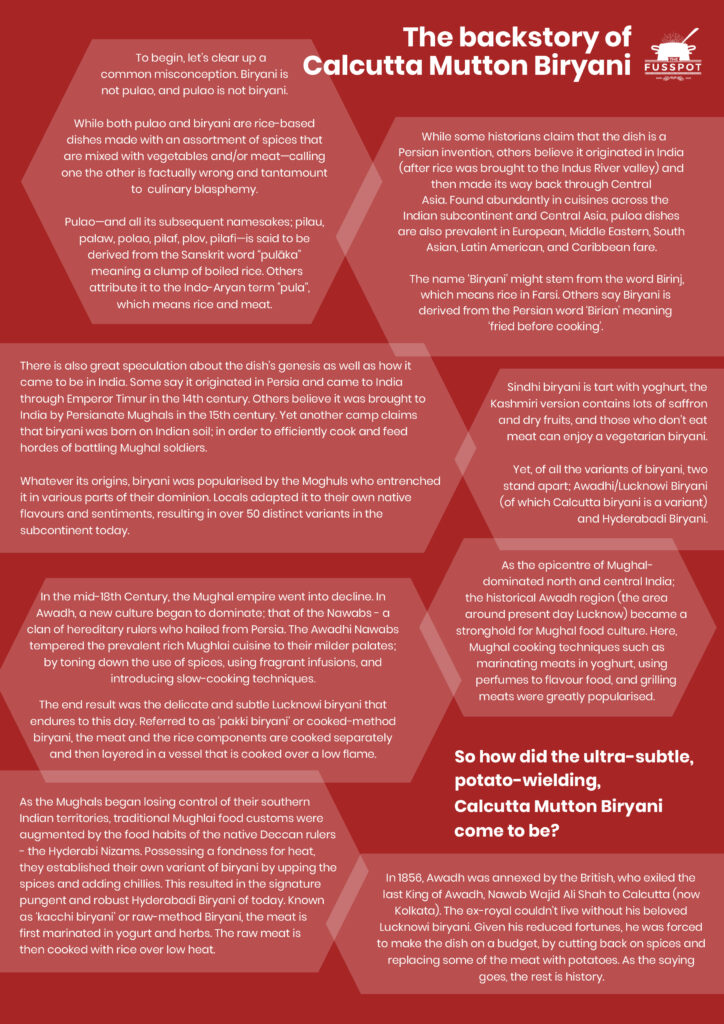
Before you embark on this dish, check out its fascinating backstory here.
At a glance
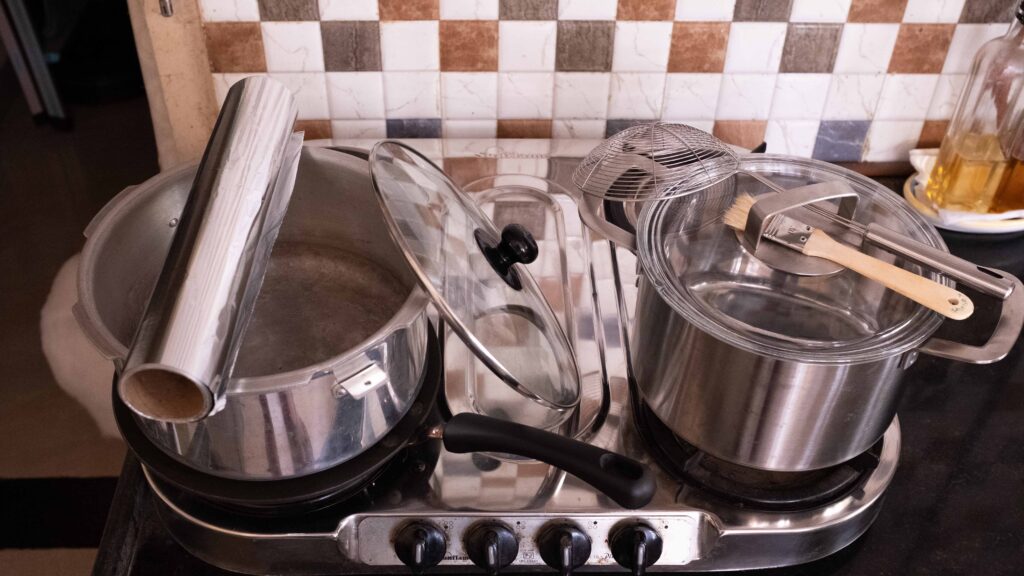
– You will need a fair number of pots and pans for this recipe. The full list of special equipment and materials can be found just below in Guide 1.
– This recipe has been broken into 8 stages for ease and comprehension. To plan your cook, please read the entire recipe from start to finish and go through Guide 2 just below.
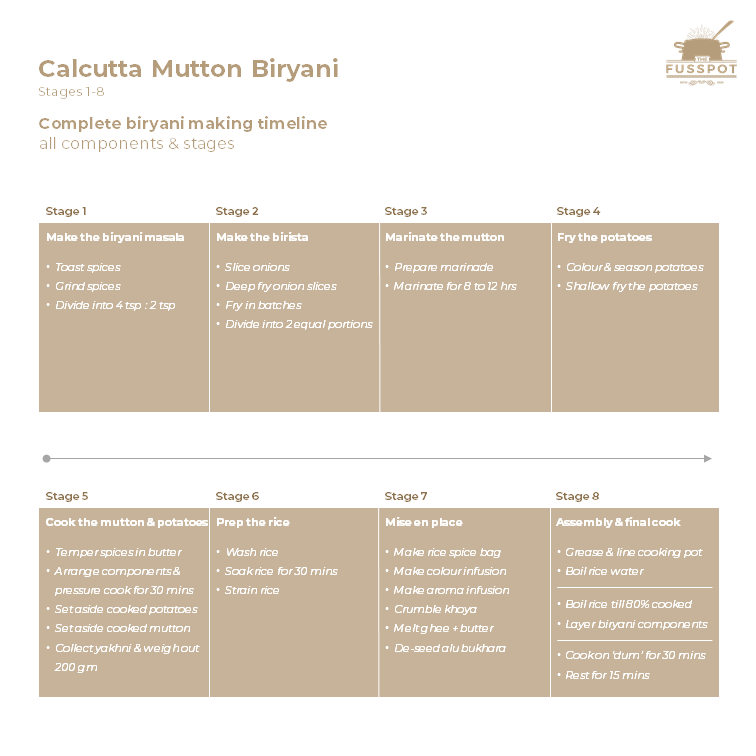
Stage 1: make the biryani masala
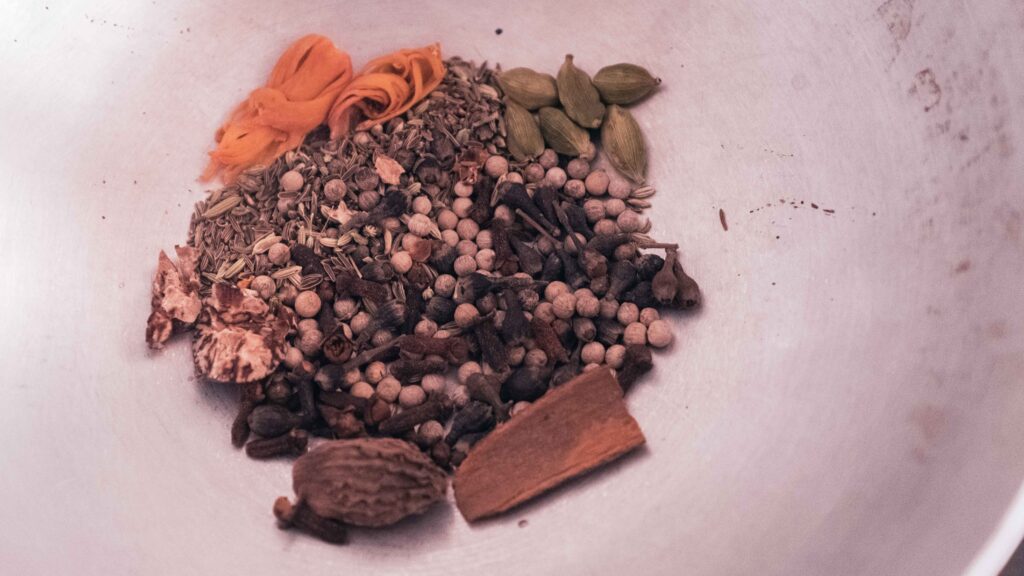
At the heart of an authentic Calcutta Mutton Biryani is the ‘masala’ or spice blend that gives it its signature taste. Unlike a Hyderabadi biryani, which is fiery with chilli, the aromatic and fragrant spices used in a Calcutta biryani are similar to those used in a Lucknowi biryani, which is native to the Awadh region in Northern India. Entrenched in Mughal food culture and perfected in the royal kitchens of the Nawabs—Awadhi cuisine has its roots in Central Asia, the Middle East, and Persia, and bears similarities to Kashmiri, Punjabi and Hyderabadi food. One of the most important differences that make Awadhi or Lucknowi food distinct from Mughlai food is that while the latter is marked by a zealous use of spices, nuts, milk and cream, the former is known for its subtle and delicate flavours, and nuanced use of spices. Even though a Calcutta biryani is made in the image of a Lucknowi biryani and the flavour profiles are similar, a Calcutta biryani contains less masala than its Lucknowi counterpart, which is just how we Bongs like it!
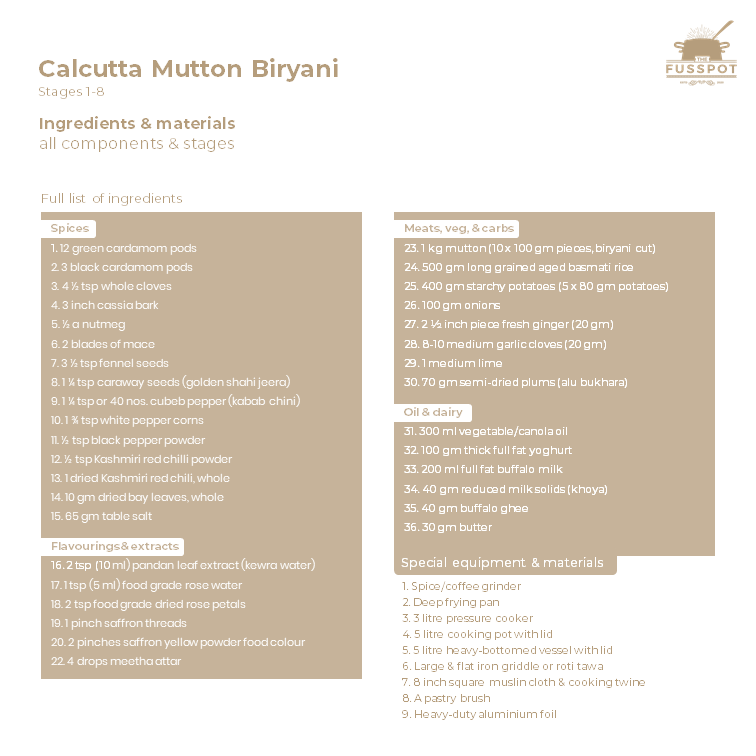
Ingredients
1. 6 green cardamom pods (chhoti elaichi)
2. 1 black cardamom pod (badi elachi)
3. 1 tsp whole cloves (laung)
4. 1 inch cassia bark (dalchini)
5. ½ a nutmeg (jaiphal)
6. 2 blades of mace (javitri)
7. ½ tsp fennel seeds (saunf)
8. 1 ¼ tsp caraway seeds (golden shahi jeera)
9. 1 ¼ tsp or 40 nos. cubeb pepper (kabab chini)
10. 1 ¾ tsp white peppercorns (safed mirch)
Method
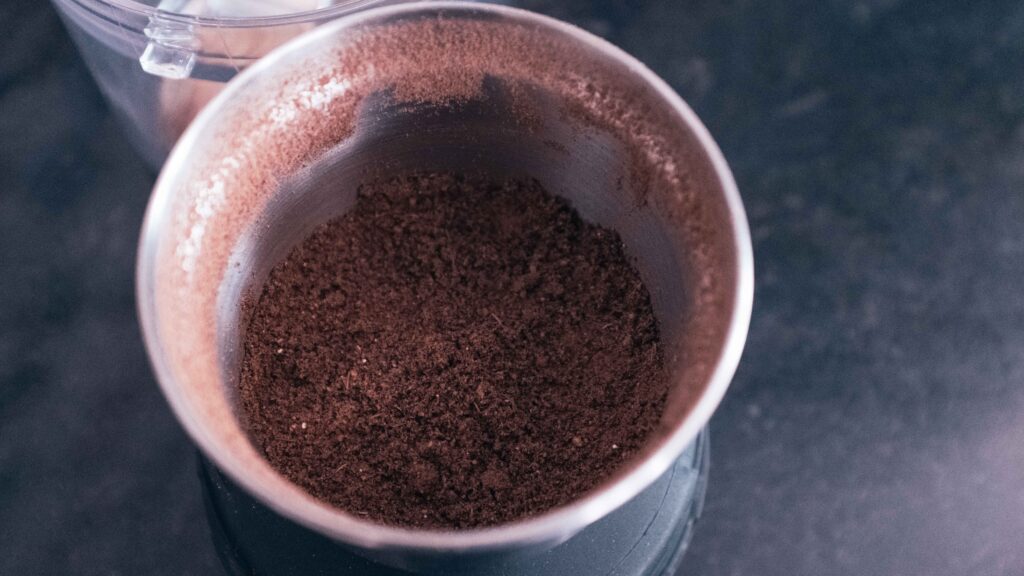
1 – Place a medium frying pan on the stove. Add all the spices listed to the pan. Gently toast the spices over low heat, stirring continuously, until lightly toasted and aromatic. This will take roughly 5 minutes once the pan is hot. Do not burn!
2 – Immediately transfer the toasted spices to a cold plate. This will stop the cooking process.
3 – Once cool, transfer the toasted spices to a spice grinder and process them into a fine powder.
4 – Weigh the biryani masala. You should have 20-25 gm or about 7-8 teaspoons worth. Divide the biryani masala. Place 4 tsp (roughly 10 gm) in one bowl and place 2 tsp (roughly 5 gm) in another bowl. Biryani masala is ready, set aside. Move on to Stage 2.
In a pinch, a readymade Calcutta biryani masala like this can be used in this recipe, but there’s nothing better than toasting fresh whole spices and grinding them yourself. Honestly, it doesn’t take more than 15 minutes to whip up and makes a world of difference. I always make a double batch so that I have leftover biryani masala to flavour a variety of meat and chicken dishes. This spice blend should be stored in an airtight container and placed inside a cool pantry cupboard or the fridge.
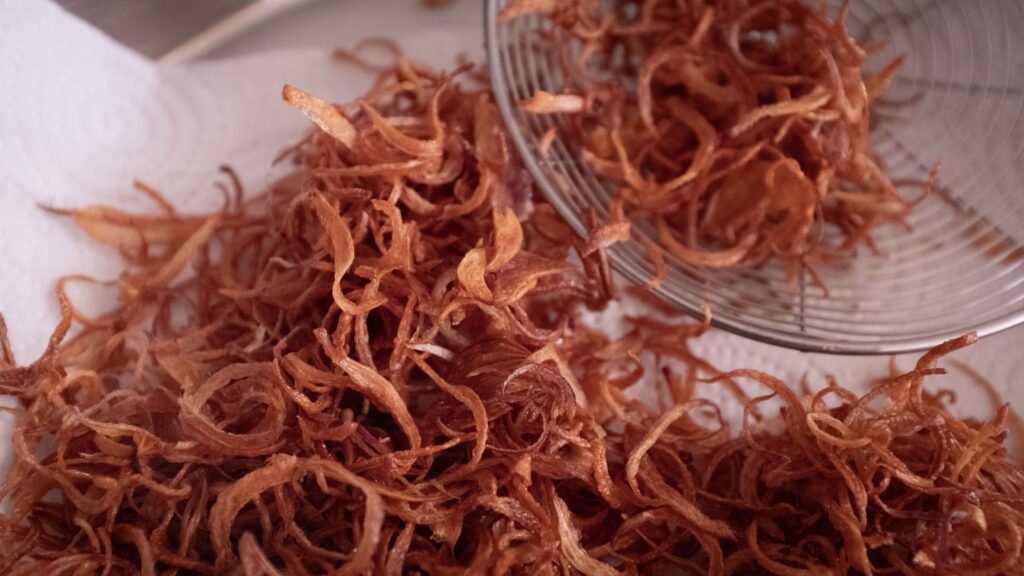
Stage 2: make the browned onions aka birista
Deep-fried, slow-cooked, golden-brown crispy slivers of onion — birista is an instant flavour enhancer and lends depth and savoury-sweetness to meat and rice dishes. Birista is 100% percent essential to a biryani so don’t leave it out!
Ingredients
1. 100 gm onions to yield 80 gm sliced onions
2. 300 ml vegetable oil or canola oil
Method
1 – Peel your onions. Cut them in half lengthwise, and then cut each half into fine slices (roughly 2 mm wide).
2 – Spread the onion slices on some kitchen paper for an hour to get rid of excess moisture.
3 – Grab a deep frying pan. Heat up the vegetable oil in it. The depth of the oil should be at least 2 inches so that the onions can deep fry.
4 – When the oil reaches 180OC, add the sliced onions in small batches, and deep fry them for 5-6 minutes. Then lower the heat and fry them until they’re golden brown. When they’re done, they will stop ‘fizzing’ and sort of float up to the surface of the oil.
5 – Immediately remove the golden brown onions from the pan and set them to drain on kitchen paper for 5 minutes. They will continue to cook after they’re out of the oil. Reserve the oil for Stage 4.
6 – Divide the browned onions; Place half the amount in one bowl (roughly 20 gm) and the other half (roughly 20 gm) in another bowl. Birista is ready, set it aside. Move on to Stage 3.
Traditionally used to season meat and rice dishes, birista can also be sprinkled on soups, salads and sandwiches. 100 gm unpeeled onions yields exactly 40 gm of birista; which is the precise amount you need for this recipe. I generally make a big batch using 250 gm onions, which gives me 100 gm of birista. Thereafter, I store the birista and its frying oil in the fridge for up to a week. For longer periods, store both in the freezer as the onions and the oil can turn rancid over time. The oil is chock-full of onion flavour and should not be discarded. Use it up in your regular cooking for some instant ‘onioniness’ without the chopping.
Stage 3: marinate the mutton
In India, mutton refers to goat meat rather than lamb/sheep’s meat. When making curries, goat meat is superior, with none of the gamey taste that can be quite off-putting to non-hardcore meat eaters. While you could substitute lamb in place of goat, it would not be as tasty in a biryani. This is because the meat structure of goat makes it more suited to slow and wet cooking, whereas lamb tastes best ‘dry cooked’ through methods like roasting or searing.
Ingredients
1. 1 kg goat meat biryani cut (roughly 10 pieces weighing 100g each)
For the marinade:
2. 100 gm thick, full-fat yoghurt
3. 3 tsp freshly made ginger paste (roughly 20 gm)
4. 3 tsp freshly made garlic paste (roughly 20 gm)
5. Half portion of birista (roughly 20 gm)
6. 4 tsp biryani masala (roughly 10 gm)
7. ½ tsp Kashmiri red chilli powder
8. ½ tsp ground black pepper
9. 3 ½ tsp salt (roughly 20 gm)
10. 1 tsp pandan leaf extract (kewra water) like this
Prep
1 – Peel your ginger and garlic. Using a mortar and pestle, pound them into a fine paste.
Method
1 – In a large bowl mix together all the ingredients listed in ‘for the marinade’. Whisk together to combine.
2 – Add the mutton to the bowl and coat it with the marinade, massaging it into the crevices of the pieces. Cover the bowl and set it aside in the fridge for at least 8 hours. Overnight is best! While the mutton is marinating, begin on Stage 4.

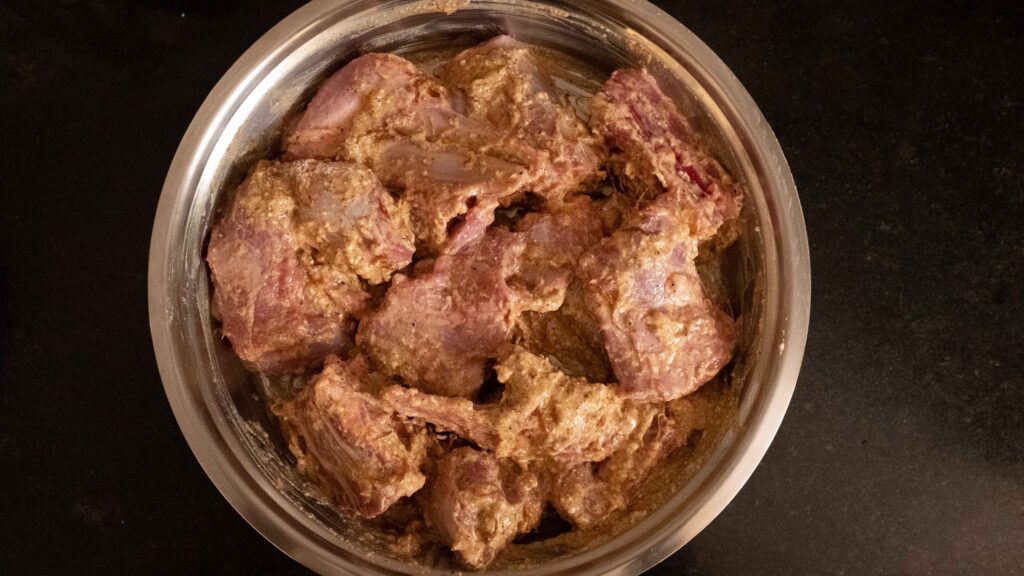
Keep in mind that biryani cuts are much larger pieces than curry cuts of mutton. Additionally, biryani cuts consist of a perfect ratio of meat, fat, and bone for optimum flavour. If you can only get curry cuts, then you’ll likely have more than 10 pieces per 1 kg. Whatever you use, try to get fresh mutton vs frozen for a superior taste and texture. If using frozen meat, thaw it fully before marinating. I like to marinate my mutton overnight so that the flavours can really penetrate the meat and the yoghurt can fully tenderise it. Remember to bring your marinated mutton to room temperature before cooking it in Stage 5.
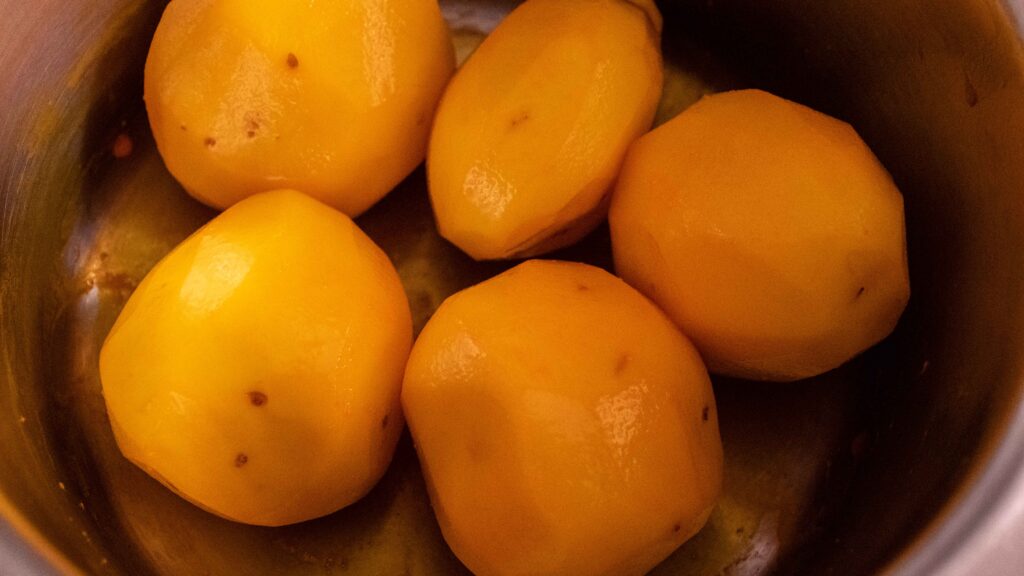
Stage 4: Fry the potatoes
A typical Calcutta style biryani must contain potatoes. In fact, Bongs add potatoes to most meat and chicken curries—not just to bulk it up in hard times, but—because like sponges, potatoes soak up the spicy meat juices and take on a rich, complex life of their own. We native Calcuttans love our meat, but we will descend into civil war over who gets that coveted biryani potato.
Ingredients
1. 400 gm starchy potatoes, (roughly 5 whole potatoes, weighing 80g each)
2. 1 pinch saffron yellow powder food colour like this
3. ¼ tsp salt
4. Reserved birista frying oil
Prep
1 – Peel the potatoes and keep them whole.
Method
1 – Place the peeled potatoes in a bowl. Sprinkle 1 pinch of saffron yellow powder food colour and ¼ tsp salt onto them and rub it onto their surfaces (use disposable food prep gloves to prevent your hands from getting stained).
2 – Pour enough reserved birista oil into your frying pan so that the oil is 1 inch deep. Bring the oil to medium heat.
3 – Fry the potatoes on all sides until lightly golden (about 1 minute on each side). Remove them from the oil with a slotted spoon and set aside until you’re ready to proceed with Stage 5.
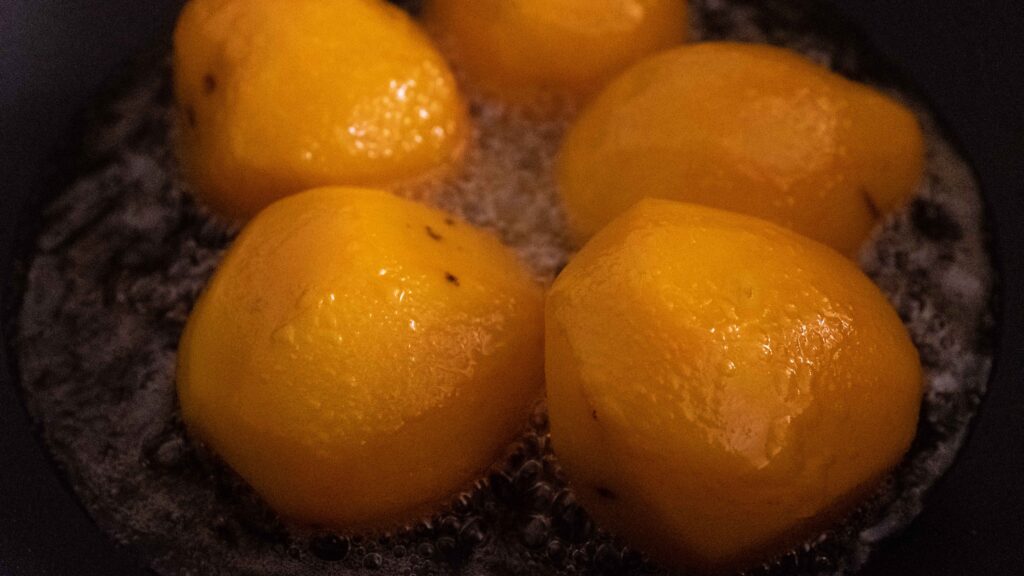
Always prep and fry the potatoes right before you’re ready to cook the mutton and potatoes in Stage 5. Do not refrigerate the potatoes after frying them, as they will turn an odd shade of green! Do not freeze the fried potatoes either, as this messes up their texture.
Stage 5: Cook the mutton & potatoes
This step serves two purposes. Not only does it cook the meat and potatoes by 99%, which speeds up the overall cook time, it yields something called ‘yakhni’ a delicious meaty, aromatic gravy used to flavour and hydrate biryani.
Components
1. ¾ tbsp. (roughly 10 gm) butter
2. 1 whole Kashmiri red chilli
3. I large Indian bay leaf (tej patta)
4. 5 nos. whole fried potatoes
5. Marinated mutton
6. 150 ml plain water
Method
1 – After the mutton has finished marinating and is at room temperature, grab a 3 litre pressure cooker. Add the butter to the pressure cooker and melt it on medium-low heat.
2 – Once the butter starts to sizzle, add the whole red chilli and bay leaf and sauté in the butter until aromatic, roughly 1 minute.
3 – Turn the heat off and bring the pressure cooker to room temperature.
4 – Once the pressure cooker is cool enough to handle, move the bay leaf and chilli to the side of the pot and lay the fried potatoes on the bottom of the pressure cooker, in a single layer.
5 – Then layer the mutton pieces on top of the potatoes. Also add in all the marinade.
6 – Pour 150 ml plain water into the pressure cooker and then secure the lid.
7 – Pressure cook the mutton and potatoes on medium-low heat for 30 minutes.
8 – After 30 minutes, turn off the heat. Do not prematurely release the steam to speed things up, as you want the contents to continue cooking within. This will take approximately 15-20 minutes.
9 – As soon as the pressure cooker lid can be opened naturally, separate the meat, potatoes, and gravy. Using tongs, remove the mutton pieces and place them in a bowl. Then remove the potatoes and place them in another bowl. The delicious liquid left in the pressure cooker is the ‘yakhni’.
10 – Discard the red chilli and the bay leaf, pour the yakhni into a bowl and then weigh out 200 gm. Meat, potatoes, and yakhni ready. Set aside.

You will get about 450 gm yahkni from the cooked mutton. After weighing out 200 gm, store the leftover yakhni covered in the fridge. The next time you make a meat or rice dish, add this liquid instead of water, and boom! Biryani-flavoured goodness!
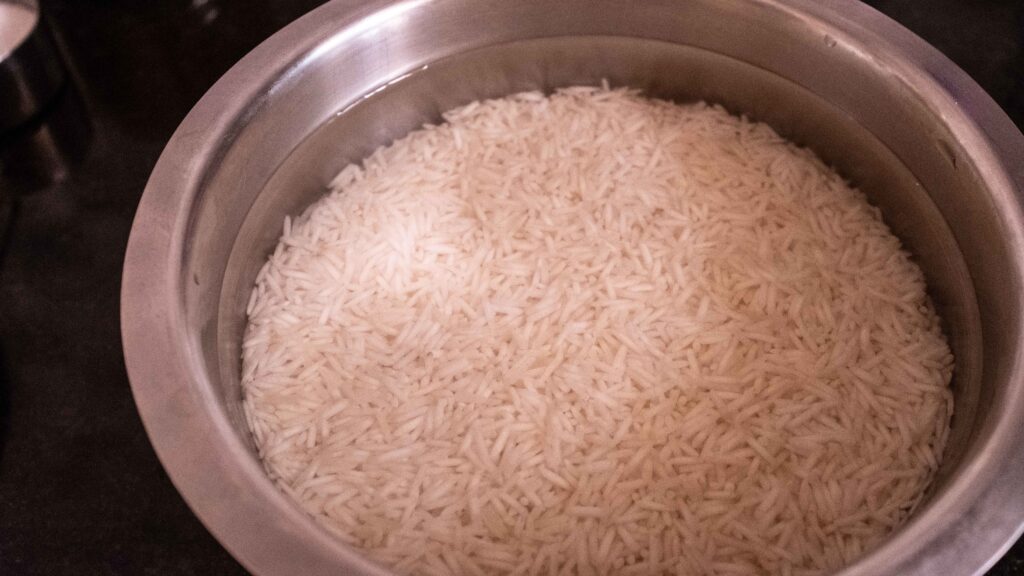
Stage 6: prep the rice
Biryani rice is typically a long-grained basmati variant, which looks quite magnificent on a plate. Additionally, it is aged, which means a fluffy end result where the fully cooked grains remain separate but whole.
Ingredients
1. 500 gm long-grained biryani rice like this
2. Enough plain water to submerge the rice by 1 inch
Method
1 – Wash the rice until the water runs clear. Be gentle as you don’t want to break any grains.
2 – Place the rice in a large vessel and pour enough water to come up above the rice by 1 inch. Let the rice soak for 30 minutes.
3 – After 30 minutes, drain out all the water and spread the rice out in a strainer placed over a bowl. Set it aside until ready to use.
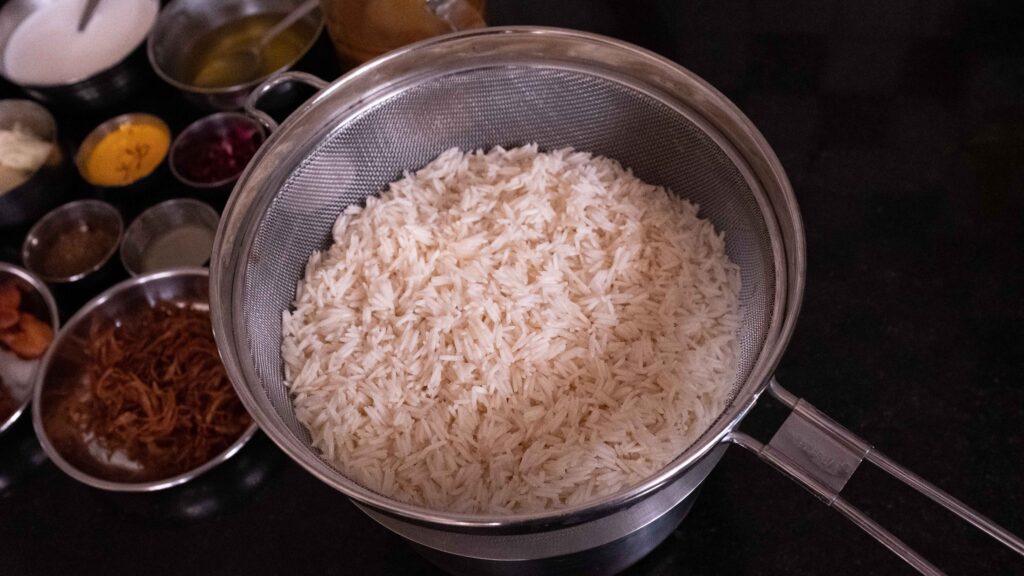
Soaking the rice for no more than 30 minutes, reduces the overall cook time while letting the grains hold their shape after being cooked. Wash, soak, and strain your rice only when you’re ready to cook it, as this should not be done well in advance.
Stage 7: mise en place
Before you cook the rice and do the final cook, it’s important to have all the elements in place and on hand, so that you can quickly layer the biryani in an organised fashion.
Ingredients
for the rice spice bag:
1. 3 gm Indian bay leaves (tej patta)
2. 2 inch cassia bark (dalchini)
3. 3 ½ tsp cloves (laung)
4. 3 tsp fennel seeds (saunf)
5. 6 green cardamom pods (chhoti elaichi)
6. 2 black cardamom pods (badi elaichi)
for the colour infusion:
7. 20 ml full fat buffalo milk
8. 1 pinch saffron strands
9. 1 pinch saffron yellow powder food colour like this
for the aroma infusion:
10. 180 ml full fat buffalo milk
11. 1 tsp food grade rose water like this
12. 1 tsp pandan leaf extract (kewra water) like this
13. 4 drops meetha attar like this
extras:
14. 70 gm semi-dried plums (alu bukhara) like this
15. 40 gm reduced milk solids (khoya/khoa/mawa) like this
16. 40 gm buffalo ghee like this
17. 20 gm butter
18. 1 medium lime
Method
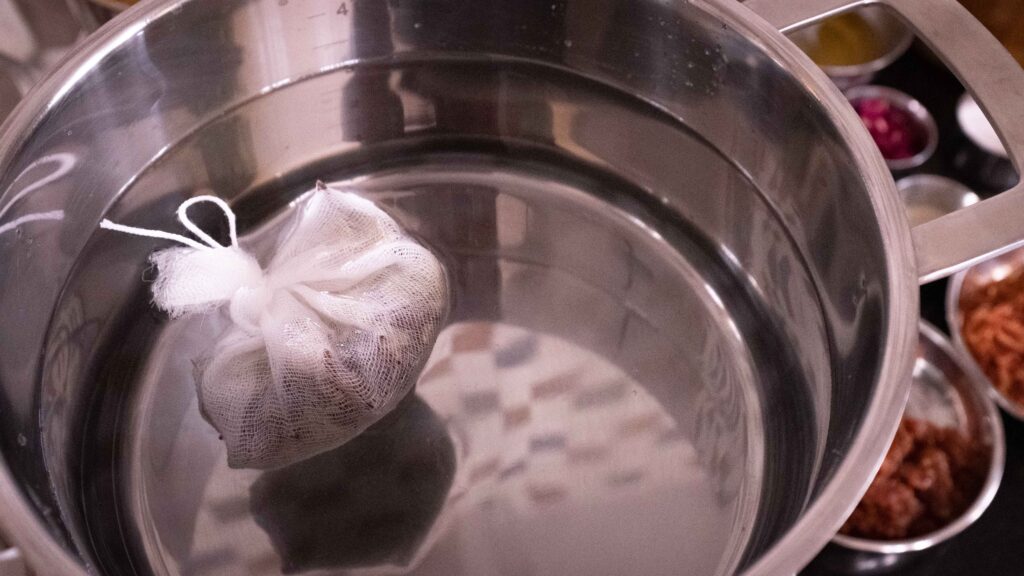
1 – Make your rice spice bag; In an 8 inch square of muslin, place all the whole spices listed in ‘for the rice spice bag’. Tie it up with some cooking twine to make a little pouch. This will flavour the water in which the rice will be boiled.
2 – If your alu bukhara contain pits, then deseed them. Else you may chip a tooth while munching down on one! Keep in mind that the alu bukhara should amount to 50 gm after being deseeded. 70 gm with seeds should yield about 50 gm pitted.
3 – Make your colour infusion; Heat 20 ml of milk until just warm (40OC). Add a pinch of saffron strands and a pinch of saffron yellow powder food colour. Stir together and set aside to infuse.
4 – Make your aroma infusion; Mix the rose water, kewra water, and meetha attar with 180 ml of milk and set aside.
5 – Crumble your khoya and set it aside.
6 – Melt your ghee and butter together and set it aside.
7 – Squeeze out the juice from a fresh lime and measure out 1 teaspoon.
Apart from specific spices, there are certain aromatic ingredients that cannot be substituted or left out of a biryani. While rose water needs no explanation, kewra/keora/kevda water, which is extracted from pandan leaves, is an intensely floral infusion that echoes the aroma of jasmine rice, gobindhobog rice or aged rice. Translating to “sweet scent” meetha attar is an edible perfumed oil made from a blend of various “exotic” flowers and plants. Used primarily in Awadhi and Mughlai cuisine, it is highly potent, and even though you only need a teeny bit, you need it without a double. In fact, all three—rose water, kewra water, and meetha attar—must be procured if you want to create a truly authentic Calcutta biryani. Alu bukhara is another classic biryani ingredient. Although they’re a type of semi-dried plum, they are not the same as prunes, which are purple, meatier, and sweet. Possessing an orange skin and considerably smaller than prunes, alu bukhara are primarily sour and add cheeky little pockets of tanginess.
Stage 8: Assembly and final cook
A great biryani perfectly exemplifies Aristotle’s adage, “the whole is the greater than the sum of its parts”. The difference between an average biryani and an extraordinary one, is the layering of flavours. If you bung in all the uncooked ingredients together and just hope for the best, you’ll get a tasty pilaf, but an underwhelming biryani. To develop a complex flavour that keeps thrilling the palate, each ingredient must be cooked for the right amount of time, at different stages, and put together in the right order. This brings out the individual flavours of each one—making for a truly outstanding biryani experience. For quick access and efficient layering; place all the cooking components together, and keep the cooking materials prepped and ready.
Cooking components
1. Soaked and strained rice
2. 3 litres plain water for boiling
3. Rice spice bag
4. 2 ½ tbsp. salt (roughly 45 gm)
5. Melted ghee+butter mixture
6. 10-15 large intact dried bay leaves (tej patta)
7. 10 nos. pressure cooked mutton pieces
8. 5 nos. fried and pressure cooked potatoes
9. 2 tsp food grade dried rose petals like this
10. Remaining half portion of birista (roughly 20 gm)
11. 50 gm pitted alu bukhara
12. 40 gm khoya, crumbled
13. 2 tsp biryani masala (roughly 5 gm)
14. Prepared colour infusion
15. 200 gm yakhni
16. 1 tsp lime juice
17. Prepared aroma infusion

Cooking materials
1. 5 litre cooking pot + lid
2. Large slotted spoon
3. Flat iron griddle or tava
4. 5 litre biryani pot/cooking vessel + tight fitting lid
5. Pastry brush
6. Thick aluminium foil
Method
In this stage, two actions will simultaneously happen.
1 – The rice will be boiled until it’s 80% cooked.
2 – All the components will be layered inside the biryani cooking pot one by one.
For the optimum biryani experience, it’s imperative that you layer the components in a particular order before serving. Check Guide 3 below to see how to layer the components—starting from the bottom to the top.
Part 1 – Boil the rice water & prep the cooking pot
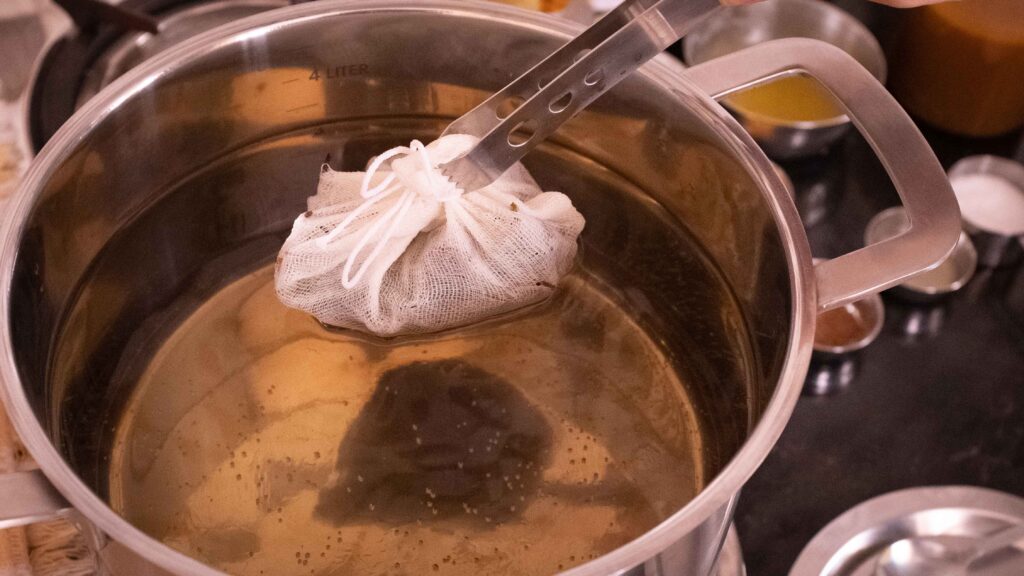
1 – Get the rice-boiling water ready; Add 3 litres of plain water to a 5 litre cooking pot and plop the spice bag into the water. Cover the pot with a lid and bring it to a boil.
2 – While the rice water is coming to a boil, prep your biryani cooking vessel; Place your flat, iron griddle/tava on the stove. Then place the biryani pot/cooking vessel on the griddle and turn the heat on at the lowest setting.
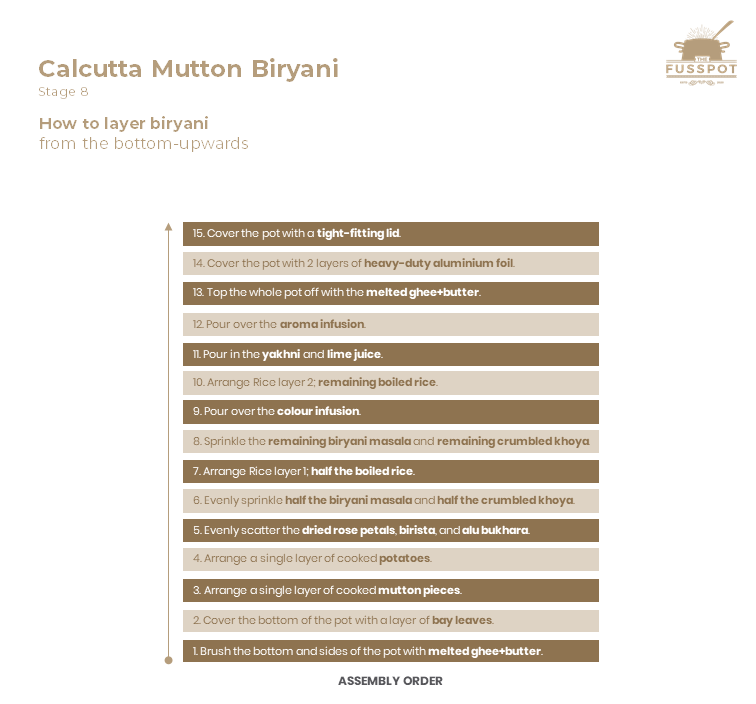
3 – Using a pastry brush, grease the bottom and sides of the biryani pot with some melted ghee.
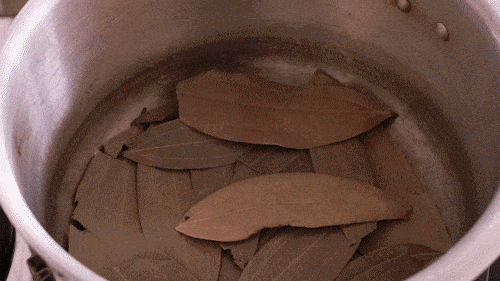
4 – Arrange the bay leaves in a single layer to cover the bottom of the pot. The leaves will provide protection against sticking and over-browning.
Part 2 – Layering the biryani components
5 – Place the mutton pieces directly on top of the bay leaves in a single layer.
6 – Arrange the potatoes on top of the mutton pieces.
7 – Evenly scatter the dried rose petals, the birista, and the pitted alu bukhara, on top of the potatoes.
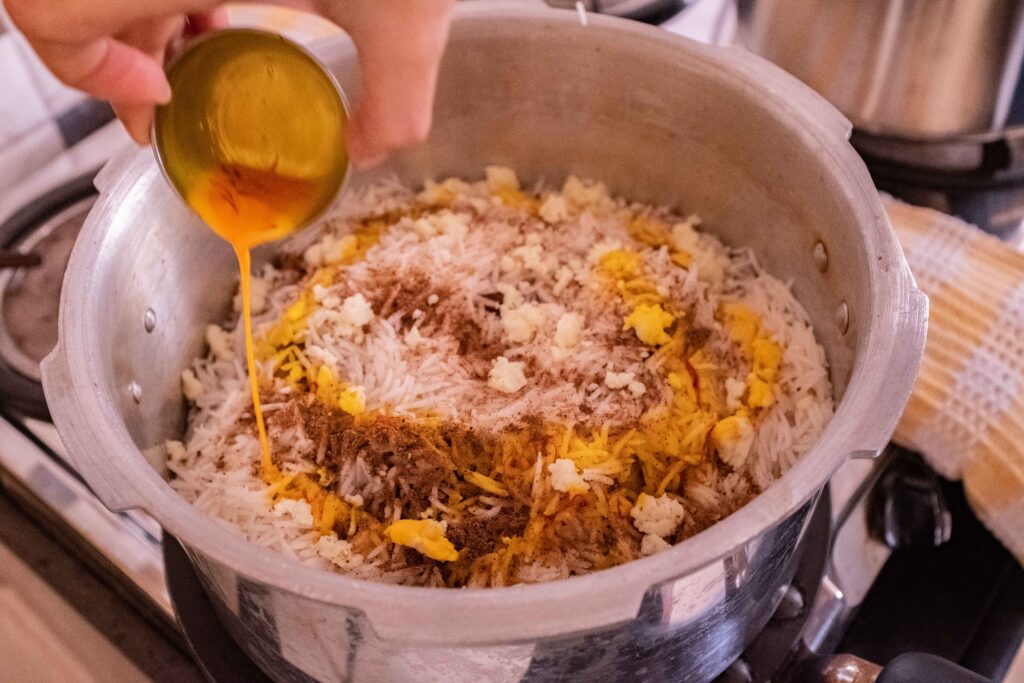
8 – Evenly sprinkle half the biryani masala and half the crumbled khoya into the pot. Reserve the other halves for the next layer.
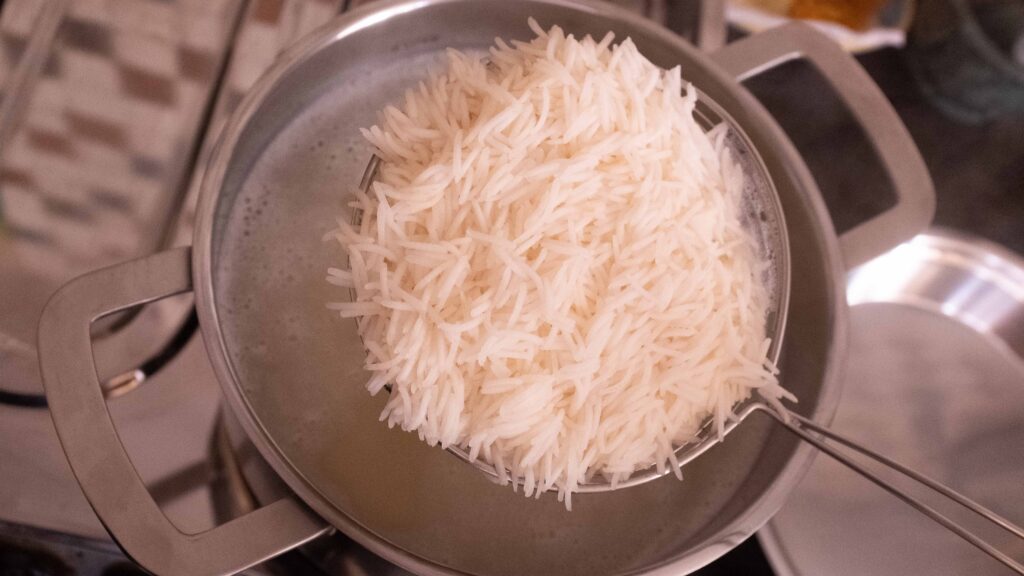
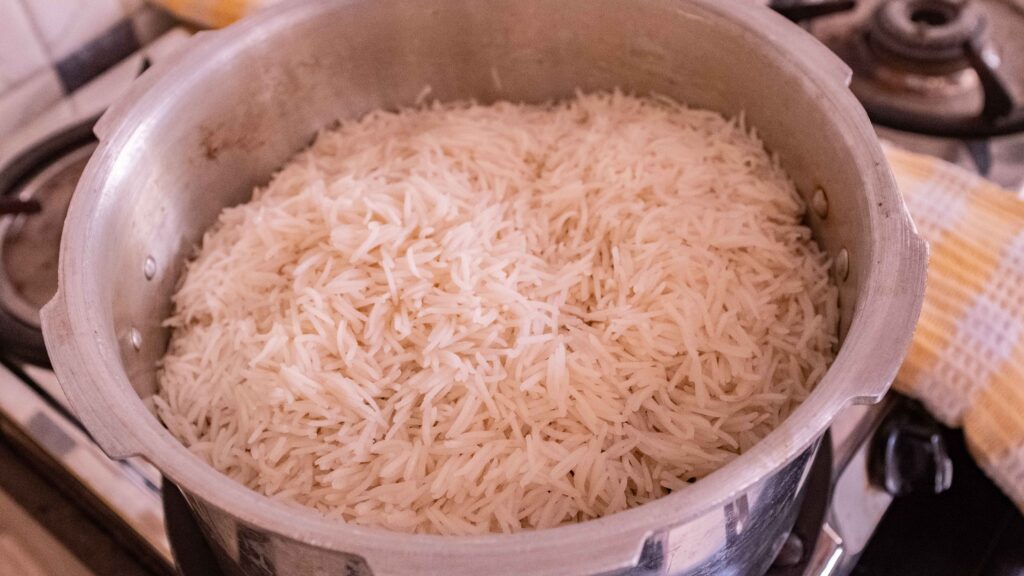
9 – Check on the pot of boiling water. As soon as it becomes a light brown colour and comes to a boil, remove and discard the rice spice bag and add the salt. Then add all of the soaked and drained rice and let it cook for 5-6 minutes or until 80% cooked. To test, check a few grains of rice; the centre should no longer be hard, but the grain should still be firm and hold its shape. Immediately turn off the heat under the rice.
10 – It’s now time to work quickly. Using a slotted spoon, strain the rice one spoonful at a time and directly add it to the pot, gently spreading it in a single layer. Repeat this until you have added half of the partially cooked rice. This is rice layer 1.
11 – Next, sprinkle the remaining biryani masala and the remaining crumbled khoya onto the rice.
12 – Now pour the colour infusion onto the rice, drizzling it onto random sections.
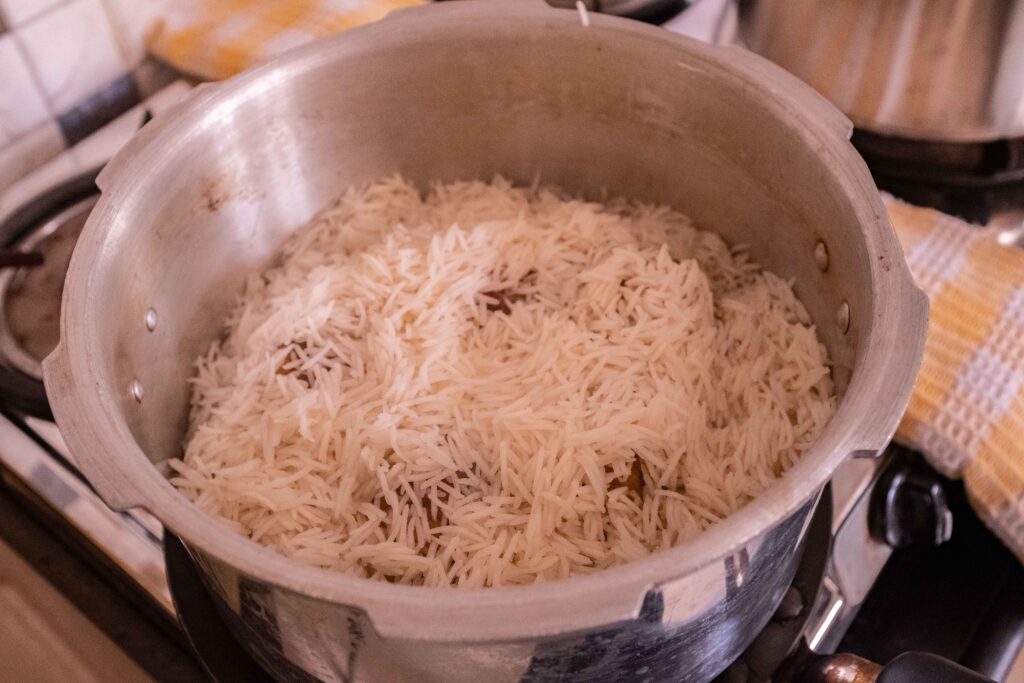
13 – Using the slotted spoon, strain the second half of the rice one spoonful at a time and add it to the pot. Using the lightest of touches, spread the rice out, leveling it evenly across the surface. This is rice layer 2.
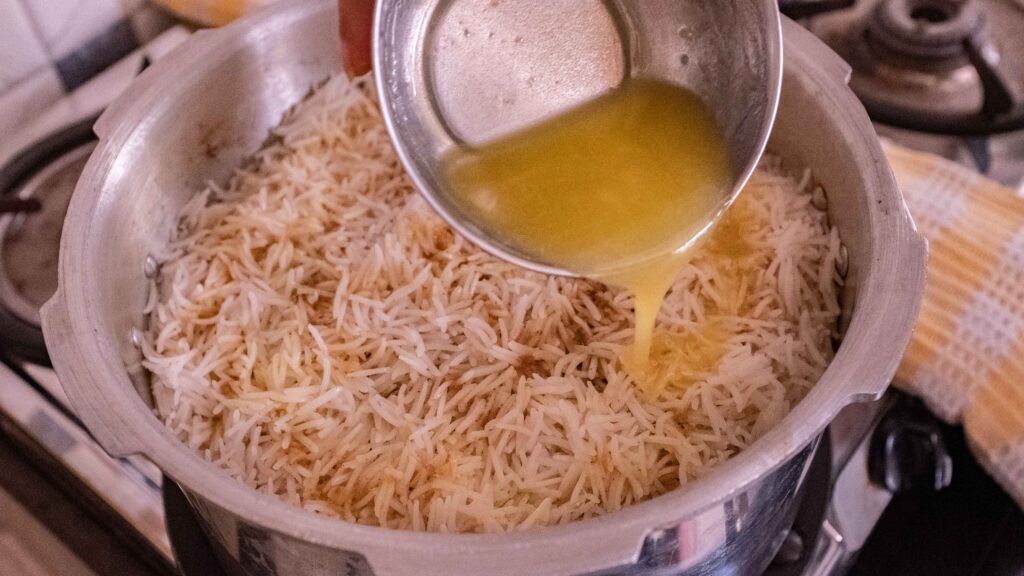
14 – Pour the yakhni and the lime juice onto the rice.
15 – Then pour on the aromatic infusion.
16 – Finally top the rice off with the melted ghee-butter mixture, pouring it over the centre as well as the sides of the pot.
Part 3 – Sealing the pot and cooking on ‘dum’
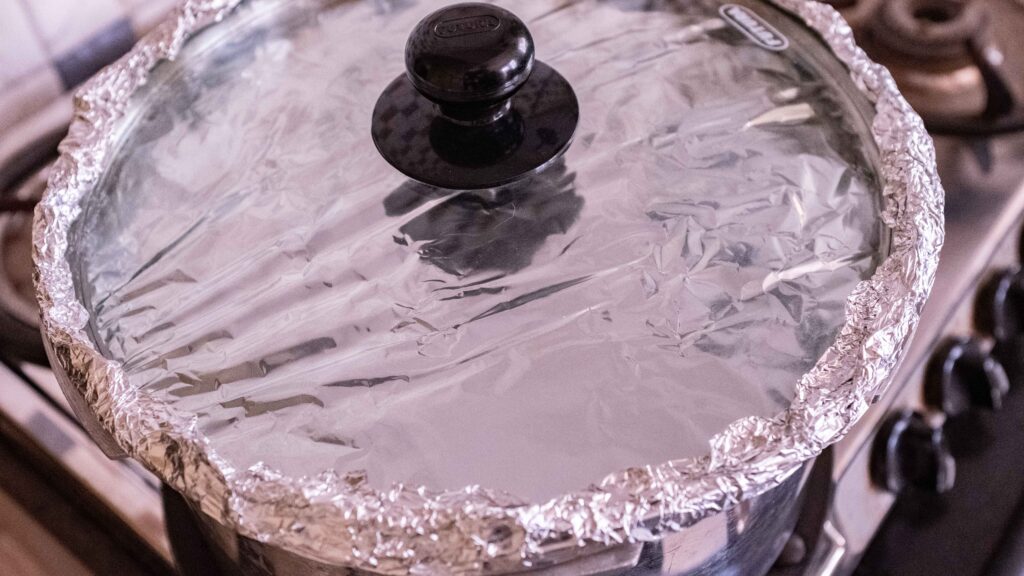
17 – Place 2 layers of heavy-duty aluminium foil onto the pot, pressing the sides down so that the top of the pot is sheathed. Thereafter, cover the pot with a tight-fitting lid so that it’s properly sealed and no steam can escape.
18 – Let the pot cook on the medium-low heat for 30 minutes. This method of sealing in all the moisture and cooking on low heat is known as “dum cooking”.
19 – After 30 minutes, switch off the stove. Let your biryani sit undisturbed for 15 minutes, before uncovering and serving.
20 – Once you unveil your biryani, take a big metal spoon to plough down deep and pull up layers of meat, potato and rice. The white rice will be saffron-marbled. Take care not to cut into a tender, buttery potato! Every plate should boast one potato, two pieces of meat and a generous serving of rice. Serve your biryani with some plain chilled yoghurt and a simple salad of brunoised onion, cucumber, and tomato, lightly seasoned with a spritz of lime, finely minced green chillies, and a sprinkle of salt and black pepper. The biryani needs no other accompaniment. Now eat!


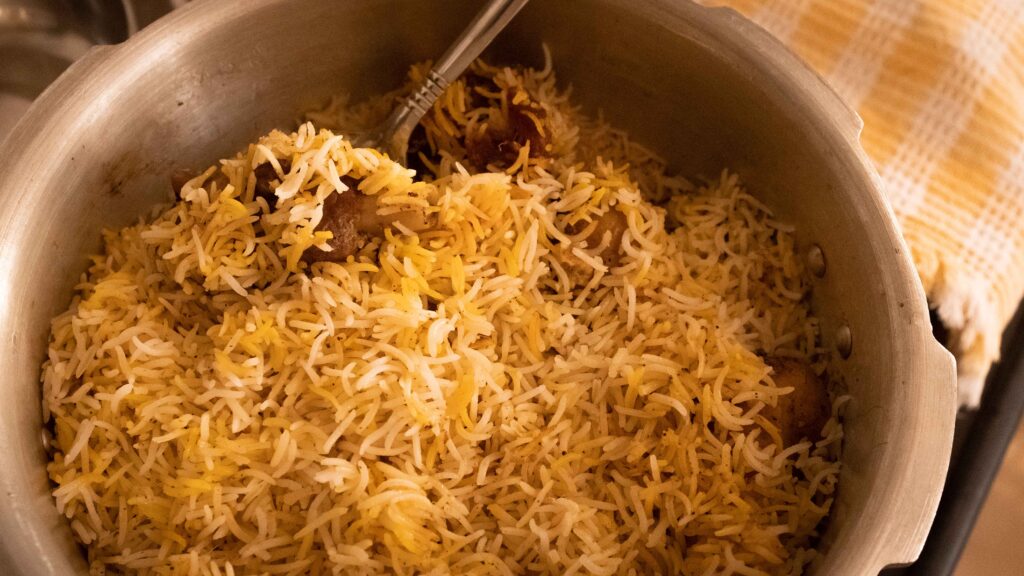
Preserved and passed down for centuries by generations of bawarchis, a traditional biryani recipe is like a prized artefact. I still have the original list of 36 ingredients, featuring 20 kg of meat, 10 kg of rice, and 8 kg of potato; intended for 100 guests. Whether you make 100 servings or just 5 (as is the case here), a meat:rice:potato ratio of 10:5:4 is customary for a Calcutta Mutton Biryani. However, we always end up with leftover meat and potatoes, but run out of rice! If you love biryani rice as much as we do, feel free to increase the ratio of rice from 10:5:4 to 5:3:2. In this recipe, that translates to 600 gm of rice.
To do justice to the rich heritage of this royal dish, 3 things must be kept in mind.
1 – The quality of ingredients; source the best ingredients at your disposal. Real saffron, organic meat, whole spices, aged rice. These will contribute greatly to the dish.
2 – The manner in which it is prepared; An exceptional Calcutta biryani can be discerned based on how it eats. It’s not for nothing that you went to all that that trouble of pre-cooking and layering the components. Every mouthful will reflect your painstaking labour by offering up layers of sensory pleasure to your palate. Meat, potatoes, rice, spices, aromatics—each with its own distinct taste, flavour, and texture—individual personalities working together in harmony.
3 – The method of cooking it; “Dum pukht’ or “dum cooking”, the practice of slow cooking food in a sealed, heavy-bottomed vessel, is a hallmark of Awadhi cuisine and essential to making a Calcutta biryani. In Urdu, “dum” translates to breath and “pukht” to ‘cooking’, wherein “dum” refers to ‘keeping food on a slow fire’ and pukht to “cooking technique”. In the traditional “dum pukht” method, the cooking vessel is sealed with dough, hot coals are placed on top of the lid, and then the dish is slow-cooked on hot coals for several hours. This offers 2 beautiful advantages. Firstly, the dough seal prevents moisture from escaping, which permits the contents to steam in their own juices as well as the flavourful liquids to be re-absorbed. Secondly, slow cooking allows the delicate flavour of the spices and aromatics to gently infuse and penetrate all the other ingredients. By containing all nutrients within the vessel, the dum pukht method retains maximum flavour. Once the dish is done cooking, the dough seal is only cracked open right before serving. My home-kitchen-friendly method comprises an aluminium foil seal and a hot griddle to facilitating slow cooking, but still offers all the same advantages of the traditional “dum pukht” method. And although I have taken a shortcut by first pressure cooking the meat, the final slow cooking of the dish sort of compensates for that. A dough seal can be a little fiddly, messy, and wasteful, so I prefer the aluminium foil method. If you would like to make an authentic dough seal, knead together 1 cup whole wheat flour with + ½ cup plain water + ½ tsp salt until you have an elastic dough. Then roll the dough into a long, ½ to 1 inch thick “sausage”. It needs to be long enough to go all the way around the lid of your vessel. Once your dish is layered with the biryani components, arrange the sausage around the rim of the pot, pressing it gently to hold it in place. Place the lid on top of the pot and press firmly to seal. The lid should be pushed lightly onto the dough to ensure a tight seal.
FYI
Research & Citations
https://indianculture.gov.in/food-and-culture/distinctive-cuisines/delicate-flavours-awadh
https://food.ndtv.com/food-drinks/the-art-of-dum-cooking-1781434
https://www.livemint.com/Leisure/Yh7PMMPtQyA92UTSd9NqJP/How-a-potato-saved-the-nawabs-biryani.html